> ## Documentation Index
> Fetch the complete documentation index at: https://langchain-zh.cn/llms.txt
> Use this file to discover all available pages before exploring further.
# 设置 Agent Auth(Beta 版)
> 通过 Agent Auth 使用 OAuth 2.0 凭证,为代理启用对任何系统的安全访问。
Agent Auth 目前处于 **Beta 阶段**,正在积极开发中。如需提供反馈或使用此功能,请联系 [LangChain 团队](https://forum.langchain.com/c/help/langsmith/)。
## 安装
```bash pip theme={"theme":{"light":"catppuccin-latte","dark":"catppuccin-mocha"}}
pip install langchain-auth
```
```bash uv theme={"theme":{"light":"catppuccin-latte","dark":"catppuccin-mocha"}}
uv add langchain-auth
```
```bash theme={"theme":{"light":"catppuccin-latte","dark":"catppuccin-mocha"}}
npm install @langchain/auth
```
## 快速开始
### 1. 初始化客户端
```python theme={"theme":{"light":"catppuccin-latte","dark":"catppuccin-mocha"}}
from langchain_auth import Client
client = Client(api_key="your-langsmith-api-key")
```
```javascript theme={"theme":{"light":"catppuccin-latte","dark":"catppuccin-mocha"}}
import { Client } from '@langchain/auth';
const client = new Client({ apiKey: 'your-langsmith-api-key' });
```
#### 自托管配置
对于自托管的 LangSmith 实例,请使用实例上的 `/api-host` 路径指定 API URL。
```bash theme={"theme":{"light":"catppuccin-latte","dark":"catppuccin-mocha"}}
export LANGSMITH_API_URL="https://your-langsmith-instance.com/api-host"
```
然后正常初始化客户端:
```python theme={"theme":{"light":"catppuccin-latte","dark":"catppuccin-mocha"}}
client = Client(api_key="your-langsmith-api-key")
```
```python theme={"theme":{"light":"catppuccin-latte","dark":"catppuccin-mocha"}}
client = Client(
api_key="your-langsmith-api-key",
api_url="https://your-langsmith-instance.com/api-host"
)
```
```javascript theme={"theme":{"light":"catppuccin-latte","dark":"catppuccin-mocha"}}
const client = new Client({
apiKey: 'your-langsmith-api-key',
apiUrl: 'https://your-langsmith-instance.com/api-host'
});
```
### 2. 设置 OAuth 提供商
在代理可以认证之前,您需要按照以下流程配置一个 OAuth 提供商:
1. 为您的 OAuth 提供商选择一个在 LangChain 平台中使用的唯一标识符(例如 "github-local-dev"、"google-workspace-prod")。
2. 前往您的 OAuth 提供商的开发者控制台,创建一个新的 OAuth 应用。
3. 在您的 OAuth 提供商中设置回调 URL:
```
https://smith.langchain.com/host-oauth-callback/{provider_id}
```
例如,如果您的 provider\_id 是 "github-local-dev",请使用:
```
https://smith.langchain.com/host-oauth-callback/github-local-dev
```
```
https://{your-langsmith-instance}/host-oauth-callback/{provider_id}
```
例如,如果您的实例是 `langsmith.example.com` 且 provider\_id 是 "github",请使用:
```
https://langsmith.example.com/host-oauth-callback/github
```
4. 使用 `client.create_oauth_provider()` 并传入您 OAuth 应用的凭证:
```python theme={"theme":{"light":"catppuccin-latte","dark":"catppuccin-mocha"}}
new_provider = await client.create_oauth_provider(
provider_id="{provider_id}", # 提供任意唯一 ID
name="{provider_display_name}", # 提供任意显示名称
client_id="{your_client_id}",
client_secret="{your_client_secret}",
auth_url="{auth_url_of_your_provider}",
token_url="{token_url_of_your_provider}",
)
```
```javascript theme={"theme":{"light":"catppuccin-latte","dark":"catppuccin-mocha"}}
const newProvider = await client.createOAuthProvider({
providerId: '{provider_id}', // 提供任意唯一 ID
name: '{provider_display_name}', // 提供任意显示名称
clientId: '{your_client_id}',
clientSecret: '{your_client_secret}',
authUrl: '{auth_url_of_your_provider}',
tokenUrl: '{token_url_of_your_provider}',
});
```
### 3. 从代理进行认证
客户端 `authenticate()` API 用于从预配置的提供商获取 OAuth 令牌。在首次调用时,它会引导调用者完成 OAuth 2.0 认证流程。
#### 在 LangGraph 上下文中
默认情况下,令牌使用 Assistant ID 参数限定在调用代理的范围内。
```python theme={"theme":{"light":"catppuccin-latte","dark":"catppuccin-mocha"}}
auth_result = await client.authenticate(
provider="{provider_id}",
scopes=["scopeA"],
user_id="your_user_id" # 任何唯一标识符,用于将此令牌限定到人类调用者
)
# 或者显式指定 agent_id 以获取代理范围的令牌
auth_result = await client.authenticate(
provider="{provider_id}",
scopes=["scopeA"],
user_id="your_user_id",
agent_id="specific-agent-id" # 可选:显式设置代理范围
)
```
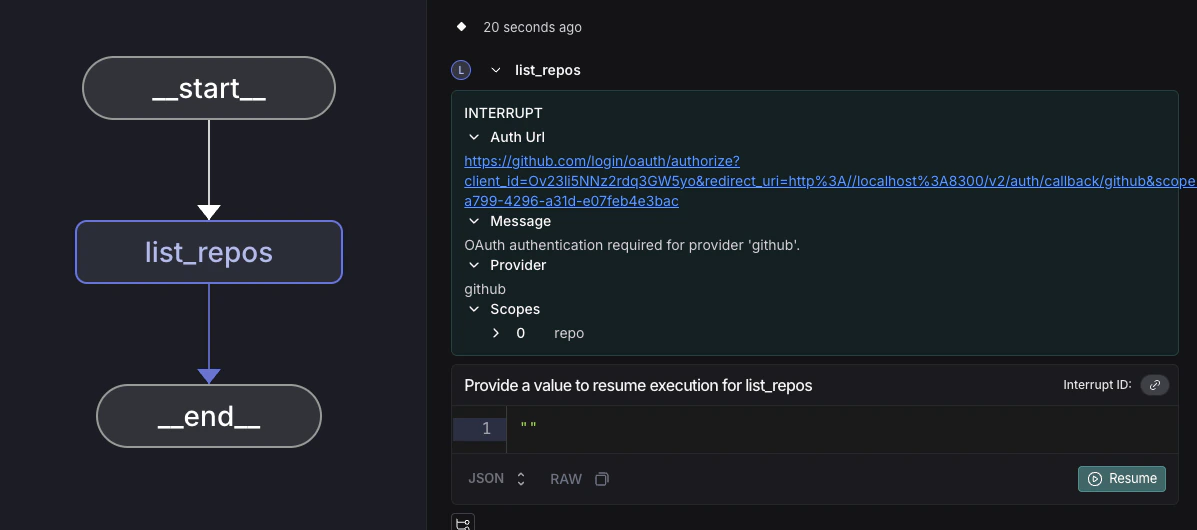
在执行过程中,如果需要认证,SDK 将抛出一个 [中断](https://langchain-ai.github.io/langgraph/how-tos/human_in_the_loop/add-human-in-the-loop/#pause-using-interrupt)。代理执行暂停,并向用户展示 OAuth URL:
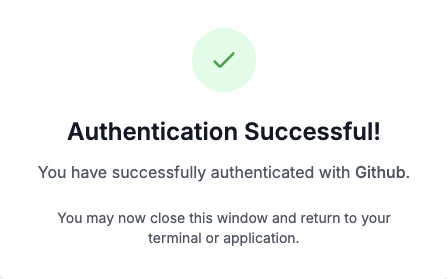
 在用户完成 OAuth 认证并且我们从提供商处收到回调后,他们将看到认证成功页面。
 然后代理会从它中断的地方恢复执行,并且令牌可以用于任何 API 调用。我们会存储并刷新 OAuth 令牌,以便用户或代理将来使用该服务时无需再次进行 OAuth 流程。
```python theme={"theme":{"light":"catppuccin-latte","dark":"catppuccin-mocha"}}
token = auth_result.token
```
#### 在 LangGraph 上下文之外
向用户提供 `auth_url` 以进行带外 OAuth 流程。
```python theme={"theme":{"light":"catppuccin-latte","dark":"catppuccin-mocha"}}
auth_result = await client.authenticate(
provider="{provider_id}",
scopes=["scopeA"],
user_id="your_user_id"
)
if auth_result.status == "pending":
print(f"请在此处完成 OAuth:{auth_result.url}")
# 等待用户完成 OAuth
completed_auth = await client.wait_for_completion(auth_result.auth_id)
print("认证完成!")
else:
token = auth_result.token
print(f"已认证,令牌:{token}")
```
```javascript theme={"theme":{"light":"catppuccin-latte","dark":"catppuccin-mocha"}}
const authResult = await client.authenticate({
provider: '{provider_id}',
scopes: ['scopeA'],
userId: 'your_user_id'
});
if (authResult.status === 'pending') {
console.log(`请在此处完成 OAuth:${authResult.authUrl}`);
// 等待用户完成 OAuth
const completedAuth = await client.waitForCompletion(authResult.authId);
console.log('认证完成!');
} else {
const token = authResult.token;
console.log(`已认证,令牌:${token}`);
}
```
## 故障排除
### 自托管:405 方法不允许
如果您收到 `405 方法不允许` 错误,请确保 `LANGSMITH_API_URL` 指向 `/api-host` 路径:
```bash theme={"theme":{"light":"catppuccin-latte","dark":"catppuccin-mocha"}}
export LANGSMITH_API_URL="https://your-instance.com/api-host"
```
### 自托管:OAuth 回调 URL 格式错误
确保您的 OAuth 提供商的 redirect URI 与您的 LangSmith 实例 URL 匹配:
```
https://your-instance.com/host-oauth-callback/{provider_id}
```
***
然后代理会从它中断的地方恢复执行,并且令牌可以用于任何 API 调用。我们会存储并刷新 OAuth 令牌,以便用户或代理将来使用该服务时无需再次进行 OAuth 流程。
```python theme={"theme":{"light":"catppuccin-latte","dark":"catppuccin-mocha"}}
token = auth_result.token
```
#### 在 LangGraph 上下文之外
向用户提供 `auth_url` 以进行带外 OAuth 流程。
```python theme={"theme":{"light":"catppuccin-latte","dark":"catppuccin-mocha"}}
auth_result = await client.authenticate(
provider="{provider_id}",
scopes=["scopeA"],
user_id="your_user_id"
)
if auth_result.status == "pending":
print(f"请在此处完成 OAuth:{auth_result.url}")
# 等待用户完成 OAuth
completed_auth = await client.wait_for_completion(auth_result.auth_id)
print("认证完成!")
else:
token = auth_result.token
print(f"已认证,令牌:{token}")
```
```javascript theme={"theme":{"light":"catppuccin-latte","dark":"catppuccin-mocha"}}
const authResult = await client.authenticate({
provider: '{provider_id}',
scopes: ['scopeA'],
userId: 'your_user_id'
});
if (authResult.status === 'pending') {
console.log(`请在此处完成 OAuth:${authResult.authUrl}`);
// 等待用户完成 OAuth
const completedAuth = await client.waitForCompletion(authResult.authId);
console.log('认证完成!');
} else {
const token = authResult.token;
console.log(`已认证,令牌:${token}`);
}
```
## 故障排除
### 自托管:405 方法不允许
如果您收到 `405 方法不允许` 错误,请确保 `LANGSMITH_API_URL` 指向 `/api-host` 路径:
```bash theme={"theme":{"light":"catppuccin-latte","dark":"catppuccin-mocha"}}
export LANGSMITH_API_URL="https://your-instance.com/api-host"
```
### 自托管:OAuth 回调 URL 格式错误
确保您的 OAuth 提供商的 redirect URI 与您的 LangSmith 实例 URL 匹配:
```
https://your-instance.com/host-oauth-callback/{provider_id}
```
***
[Edit this page on GitHub](https://github.com/langchain-ai/docs/edit/main/src/i18n\zh-CN\langsmith\agent-auth.mdx) or [file an issue](https://github.com/langchain-ai/docs/issues/new/choose).
[Connect these docs](/use-these-docs) to Claude, VSCode, and more via MCP for real-time answers.