> ## Documentation Index
> Fetch the complete documentation index at: https://langchain-zh.cn/llms.txt
> Use this file to discover all available pages before exploring further.
# 追踪 LLM 应用教程
在本教程中,我们将构建一个使用检索增强生成(RAG)来回答关于数据集问题的 LLM 应用。我们将在开发的每个阶段(从原型设计到生产)为应用添加可观测性。
```python Python theme={"theme":{"light":"catppuccin-latte","dark":"catppuccin-mocha"}}
from openai import OpenAI
openai_client = OpenAI()
# 这是我们在 RAG 中要使用的检索器
# 这里模拟了功能,但它可以是任何我们想要的内容
def retriever(query: str):
results = ["Harrison worked at Kensho"]
return results
# 这是端到端的 RAG 链。
# 它先执行检索步骤,然后调用 OpenAI
def rag(question):
docs = retriever(question)
system_message = """Answer the users question using only the provided information below:
{docs}""".format(docs="\n".join(docs))
return openai_client.chat.completions.create(
messages=[
{"role": "system", "content": system_message},
{"role": "user", "content": question},
],
model="gpt-4.1-mini",
)
```
```typescript TypeScript theme={"theme":{"light":"catppuccin-latte","dark":"catppuccin-mocha"}}
import { OpenAI } from "openai";
const openAIClient = new OpenAI();
// 这是我们在 RAG 中要使用的检索器
// 这里模拟了功能,但它可以是任何我们想要的内容
async function retriever(query: string) {
return ["This is a document"];
}
// 这是端到端的 RAG 链。
// 它先执行检索步骤,然后调用 OpenAI
async function rag(question: string) {
const docs = await retriever(question);
const systemMessage =
"Answer the users question using only the provided information below:\n\n" +
docs.join("\n");
return await openAIClient.chat.completions.create({
messages: [
{ role: "system", content: systemMessage },
{ role: "user", content: question },
],
model: "gpt-4.1-mini",
});
}
```
## 原型设计
从一开始就设置好可观测性,可以帮助你比原本可能的速度**快得多**地进行迭代。它让你在快速迭代提示词,或更改使用的数据和模型时,能够清晰地洞察你的应用。在本节中,我们将介绍如何设置可观测性,以便你在原型设计阶段获得最大的可见性。
### 设置环境
首先,通过导航到[设置页面](https://smith.langchain.com/settings)创建一个 API 密钥。
接下来,安装 LangSmith SDK:
```bash Python SDK theme={"theme":{"light":"catppuccin-latte","dark":"catppuccin-mocha"}}
pip install langsmith
```
```bash TypeScript SDK theme={"theme":{"light":"catppuccin-latte","dark":"catppuccin-mocha"}}
npm install langsmith
```
最后,设置适当的环境变量。这将把追踪记录到 `default` 项目(不过你可以轻松更改)。
```bash theme={"theme":{"light":"catppuccin-latte","dark":"catppuccin-mocha"}}
export LANGSMITH_TRACING=true
export LANGSMITH_API_KEY=<你的-api-key>
export LANGSMITH_WORKSPACE_ID=<你的-workspace-id>
export LANGSMITH_PROJECT=default
```
要将追踪发送到特定项目,请使用 [`LANGSMITH_PROJECT` 环境变量](/langsmith/log-traces-to-project)。如果未设置此变量,LangSmith 将在追踪摄入时自动创建一个默认追踪项目。
你可能在其他地方看到这些变量被引用为 `LANGCHAIN_*`。它们是等价的,但最佳实践是使用 `LANGSMITH_TRACING`、`LANGSMITH_API_KEY`、`LANGSMITH_PROJECT`。
`LANGSMITH_PROJECT` 标志仅在 JS SDK 版本 >= 0.2.16 中受支持,如果你使用的是旧版本,请改用 `LANGCHAIN_PROJECT`。
### 追踪你的 LLM 调用
你可能首先想要追踪的是所有 OpenAI 调用。毕竟,这是实际调用 LLM 的地方,所以是最重要的部分!我们通过引入一个极其简单的 OpenAI 包装器,尝试让这个过程在 LangSmith 中尽可能容易。你只需要修改你的代码,使其看起来像这样:
```python Python theme={"theme":{"light":"catppuccin-latte","dark":"catppuccin-mocha"}}
from openai import OpenAI
from langsmith.wrappers import wrap_openai
openai_client = wrap_openai(OpenAI())
# 这是我们在 RAG 中要使用的检索器
# 这里模拟了功能,但它可以是任何我们想要的内容
def retriever(query: str):
results = ["Harrison worked at Kensho"]
return results
# 这是端到端的 RAG 链。
# 它先执行检索步骤,然后调用 OpenAI
def rag(question):
docs = retriever(question)
system_message = """Answer the users question using only the provided information below:
{docs}""".format(docs="\n".join(docs))
return openai_client.chat.completions.create(
messages=[
{"role": "system", "content": system_message},
{"role": "user", "content": question},
],
model="gpt-4.1-mini",
)
```
```typescript TypeScript theme={"theme":{"light":"catppuccin-latte","dark":"catppuccin-mocha"}}
import { OpenAI } from "openai";
import { wrapOpenAI } from "langsmith/wrappers";
const openAIClient = wrapOpenAI(new OpenAI());
// 这是我们在 RAG 中要使用的检索器
// 这里模拟了功能,但它可以是任何我们想要的内容
async function retriever(query: string) {
return ["This is a document"];
}
// 这是端到端的 RAG 链。
// 它先执行检索步骤,然后调用 OpenAI
async function rag(question: string) {
const docs = await retriever(question);
const systemMessage =
"Answer the users question using only the provided information below:\n\n" +
docs.join("\n");
return await openAIClient.chat.completions.create({
messages: [
{ role: "system", content: systemMessage },
{ role: "user", content: question },
],
model: "gpt-4.1-mini",
});
}
```
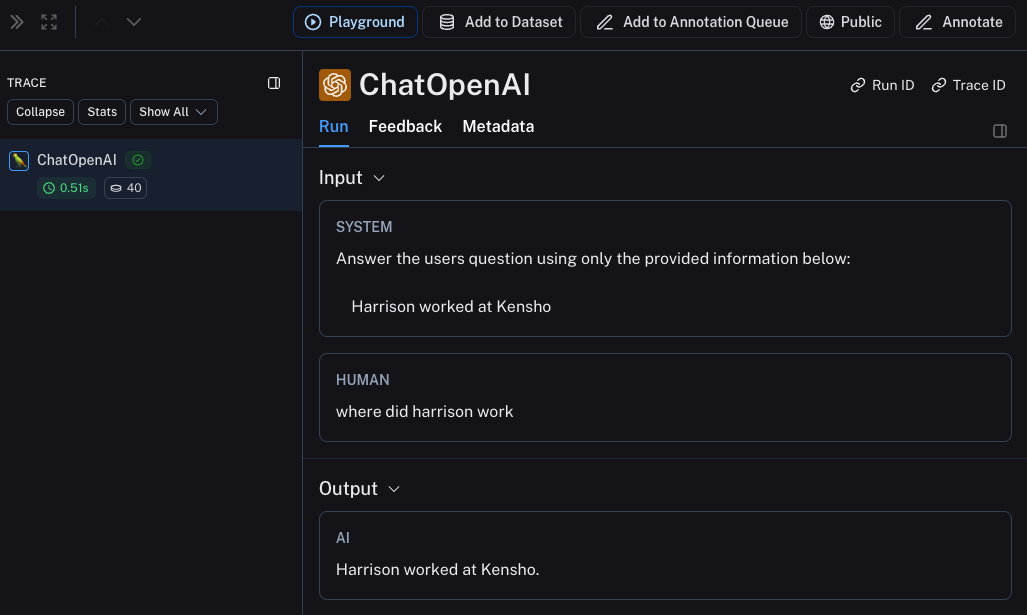
注意我们如何导入 `from langsmith.wrappers import wrap_openai` 并使用它来包装 OpenAI 客户端(`openai_client = wrap_openai(OpenAI())`)。
如果你以下列方式调用它会发生什么?
```python theme={"theme":{"light":"catppuccin-latte","dark":"catppuccin-mocha"}}
rag("where did harrison work")
```
这将生成仅包含 OpenAI 调用的追踪记录——它应该看起来像[这样](https://smith.langchain.com/public/e7b7d256-10fe-4d49-a8d5-36ca8e5af0d2/r)
 ### 追踪整个链
很好——我们已经追踪了 LLM 调用。但追踪更多内容通常非常有价值。LangSmith **专为**追踪整个 LLM 流水线而构建——让我们开始吧!我们可以通过修改代码来实现,使其现在看起来像这样:
```python Python theme={"theme":{"light":"catppuccin-latte","dark":"catppuccin-mocha"}}
from openai import OpenAI
from langsmith import traceable
from langsmith.wrappers import wrap_openai
openai_client = wrap_openai(OpenAI())
def retriever(query: str):
results = ["Harrison worked at Kensho"]
return results
@traceable
def rag(question):
docs = retriever(question)
system_message = """Answer the users question using only the provided information below:
{docs}""".format(docs="\n".join(docs))
return openai_client.chat.completions.create(
messages=[
{"role": "system", "content": system_message},
{"role": "user", "content": question},
],
model="gpt-4.1-mini",
)
```
```typescript TypeScript theme={"theme":{"light":"catppuccin-latte","dark":"catppuccin-mocha"}}
import { OpenAI } from "openai";
import { traceable } from "langsmith/traceable";
import { wrapOpenAI } from "langsmith/wrappers";
const openAIClient = wrapOpenAI(new OpenAI());
async function retriever(query: string) {
return ["This is a document"];
}
const rag = traceable(async function rag(question: string) {
const docs = await retriever(question);
const systemMessage =
"Answer the users question using only the provided information below:\n\n" +
docs.join("\n");
return await openAIClient.chat.completions.create({
messages: [
{ role: "system", content: systemMessage },
{ role: "user", content: question },
],
model: "gpt-4.1-mini",
});
});
```
注意我们如何导入 `from langsmith import traceable` 并使用它来装饰整个函数(`@traceable`)。
如果你以下列方式调用它会发生什么?
```python theme={"theme":{"light":"catppuccin-latte","dark":"catppuccin-mocha"}}
rag("where did harrison work")
```
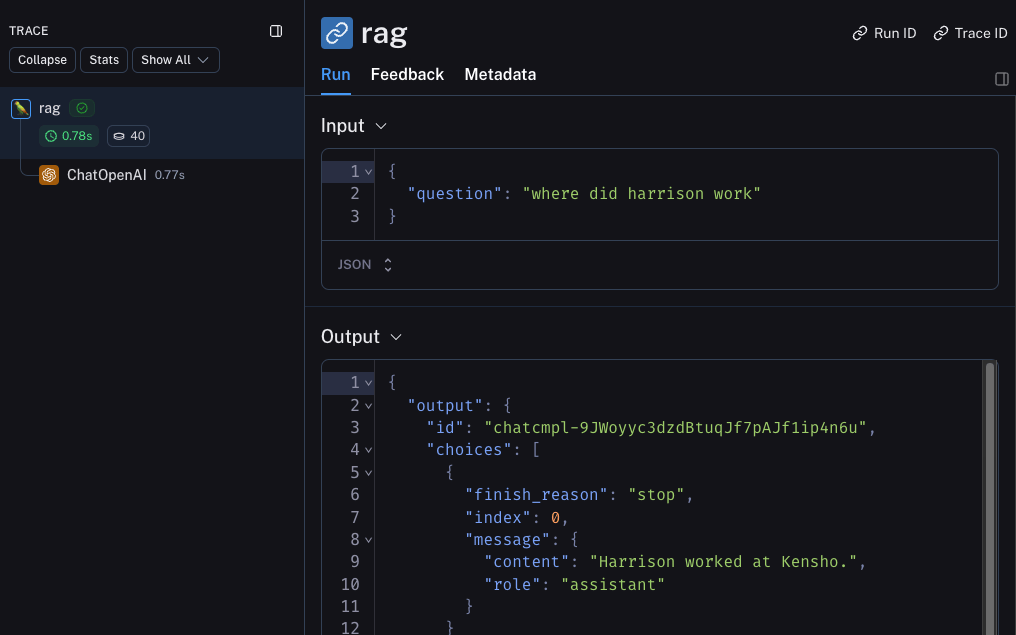
这将生成整个 RAG 流水线的追踪记录——它应该看起来像[这样](https://smith.langchain.com/public/8cafba6a-1a6d-4a73-8565-483186f31c29/r)
### 追踪整个链
很好——我们已经追踪了 LLM 调用。但追踪更多内容通常非常有价值。LangSmith **专为**追踪整个 LLM 流水线而构建——让我们开始吧!我们可以通过修改代码来实现,使其现在看起来像这样:
```python Python theme={"theme":{"light":"catppuccin-latte","dark":"catppuccin-mocha"}}
from openai import OpenAI
from langsmith import traceable
from langsmith.wrappers import wrap_openai
openai_client = wrap_openai(OpenAI())
def retriever(query: str):
results = ["Harrison worked at Kensho"]
return results
@traceable
def rag(question):
docs = retriever(question)
system_message = """Answer the users question using only the provided information below:
{docs}""".format(docs="\n".join(docs))
return openai_client.chat.completions.create(
messages=[
{"role": "system", "content": system_message},
{"role": "user", "content": question},
],
model="gpt-4.1-mini",
)
```
```typescript TypeScript theme={"theme":{"light":"catppuccin-latte","dark":"catppuccin-mocha"}}
import { OpenAI } from "openai";
import { traceable } from "langsmith/traceable";
import { wrapOpenAI } from "langsmith/wrappers";
const openAIClient = wrapOpenAI(new OpenAI());
async function retriever(query: string) {
return ["This is a document"];
}
const rag = traceable(async function rag(question: string) {
const docs = await retriever(question);
const systemMessage =
"Answer the users question using only the provided information below:\n\n" +
docs.join("\n");
return await openAIClient.chat.completions.create({
messages: [
{ role: "system", content: systemMessage },
{ role: "user", content: question },
],
model: "gpt-4.1-mini",
});
});
```
注意我们如何导入 `from langsmith import traceable` 并使用它来装饰整个函数(`@traceable`)。
如果你以下列方式调用它会发生什么?
```python theme={"theme":{"light":"catppuccin-latte","dark":"catppuccin-mocha"}}
rag("where did harrison work")
```
这将生成整个 RAG 流水线的追踪记录——它应该看起来像[这样](https://smith.langchain.com/public/8cafba6a-1a6d-4a73-8565-483186f31c29/r)
 ## Beta 测试
LLM 应用开发的下一个阶段是对你的应用进行 Beta 测试。这是你将其发布给少数初始用户的时候。在这里设置良好的可观测性至关重要,因为你通常不知道用户实际上会如何使用你的应用,所以这让你能够深入了解他们的使用方式。这也意味着你可能需要对追踪设置进行一些更改,以便更好地支持这一点。这扩展了你在上一节中设置的可观测性。
### 收集反馈
在 Beta 测试期间,拥有良好可观测性的一个重要部分是收集反馈。你收集的反馈通常是特定于应用的——但至少一个简单的点赞/点踩是一个好的开始。记录该反馈后,你需要能够轻松地将其与导致该反馈的运行关联起来。幸运的是,LangSmith 让这变得很容易。
首先,你需要从你的应用中记录反馈。一个简单的方法是跟踪每次运行的运行 ID,然后使用它来记录反馈。跟踪运行 ID 看起来像这样:
```python theme={"theme":{"light":"catppuccin-latte","dark":"catppuccin-mocha"}}
from langsmith import uuid7
run_id = str(uuid7())
rag(
"where did harrison work",
langsmith_extra={"run_id": run_id}
)
```
将反馈与该运行关联起来看起来像这样:
```python theme={"theme":{"light":"catppuccin-latte","dark":"catppuccin-mocha"}}
from langsmith import Client
ls_client = Client()
ls_client.create_feedback(
run_id,
key="user-score",
score=1.0,
)
```
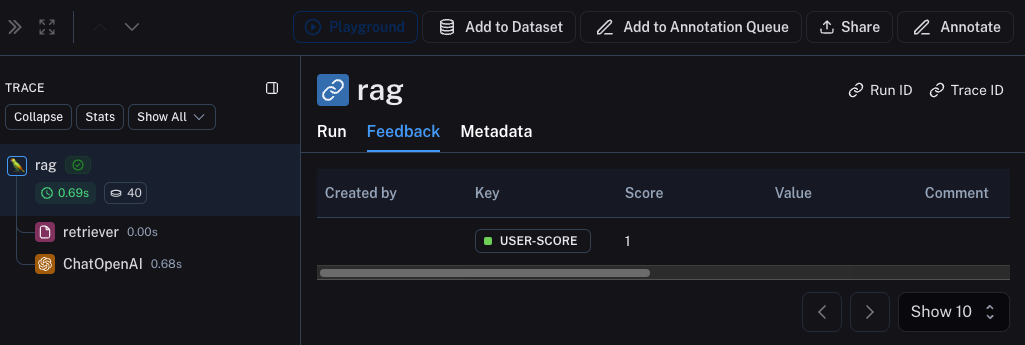
一旦反馈被记录,你就可以通过点击检查运行时的 `Metadata` 选项卡,看到它与每次运行的关联。它应该看起来像[这样](https://smith.langchain.com/public/8cafba6a-1a6d-4a73-8565-483186f31c29/r)
## Beta 测试
LLM 应用开发的下一个阶段是对你的应用进行 Beta 测试。这是你将其发布给少数初始用户的时候。在这里设置良好的可观测性至关重要,因为你通常不知道用户实际上会如何使用你的应用,所以这让你能够深入了解他们的使用方式。这也意味着你可能需要对追踪设置进行一些更改,以便更好地支持这一点。这扩展了你在上一节中设置的可观测性。
### 收集反馈
在 Beta 测试期间,拥有良好可观测性的一个重要部分是收集反馈。你收集的反馈通常是特定于应用的——但至少一个简单的点赞/点踩是一个好的开始。记录该反馈后,你需要能够轻松地将其与导致该反馈的运行关联起来。幸运的是,LangSmith 让这变得很容易。
首先,你需要从你的应用中记录反馈。一个简单的方法是跟踪每次运行的运行 ID,然后使用它来记录反馈。跟踪运行 ID 看起来像这样:
```python theme={"theme":{"light":"catppuccin-latte","dark":"catppuccin-mocha"}}
from langsmith import uuid7
run_id = str(uuid7())
rag(
"where did harrison work",
langsmith_extra={"run_id": run_id}
)
```
将反馈与该运行关联起来看起来像这样:
```python theme={"theme":{"light":"catppuccin-latte","dark":"catppuccin-mocha"}}
from langsmith import Client
ls_client = Client()
ls_client.create_feedback(
run_id,
key="user-score",
score=1.0,
)
```
一旦反馈被记录,你就可以通过点击检查运行时的 `Metadata` 选项卡,看到它与每次运行的关联。它应该看起来像[这样](https://smith.langchain.com/public/8cafba6a-1a6d-4a73-8565-483186f31c29/r)
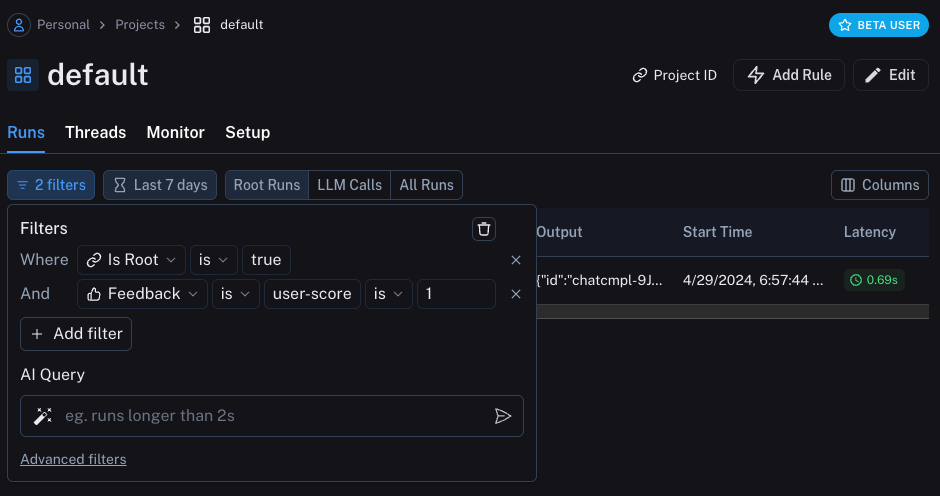
 你还可以通过使用运行表中的过滤逻辑,查询所有具有正面(或负面)反馈的运行。你可以通过创建如下过滤器来实现:
 ### 记录元数据
开始记录元数据也是一个好主意。这让你能够开始跟踪应用的不同属性。这对于让你了解产生特定结果时使用了哪个版本或变体的应用非常重要。
对于这个例子,我们将记录使用的 LLM。通常你可能正在尝试不同的 LLM,因此将该信息作为元数据记录对于过滤很有用。为了做到这一点,我们可以像这样添加它:
```python theme={"theme":{"light":"catppuccin-latte","dark":"catppuccin-mocha"}}
from openai import OpenAI
from langsmith import traceable
from langsmith.wrappers import wrap_openai
openai_client = wrap_openai(OpenAI())
@traceable(run_type="retriever")
def retriever(query: str):
results = ["Harrison worked at Kensho"]
return results
@traceable(metadata={"llm": "gpt-4.1-mini"})
def rag(question):
docs = retriever(question)
system_message = """Answer the users question using only the provided information below:
{docs}""".format(docs='\n'.join(docs))
return openai_client.chat.completions.create(messages = [
{"role": "system", "content": system_message},
{"role": "user", "content": question},
], model="gpt-4.1-mini")
```
注意我们向 `rag` 函数添加了 `@traceable(metadata={"llm": "gpt-4.1-mini"})`。
以这种方式跟踪元数据假设它是事先已知的。这对于 LLM 类型来说没问题,但对于其他类型的信息(如用户 ID)则不太理想。为了记录这类信息,我们可以在运行时与运行 ID 一起传入。
```python theme={"theme":{"light":"catppuccin-latte","dark":"catppuccin-mocha"}}
from langsmith import uuid7
run_id = str(uuid7())
rag(
"where did harrison work",
langsmith_extra={"run_id": run_id, "metadata": {"user_id": "harrison"}}
)
```
现在我们已经记录了这两条元数据,我们应该能够在[追踪教程追踪 UI](https://smith.langchain.com/public/37adf7e5-97aa-42d0-9850-99c0199bddf6/r) 中看到它们都显示出来。
### 记录元数据
开始记录元数据也是一个好主意。这让你能够开始跟踪应用的不同属性。这对于让你了解产生特定结果时使用了哪个版本或变体的应用非常重要。
对于这个例子,我们将记录使用的 LLM。通常你可能正在尝试不同的 LLM,因此将该信息作为元数据记录对于过滤很有用。为了做到这一点,我们可以像这样添加它:
```python theme={"theme":{"light":"catppuccin-latte","dark":"catppuccin-mocha"}}
from openai import OpenAI
from langsmith import traceable
from langsmith.wrappers import wrap_openai
openai_client = wrap_openai(OpenAI())
@traceable(run_type="retriever")
def retriever(query: str):
results = ["Harrison worked at Kensho"]
return results
@traceable(metadata={"llm": "gpt-4.1-mini"})
def rag(question):
docs = retriever(question)
system_message = """Answer the users question using only the provided information below:
{docs}""".format(docs='\n'.join(docs))
return openai_client.chat.completions.create(messages = [
{"role": "system", "content": system_message},
{"role": "user", "content": question},
], model="gpt-4.1-mini")
```
注意我们向 `rag` 函数添加了 `@traceable(metadata={"llm": "gpt-4.1-mini"})`。
以这种方式跟踪元数据假设它是事先已知的。这对于 LLM 类型来说没问题,但对于其他类型的信息(如用户 ID)则不太理想。为了记录这类信息,我们可以在运行时与运行 ID 一起传入。
```python theme={"theme":{"light":"catppuccin-latte","dark":"catppuccin-mocha"}}
from langsmith import uuid7
run_id = str(uuid7())
rag(
"where did harrison work",
langsmith_extra={"run_id": run_id, "metadata": {"user_id": "harrison"}}
)
```
现在我们已经记录了这两条元数据,我们应该能够在[追踪教程追踪 UI](https://smith.langchain.com/public/37adf7e5-97aa-42d0-9850-99c0199bddf6/r) 中看到它们都显示出来。
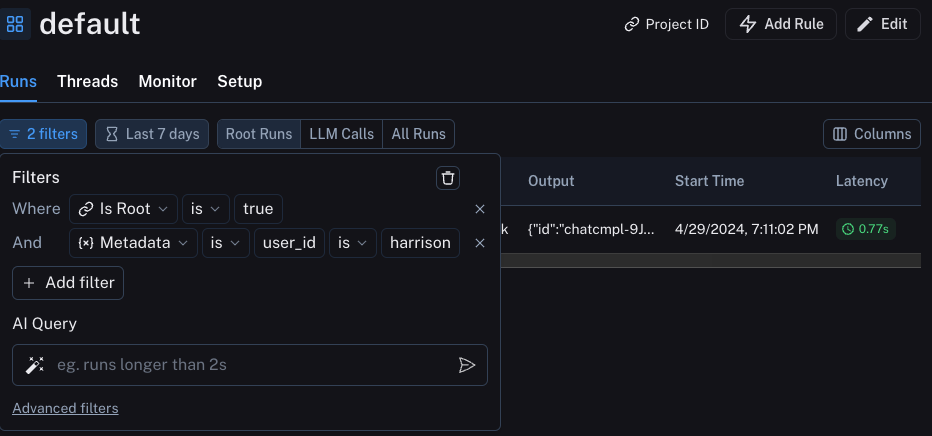
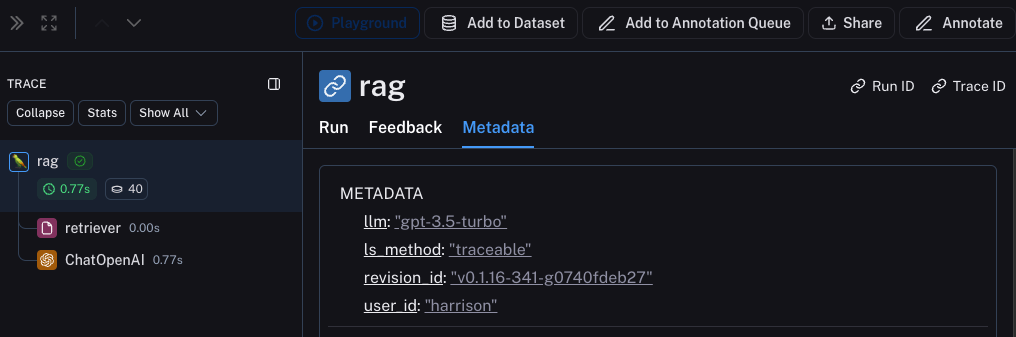 我们可以通过构建如下过滤器来筛选这些信息:
 ## 生产环境
很好——你已经利用这种新的可观测性快速迭代,并确信你的应用表现良好。是时候将其部署到生产环境了!你需要添加哪些新的可观测性?
首先,请注意你已经添加的相同可观测性将在生产环境中继续提供价值。你将能够继续深入查看特定的运行。
在生产环境中,你可能拥有**更多**的流量。你不想被困在逐个查看数据点上。幸运的是,LangSmith 有一套工具来帮助实现生产环境中的可观测性。
### 监控
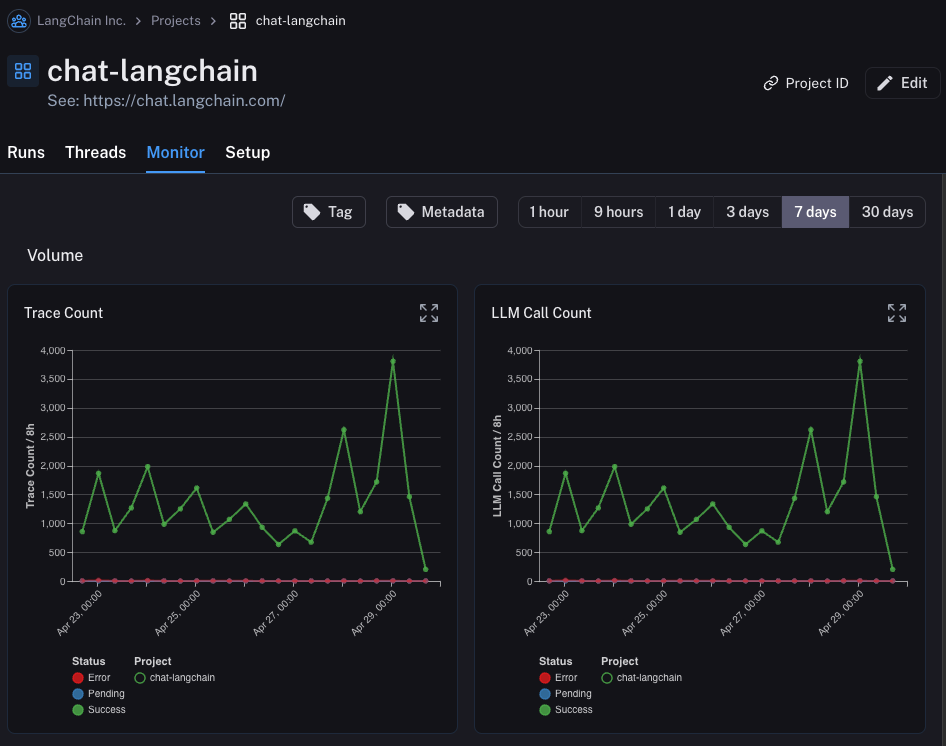
如果你在项目中点击 `Monitor` 选项卡,你将看到一系列监控图表。在这里,我们跟踪许多 LLM 特定的统计数据——追踪数量、反馈、首令牌时间等。你可以跨几个不同的时间区间查看这些数据随时间的变化。
## 生产环境
很好——你已经利用这种新的可观测性快速迭代,并确信你的应用表现良好。是时候将其部署到生产环境了!你需要添加哪些新的可观测性?
首先,请注意你已经添加的相同可观测性将在生产环境中继续提供价值。你将能够继续深入查看特定的运行。
在生产环境中,你可能拥有**更多**的流量。你不想被困在逐个查看数据点上。幸运的是,LangSmith 有一套工具来帮助实现生产环境中的可观测性。
### 监控
如果你在项目中点击 `Monitor` 选项卡,你将看到一系列监控图表。在这里,我们跟踪许多 LLM 特定的统计数据——追踪数量、反馈、首令牌时间等。你可以跨几个不同的时间区间查看这些数据随时间的变化。
 ### A/B 测试
用于 A/B 测试的分组功能要求给定元数据键至少存在 2 个不同的值。
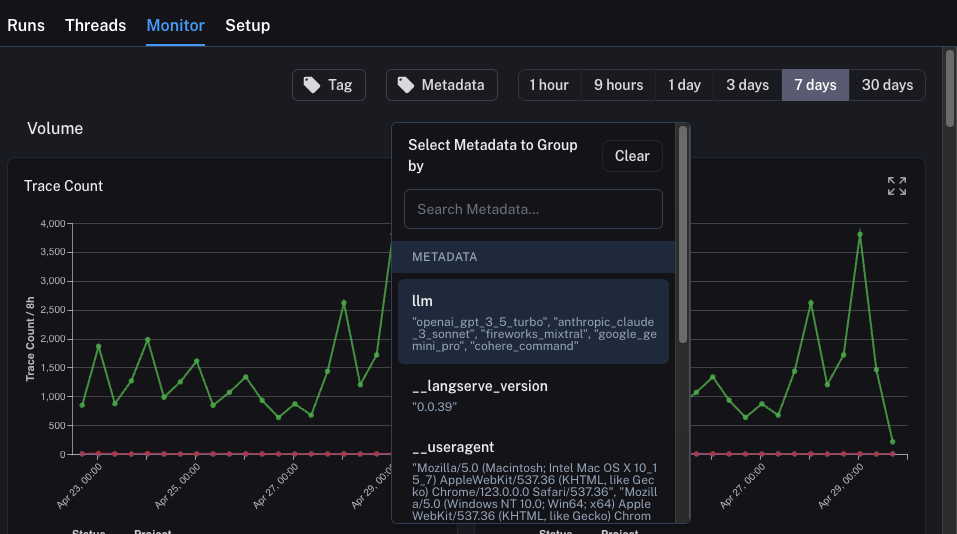
你还可以使用此选项卡执行一种 A/B 测试。在之前的教程中,我们开始跟踪几个不同的元数据属性——其中之一是 `llm`。我们可以按**任何**元数据属性对监控图表进行分组,并立即获得随时间变化的分组图表。这让我们可以尝试不同的 LLM(或提示词,或其他),并跟踪它们随时间变化的性能。
为了做到这一点,我们只需要点击顶部的 `Metadata` 按钮。这将给我们一个下拉选项来选择分组依据:
### A/B 测试
用于 A/B 测试的分组功能要求给定元数据键至少存在 2 个不同的值。
你还可以使用此选项卡执行一种 A/B 测试。在之前的教程中,我们开始跟踪几个不同的元数据属性——其中之一是 `llm`。我们可以按**任何**元数据属性对监控图表进行分组,并立即获得随时间变化的分组图表。这让我们可以尝试不同的 LLM(或提示词,或其他),并跟踪它们随时间变化的性能。
为了做到这一点,我们只需要点击顶部的 `Metadata` 按钮。这将给我们一个下拉选项来选择分组依据:
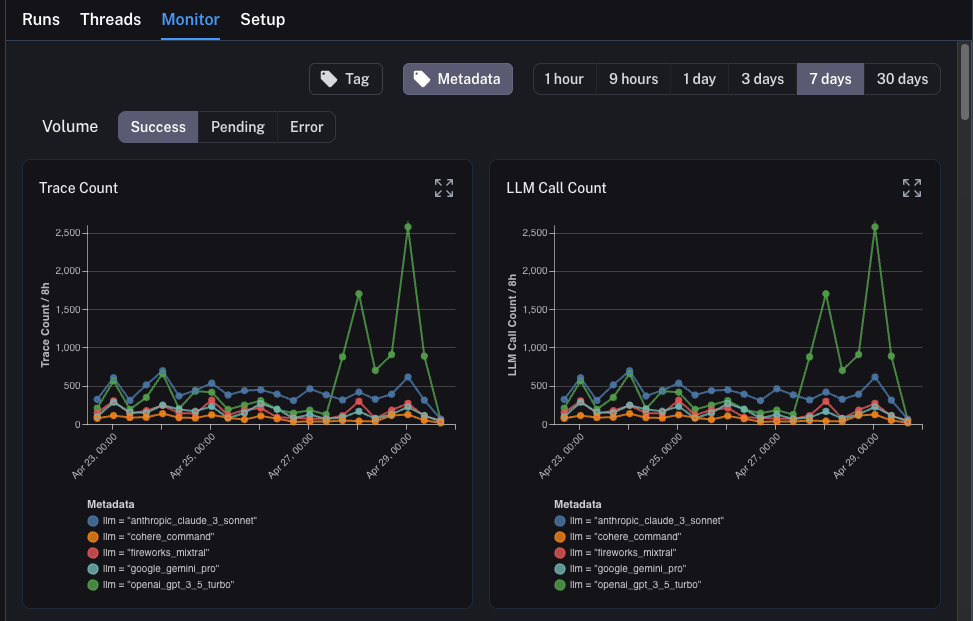
 一旦我们选择这个,我们将开始看到按此属性分组的图表:
 ### 深入分析
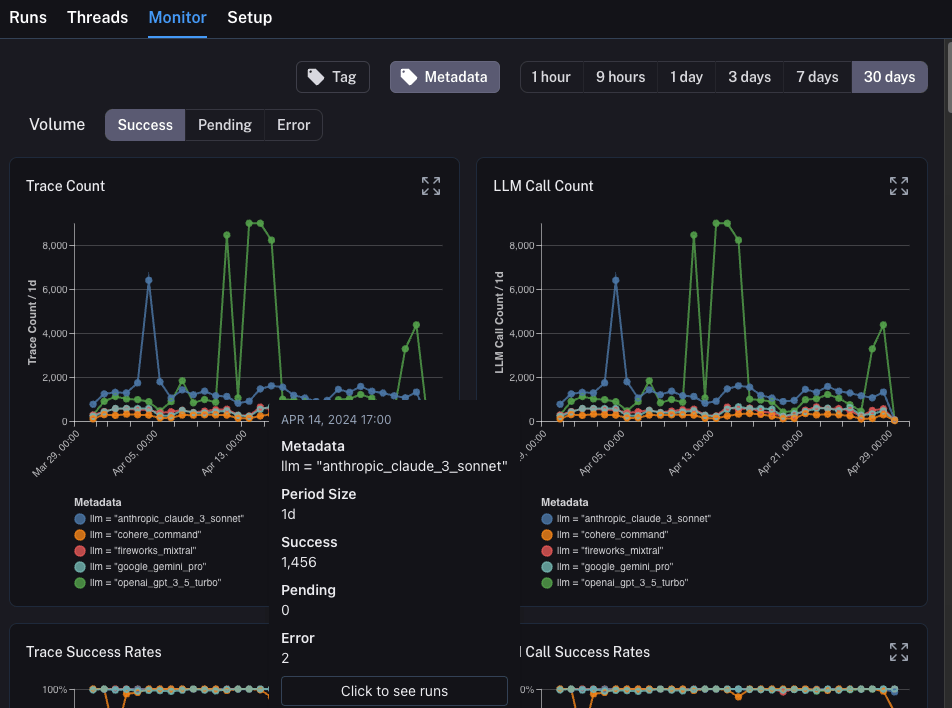
LangSmith 提供的一个强大能力是,当你在监控图表中发现有问题的数据点时,能够轻松地深入分析这些数据点。为了做到这一点,你只需将鼠标悬停在监控图表中的数据点上。当你这样做时,你将能够点击该数据点。这将带你回到运行表,并显示一个过滤后的视图:
### 深入分析
LangSmith 提供的一个强大能力是,当你在监控图表中发现有问题的数据点时,能够轻松地深入分析这些数据点。为了做到这一点,你只需将鼠标悬停在监控图表中的数据点上。当你这样做时,你将能够点击该数据点。这将带你回到运行表,并显示一个过滤后的视图:
 ## 结论
在本教程中,你看到了如何为你的 LLM 应用设置一流的可观测性。无论你的应用处于哪个阶段,你都将从可观测性中受益。
如果你对可观测性有更深入的问题,请查看[操作指南部分](/langsmith/observability-concepts),了解关于测试、提示词管理等主题的指南。
***
## 结论
在本教程中,你看到了如何为你的 LLM 应用设置一流的可观测性。无论你的应用处于哪个阶段,你都将从可观测性中受益。
如果你对可观测性有更深入的问题,请查看[操作指南部分](/langsmith/observability-concepts),了解关于测试、提示词管理等主题的指南。
***
[Edit this page on GitHub](https://github.com/langchain-ai/docs/edit/main/src/i18n\zh-CN\langsmith\observability-llm-tutorial.mdx) or [file an issue](https://github.com/langchain-ai/docs/issues/new/choose).
[Connect these docs](/use-these-docs) to Claude, VSCode, and more via MCP for real-time answers.