> ## Documentation Index
> Fetch the complete documentation index at: https://langchain-zh.cn/llms.txt
> Use this file to discover all available pages before exploring further.
# 提示工程快速入门
提示(Prompts)指导着大语言模型(LLM)的行为。[*提示工程*](/langsmith/prompt-engineering-concepts) 是指精心设计、测试和完善你提供给 LLM 的指令,使其产生可靠且有用的回复的过程。
LangSmith 提供了创建、版本控制、测试和协作处理提示的工具。你还会遇到一些常见概念,例如 [*提示模板*](/langsmith/prompt-engineering-concepts#prompts-vs-prompt-templates),它允许你复用结构化的提示;以及 [*变量*](/langsmith/prompt-engineering-concepts#f-string-vs-mustache),它允许你将值(例如用户的问题)动态插入到提示中。
在本快速入门中,你将使用 UI 或 SDK 来创建、测试和改进提示。本快速入门将以 OpenAI 作为示例 LLM 提供商,但相同的工作流程也适用于其他提供商。
## 先决条件
开始之前,请确保你拥有:
* **一个 LangSmith 账户**:在 [smith.langchain.com](https://smith.langchain.com) 注册或登录。
* **一个 LangSmith API 密钥**:按照 [创建 API 密钥](/langsmith/create-account-api-key#create-an-api-key) 指南操作。
* **一个 OpenAI API 密钥**:从 [OpenAI 控制台](https://platform.openai.com/account/api-keys) 生成。
选择 UI 或 SDK 工作流程的标签页:
## 1. 设置工作区密钥
在 [LangSmith UI](https://smith.langchain.com) 中,请确保您的 API 密钥已设置为 [工作区机密](/langsmith/set-up-hierarchy#configure-workspace-settings)。
1. 前往 **设置**,然后转到 **机密** 选项卡。
2. 选择 **添加机密**,并输入密钥环境变量(例如,`OPENAI_API_KEY` 或 `ANTHROPIC_API_KEY`)以及您的 API 密钥作为 **值**。
3. 选择 **保存机密**。
在 LangSmith UI 中添加工作区机密时,请确保机密密钥与模型提供商预期的环境变量名称匹配。
## 2. 创建提示
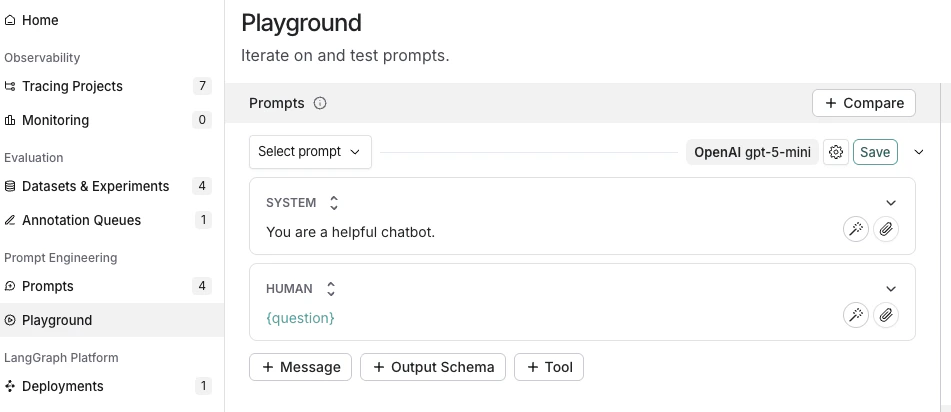
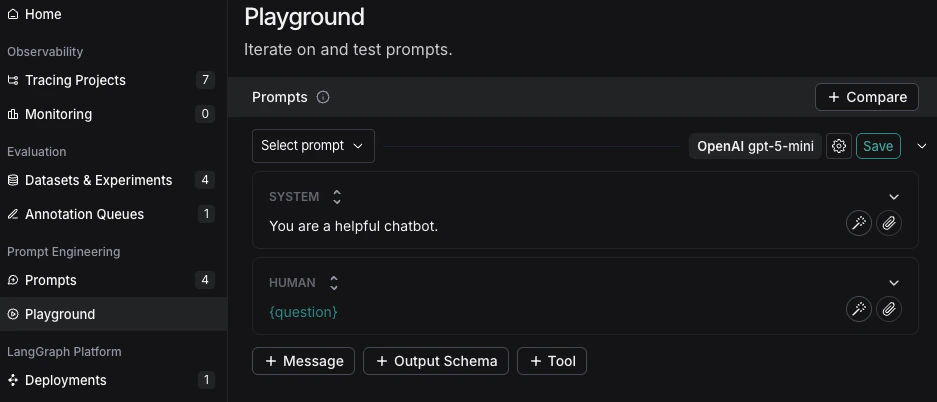
1. 在 [LangSmith UI](https://smith.langchain.com) 中,导航到左侧菜单的 **Prompts** 部分。
2. 点击 **+ Prompt** 来创建一个提示。
3. 根据需要编辑或添加提示和输入变量来修改提示。
## 3. 测试提示
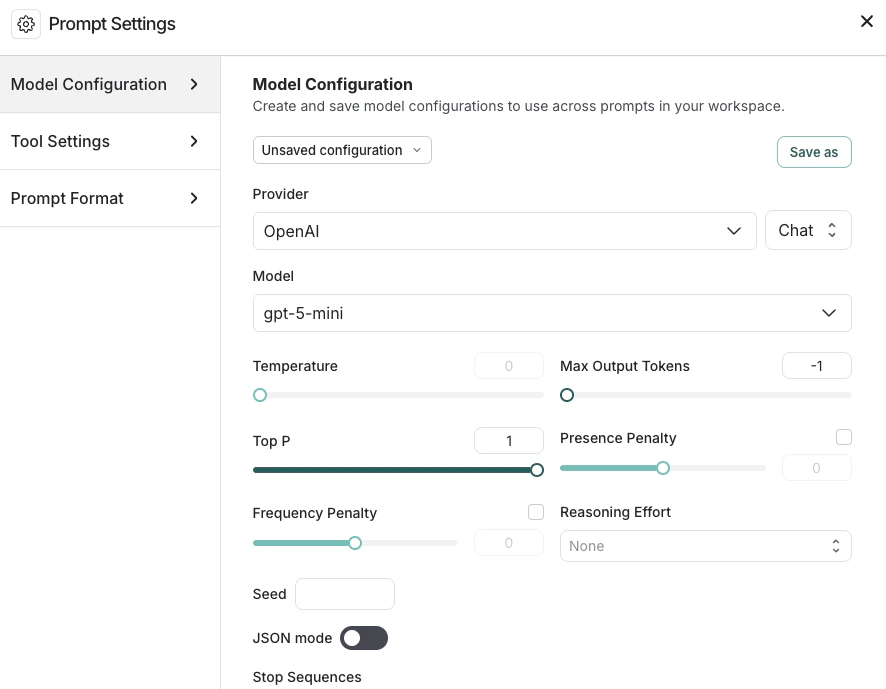
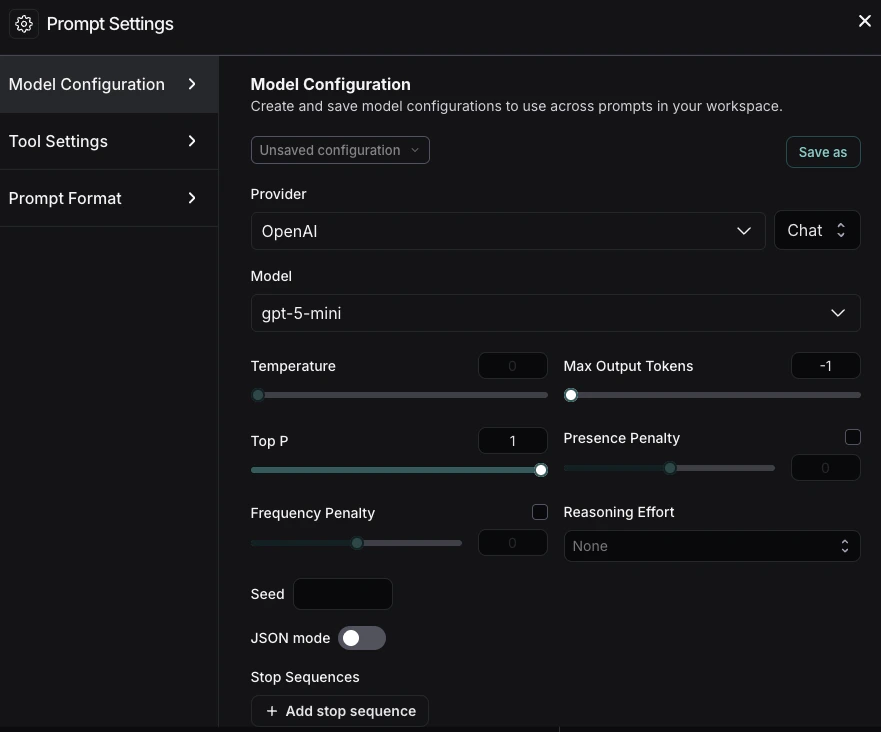
1. 在 **Prompts** 标题下,选择模型名称旁边的齿轮 图标,这将打开 **Prompt Settings** 窗口并定位到 **Model Configuration** 标签页。
2. 设置你想要使用的 [模型配置](/langsmith/managing-model-configurations)。你选择的 **Provider** 和 **Model** 将决定此配置页面上可配置的参数。设置完成后,点击 **Save as**。
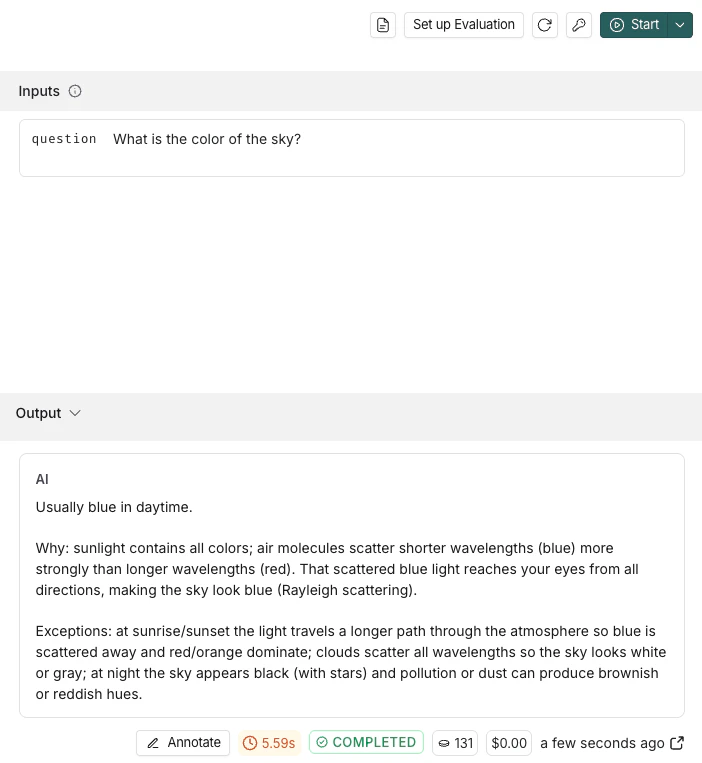
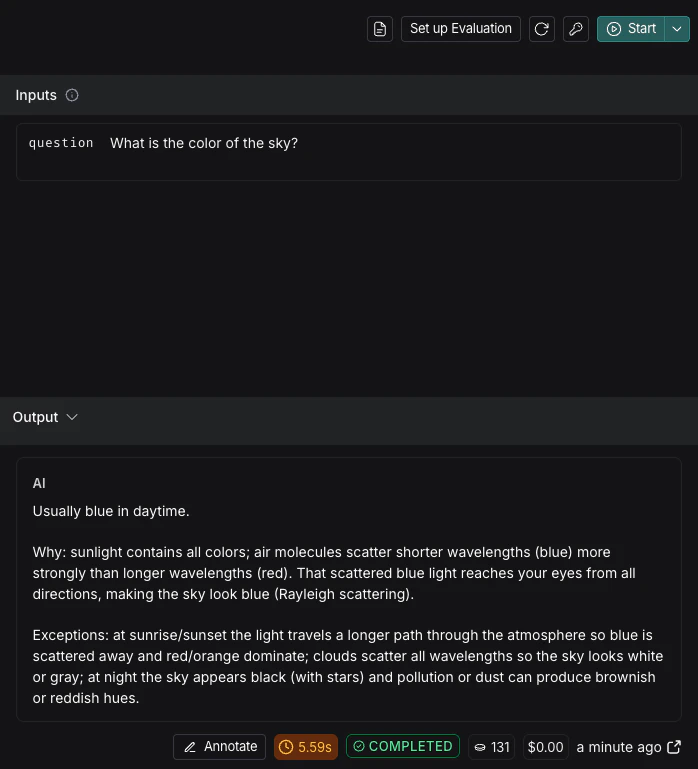
3. 在 **Inputs** 框中指定你想要测试的输入变量,然后点击 **Start**。
要了解在 Playground 中配置提示的更多选项,请参阅 [配置提示设置](/langsmith/managing-model-configurations)。
4. 测试并完善你的提示后,点击 **Save** 以保存供将来使用。
## 4. 迭代提示
LangSmith 支持基于团队的提示迭代。[工作区](/langsmith/administration-overview#workspaces) 成员可以在 Playground 中试验提示,并在准备好时将他们的更改保存为新的 [*提交*](/langsmith/prompt-engineering-concepts#commits)。
要改进你的提示:
* 参考你的模型提供商提供的文档,了解提示创建的最佳实践,例如:
* [OpenAI API 提示工程最佳实践](https://help.openai.com/en/articles/6654000-best-practices-for-prompt-engineering-with-the-openai-api)
* [Gemini 的提示设计简介](https://ai.google.dev/gemini-api/docs/prompting-intro)
* 使用 LangSmith 中的交互式工具 Prompt Canvas 来构建和完善你的提示。在 [Prompt Canvas 指南](/langsmith/write-prompt-with-ai) 中了解更多信息。
* 标记特定的提交,以在你的提交历史中标记重要时刻。
1. 要创建提交,请导航到 **Playground** 并选择 **Commit**。选择要提交更改的提示,然后点击 **Commit**。
2. 导航到左侧菜单中的 **Prompts**。选择提示。在提示详情页面上,选择右上角的 **Tag** 来添加 [提交标签](/langsmith/manage-prompts#commit-tags)。
## 1. 设置环境
1. 在你的终端中,准备你的环境:
```bash Python theme={"theme":{"light":"catppuccin-latte","dark":"catppuccin-mocha"}}
mkdir ls-prompt-quickstart && cd ls-prompt-quickstart
python -m venv .venv
source .venv/bin/activate
pip install -qU langsmith openai langchain_core
```
```bash TypeScript theme={"theme":{"light":"catppuccin-latte","dark":"catppuccin-mocha"}}
mkdir ls-prompt-quickstart-ts && cd ls-prompt-quickstart-ts
npm init -y
npm install langsmith openai typescript ts-node
npx tsc --init
```
2. 设置你的 API 密钥:
```bash theme={"theme":{"light":"catppuccin-latte","dark":"catppuccin-mocha"}}
export LANGSMITH_API_KEY=''
export OPENAI_API_KEY=''
```
## 2. 创建提示
要创建提示,你需要定义提示中想要的消息列表,然后推送到 LangSmith。
使用特定语言的构造函数和推送方法:
* Python: [`ChatPromptTemplate`](https://reference.langchain.com/python/langchain-core/prompts/chat/ChatPromptTemplate) → [`client.push_prompt(...)`](https://docs.smith.langchain.com/reference/python/client/langsmith.client.Client#langsmith.client.Client.push_prompt)
* TypeScript: [`ChatPromptTemplate.fromMessages(...)`](https://reference.langchain.com/javascript/langchain-core/prompts/ChatPromptTemplate) → [`client.pushPrompt(...)`](https://reference.langchain.com/javascript/langsmith/client/Client/pushPrompt)
1. 将以下代码添加到 `create_prompt` 文件中:
```python Python theme={"theme":{"light":"catppuccin-latte","dark":"catppuccin-mocha"}}
from langsmith import Client
from langchain_core.prompts import ChatPromptTemplate
client = Client()
prompt = ChatPromptTemplate([
("system", "You are a helpful chatbot."),
("user", "{question}"),
])
client.push_prompt("prompt-quickstart", object=prompt)
```
```typescript TypeScript theme={"theme":{"light":"catppuccin-latte","dark":"catppuccin-mocha"}}
import { Client } from "langsmith";
import { ChatPromptTemplate } from "@langchain/core/prompts";
const client = new Client();
const prompt = ChatPromptTemplate.fromMessages([
["system", "You are a helpful chatbot."],
["user", "{question}"],
]);
await client.pushPrompt("prompt-quickstart", {
object: prompt,
});
```
这将创建一个有序的消息列表,用 `ChatPromptTemplate` 包装它们,然后按名称将提示推送到你的 [工作区](/langsmith/administration-overview#workspaces) 以进行版本控制和复用。
2. 运行 `create_prompt`:
```python Python theme={"theme":{"light":"catppuccin-latte","dark":"catppuccin-mocha"}}
python create_prompt.py
```
```typescript TypeScript theme={"theme":{"light":"catppuccin-latte","dark":"catppuccin-mocha"}}
npx tsx create_prompt.ts
```
按照结果中的链接,在 LangSmith UI 中查看新创建的 Prompt Hub 提示。
## 3. 测试提示
在此步骤中,你将通过名称(`"prompt-quickstart"`)拉取在 [步骤 2](#2-create-a-prompt) 中创建的提示,使用测试输入格式化它,将其转换为 OpenAI 的聊天格式,并调用 OpenAI Chat Completions API。
然后,你将通过创建新版本迭代提示。你工作区的成员可以打开现有提示,在 [UI](https://smith.langchain.com) 中试验更改,并将这些更改保存为同一提示的新提交,从而为整个团队保留历史记录。
1. 将以下内容添加到 `test_prompt` 文件中:
```python Python theme={"theme":{"light":"catppuccin-latte","dark":"catppuccin-mocha"}}
from langsmith import Client
from openai import OpenAI
from langchain_core.messages import convert_to_openai_messages
client = Client()
oai_client = OpenAI()
prompt = client.pull_prompt("prompt-quickstart")
# 由于提示只有一个变量,你也可以直接传入值
# 等同于 formatted_prompt = prompt.invoke("What is the color of the sky?")
formatted_prompt = prompt.invoke({"question": "What is the color of the sky?"})
response = oai_client.chat.completions.create(
model="gpt-4.1",
messages=convert_to_openai_messages(formatted_prompt.messages),
)
```
```typescript TypeScript theme={"theme":{"light":"catppuccin-latte","dark":"catppuccin-mocha"}}
import { OpenAI } from "openai";
import { pull } from "langchain/hub"
import { convertPromptToOpenAI } from "@langchain/openai";
const oaiClient = new OpenAI();
const prompt = await pull("prompt-quickstart");
// 用问题格式化提示
const formattedPrompt = await prompt.invoke({ question: "What is the color of the sky?" });
const response = await oaiClient.chat.completions.create({
model: "gpt-4.1",
messages: convertPromptToOpenAI(formattedPrompt).messages,
});
```
这将使用 `pull` 按名称加载你正在测试的提示的最新提交版本。你也可以通过传递提交哈希 `":"` 来指定特定的提交。
2. 运行 `test_prompt`:
```python Python theme={"theme":{"light":"catppuccin-latte","dark":"catppuccin-mocha"}}
python test_prompt.py
```
```typescript TypeScript theme={"theme":{"light":"catppuccin-latte","dark":"catppuccin-mocha"}}
npx tsx test_prompt.ts
```
3. 要创建提示的新版本,请使用相同的提示名称和更新后的模板调用最初使用的相同推送方法。LangSmith 会将其记录为新提交并保留先前版本。
将以下代码复制到 `iterate_prompt` 文件中:
```python Python theme={"theme":{"light":"catppuccin-latte","dark":"catppuccin-mocha"}}
from langsmith import Client
from langchain_core.prompts import ChatPromptTemplate
client = Client()
new_prompt = ChatPromptTemplate([
("system", "You are a helpful chatbot. Respond in Spanish."),
("user", "{question}"),
])
client.push_prompt("prompt-quickstart", object=new_prompt)
```
```typescript TypeScript theme={"theme":{"light":"catppuccin-latte","dark":"catppuccin-mocha"}}
import { Client } from "langsmith";
import { ChatPromptTemplate } from "@langchain/core/prompts";
const client = new Client();
const newPrompt = ChatPromptTemplate.fromMessages([
["system", "You are a helpful chatbot. Speak in Spanish."],
["user", "{question}"]
]);
await client.pushPrompt("prompt-quickstart", {
object: newPrompt
});
```
4. 运行 `iterate_prompt`:
```python Python theme={"theme":{"light":"catppuccin-latte","dark":"catppuccin-mocha"}}
python iterate_prompt.py
```
```typescript TypeScript theme={"theme":{"light":"catppuccin-latte","dark":"catppuccin-mocha"}}
npx tsx iterate_prompt.ts
```
现在你的提示将包含两个提交。
要改进你的提示:
* 参考你的模型提供商提供的文档,了解提示创建的最佳实践,例如:
* [OpenAI API 提示工程最佳实践](https://help.openai.com/en/articles/6654000-best-practices-for-prompt-engineering-with-the-openai-api)
* [Gemini 的提示设计简介](https://ai.google.dev/gemini-api/docs/prompting-intro)
* 使用 LangSmith 中的交互式工具 Prompt Canvas 来构建和完善你的提示。在 [Prompt Canvas 指南](/langsmith/write-prompt-with-ai) 中了解更多信息。
## 后续步骤
* 在 [创建提示指南](/langsmith/create-a-prompt) 中了解如何使用 Prompt Hub 存储和管理提示。
* 在本教程中学习如何设置 Playground 以 [测试多轮对话](/langsmith/multiple-messages)。
* 要了解如何针对数据集而非单个示例测试提示的性能,请参阅 [从 Playground 运行评估](/langsmith/run-evaluation-from-playground)。
在 Playground 中使用 **[Polly](/langsmith/polly)** 来帮助优化你的提示、生成工具和创建输出模式。
***
[Edit this page on GitHub](https://github.com/langchain-ai/docs/edit/main/src/i18n\zh-CN\langsmith\prompt-engineering-quickstart.mdx) or [file an issue](https://github.com/langchain-ai/docs/issues/new/choose).
[Connect these docs](/use-these-docs) to Claude, VSCode, and more via MCP for real-time answers.