> ## Documentation Index
> Fetch the complete documentation index at: https://langchain-zh.cn/llms.txt
> Use this file to discover all available pages before exploring further.
# 如何使用 pytest 运行评估
LangSmith 的 pytest 插件允许 Python 开发者将数据集和评估定义为 pytest 测试用例。
与标准评估流程相比,这在以下情况下非常有用:
* **每个示例需要不同的评估逻辑**:标准评估流程假设所有数据集示例都采用一致的应用程序和评估器执行。对于更复杂的系统或全面的评估,特定的系统子集可能需要使用特定的输入类型和指标进行评估。将这些异构评估编写为独立的测试用例套件并一起跟踪会更简单。
* **您想断言二元期望**:在 LangSmith 中跟踪断言,并在本地(例如在 CI 流水线中)引发断言错误。测试工具在评估系统输出并断言其基本属性时很有帮助。
* **您想要类似 pytest 的终端输出**:获得熟悉的 pytest 输出格式
* **您已经使用 pytest 来测试您的应用**:将 LangSmith 跟踪添加到现有的 pytest 工作流中
JS/TS SDK 有一个类似的 [Vitest/Jest 集成](/langsmith/vitest-jest)。
## 安装
此功能需要 Python SDK 版本 `langsmith>=0.3.4`。
如需额外功能,如[丰富的终端输出](#rich-outputs)和[测试缓存](#caching),请安装:
```bash pip theme={"theme":{"light":"catppuccin-latte","dark":"catppuccin-mocha"}}
pip install -U "langsmith[pytest]"
```
```bash uv theme={"theme":{"light":"catppuccin-latte","dark":"catppuccin-mocha"}}
uv add "langsmith[pytest]"
```
## 定义和运行测试
pytest 集成允许您将数据集和评估器定义为测试用例。
要在 LangSmith 中跟踪测试,请添加 `@pytest.mark.langsmith` 装饰器。每个被装饰的测试用例都将同步到一个数据集示例。当您运行测试套件时,数据集将被更新,并创建一个新的实验,其中包含每个测试用例的一个结果。
```python Python theme={"theme":{"light":"catppuccin-latte","dark":"catppuccin-mocha"}}
###################### my_app/main.py ######################
import openai
from langsmith import traceable, wrappers
oai_client = wrappers.wrap_openai(openai.OpenAI())
@traceable
def generate_sql(user_query: str) -> str:
result = oai_client.chat.completions.create(
model="gpt-4.1-mini",
messages=[
{"role": "system", "content": "将用户查询转换为 SQL 查询。"},
{"role": "user", "content": user_query},
],
)
return result.choices[0].message.content
###################### tests/test_my_app.py ######################
import pytest
from langsmith import testing as t
def is_valid_sql(query: str) -> bool:
"""如果查询是有效的 SQL,则返回 True。"""
return True # 虚拟实现
@pytest.mark.langsmith # <-- 标记为 LangSmith 测试用例
def test_sql_generation_select_all() -> None:
user_query = "从 customers 表中获取所有用户"
t.log_inputs({"user_query": user_query}) # <-- 记录示例输入,可选
expected = "SELECT * FROM customers;"
t.log_reference_outputs({"sql": expected}) # <-- 记录示例参考输出,可选
sql = generate_sql(user_query)
t.log_outputs({"sql": sql}) # <-- 记录运行输出,可选
t.log_feedback(key="valid_sql", score=is_valid_sql(sql)) # <-- 记录反馈,可选
assert sql == expected # <-- 测试通过/失败状态自动记录到 LangSmith 的 'pass' 反馈键下
```
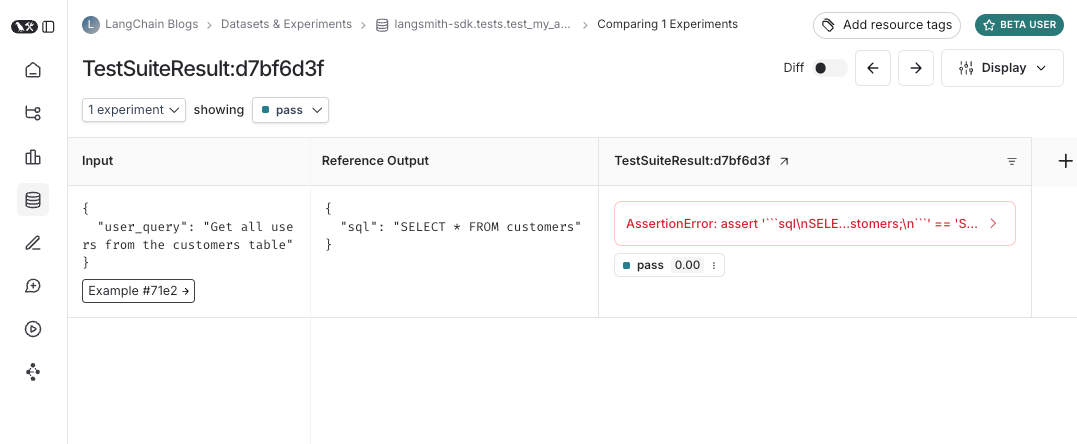
当您运行此测试时,它将有一个基于测试用例通过/失败的默认 `pass` 布尔反馈键。它还将跟踪您记录的任何输入、输出和参考(预期)输出。
像往常一样使用 `pytest` 来运行测试:
```bash theme={"theme":{"light":"catppuccin-latte","dark":"catppuccin-mocha"}}
pytest tests/
```
在大多数情况下,我们建议设置一个测试套件名称:
```bash theme={"theme":{"light":"catppuccin-latte","dark":"catppuccin-mocha"}}
LANGSMITH_TEST_SUITE='SQL 应用测试' pytest tests/
```
每次运行此测试套件时,LangSmith:
* 为每个测试文件创建一个[数据集](/langsmith/evaluation-concepts#datasets)。如果此测试文件的数据集已存在,它将被更新
* 在每个创建/更新的数据集中创建一个[实验](/langsmith/evaluation-concepts#experiment)
* 为每个测试用例创建一个实验行,包含您记录的输入、输出、参考输出和反馈
* 收集每个测试用例在 `pass` 反馈键下的通过/失败率
以下是测试套件数据集的样子:
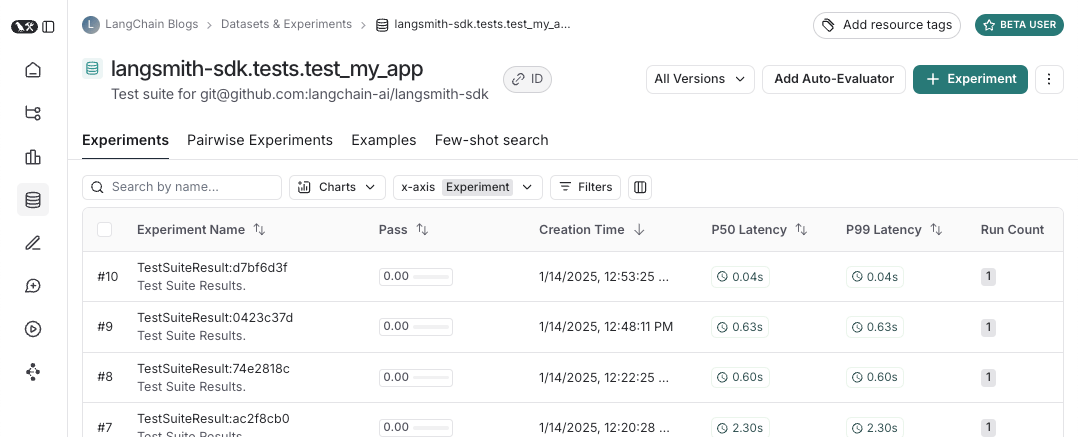 以及针对该测试套件的实验的样子:
 ## 记录输入、输出和参考输出
每次运行测试时,我们都会将其同步到数据集示例并将其作为运行进行跟踪。有几种不同的方法可以跟踪示例输入、参考输出和运行输出。最简单的方法是使用 `log_inputs`、`log_outputs` 和 `log_reference_outputs` 方法。您可以在测试中的任何时间运行这些方法来更新该测试的示例和运行:
```python theme={"theme":{"light":"catppuccin-latte","dark":"catppuccin-mocha"}}
import pytest
from langsmith import testing as t
@pytest.mark.langsmith
def test_foo() -> None:
t.log_inputs({"a": 1, "b": 2})
t.log_reference_outputs({"foo": "bar"})
t.log_outputs({"foo": "baz"})
assert True
```
运行此测试将创建/更新一个名为 "test\_foo" 的示例,输入为 `{"a": 1, "b": 2}`,参考输出为 `{"foo": "bar"}`,并跟踪一个输出为 `{"foo": "baz"}` 的运行。
**注意**:如果您运行 `log_inputs`、`log_outputs` 或 `log_reference_outputs` 两次,之前的值将被覆盖。
定义示例输入和参考输出的另一种方式是通过 pytest 夹具/参数化。默认情况下,测试函数的任何参数都将作为相应示例的输入被记录。如果某些参数旨在表示参考输出,您可以使用 `@pytest.mark.langsmith(output_keys=["name_of_ref_output_arg"])` 指定它们应被记录为参考输出:
```python theme={"theme":{"light":"catppuccin-latte","dark":"catppuccin-mocha"}}
import pytest
@pytest.fixture
def c() -> int:
return 5
@pytest.fixture
def d() -> int:
return 6
@pytest.mark.langsmith(output_keys=["d"])
def test_cd(c: int, d: int) -> None:
result = 2 * c
t.log_outputs({"d": result}) # 记录运行输出
assert result == d
```
这将创建/同步一个名为 "test\_cd" 的示例,输入为 `{"c": 5}`,参考输出为 `{"d": 6}`,运行输出为 `{"d": 10}`。
## 记录反馈
默认情况下,LangSmith 会收集每个测试用例在 `pass` 反馈键下的通过/失败率。您可以使用 `log_feedback` 添加额外的反馈。
```python theme={"theme":{"light":"catppuccin-latte","dark":"catppuccin-mocha"}}
import openai
import pytest
from langsmith import wrappers
from langsmith import testing as t
oai_client = wrappers.wrap_openai(openai.OpenAI())
@pytest.mark.langsmith
def test_offtopic_input() -> None:
user_query = "whats up"
t.log_inputs({"user_query": user_query})
sql = generate_sql(user_query)
t.log_outputs({"sql": sql})
expected = "Sorry that is not a valid query."
t.log_reference_outputs({"sql": expected})
# 使用此上下文管理器来跟踪用于生成评估反馈的任何步骤
# 与主要应用程序逻辑分开
with t.trace_feedback():
instructions = (
"如果 ACTUAL 和 EXPECTED 答案在语义上等价,则返回 1,"
"否则返回 0。仅返回 0 或 1,不返回其他内容。"
)
grade = oai_client.chat.completions.create(
model="gpt-4.1-mini",
messages=[
{"role": "system", "content": instructions},
{"role": "user", "content": f"ACTUAL: {sql}\nEXPECTED: {expected}"},
],
)
score = float(grade.choices[0].message.content)
t.log_feedback(key="correct", score=score)
assert score
```
请注意 `trace_feedback()` 上下文管理器的使用。这使得 LLM 作为评判的调用与测试用例的其余部分分开跟踪。它不会出现在主要测试用例运行中,而是会出现在 `correct` 反馈键的跟踪中。
**注意**:确保与反馈跟踪关联的 `log_feedback` 调用发生在 `trace_feedback` 上下文中。这样我们就能够将反馈与跟踪关联起来,并且在 UI 中查看反馈时,您可以点击它来查看生成它的跟踪。
## 跟踪中间调用
LangSmith 将自动跟踪测试用例执行过程中发生的任何可跟踪的中间调用。
## 将测试分组到测试套件中
默认情况下,给定文件中的所有测试将作为一个单一的“测试套件”进行分组,并对应一个数据集。您可以通过将 `test_suite_name` 参数传递给 `@pytest.mark.langsmith` 来配置测试属于哪个测试套件,以便进行逐个分组,或者您可以设置 `LANGSMITH_TEST_SUITE` 环境变量,将一次执行中的所有测试分组到一个测试套件中:
```bash theme={"theme":{"light":"catppuccin-latte","dark":"catppuccin-mocha"}}
LANGSMITH_TEST_SUITE="SQL 应用测试" pytest tests/
```
我们通常建议设置 `LANGSMITH_TEST_SUITE` 以获得所有结果的统一视图。
## 命名实验
您可以使用 `LANGSMITH_EXPERIMENT` 环境变量来命名实验:
```bash theme={"theme":{"light":"catppuccin-latte","dark":"catppuccin-mocha"}}
LANGSMITH_TEST_SUITE="SQL 应用测试" LANGSMITH_EXPERIMENT="baseline" pytest tests/
```
## 实验元数据
您可以将自定义元数据附加到每次测试运行创建的实验(项目)中。这对于跟踪给定实验使用的模型、提示版本或环境非常有用。
**选项 1:夹具(推荐)**
在您的 `conftest.py` 中定义一个会话作用域的夹具:
```python theme={"theme":{"light":"catppuccin-latte","dark":"catppuccin-mocha"}}
# conftest.py
import os
import pytest
@pytest.fixture(scope="session")
def langsmith_experiment_metadata():
return {
"model": "gpt-4o",
"prompt_version": "v2.3",
"environment": os.environ.get("ENV", "local"),
}
```
该夹具是动态的(可以读取环境变量、调用函数等),并遵循 pytest 的 `conftest.py` 层次结构,因此可以按目录进行作用域限定。
**选项 2:环境变量**
将 `LANGSMITH_EXPERIMENT_METADATA` 设置为 JSON 字符串。这在您不想修改代码的 CI/CD 流水线中很有用:
```bash theme={"theme":{"light":"catppuccin-latte","dark":"catppuccin-mocha"}}
LANGSMITH_EXPERIMENT_METADATA='{"model":"gpt-4o","env":"staging"}' pytest tests/
```
如果同时设置了夹具和环境变量,则夹具优先。系统管理的元数据键(如 `revision_id` 和 git 信息)始终优先于用户提供的键。
此功能需要 `langsmith>=0.7.13`。
## 缓存
在 CI 中每次提交都调用 LLM 可能会很昂贵。为了节省时间和资源,LangSmith 允许您将 HTTP 请求缓存到磁盘。要启用缓存,请安装 `langsmith[pytest]` 并设置环境变量:`LANGSMITH_TEST_CACHE=/my/cache/path`:
```bash pip theme={"theme":{"light":"catppuccin-latte","dark":"catppuccin-mocha"}}
pip install -U "langsmith[pytest]"
LANGSMITH_TEST_CACHE=tests/cassettes pytest tests/my_llm_tests
```
```bash uv theme={"theme":{"light":"catppuccin-latte","dark":"catppuccin-mocha"}}
uv add "langsmith[pytest]"
LANGSMITH_TEST_CACHE=tests/cassettes pytest tests/my_llm_tests
```
所有请求都将被缓存到 `tests/cassettes`,并在后续运行时从那里加载。如果您将此检查到您的仓库中,您的 CI 也将能够使用缓存。
在 `langsmith>=0.4.10` 中,您可以像这样选择性地为单个 URL 或主机名的请求启用缓存:
```python theme={"theme":{"light":"catppuccin-latte","dark":"catppuccin-mocha"}}
@pytest.mark.langsmith(cached_hosts=["api.openai.com", "https://api.anthropic.com"])
def my_test():
...
```
## pytest 功能
`@pytest.mark.langsmith` 旨在不干扰您的工作,并能很好地与熟悉的 `pytest` 功能配合使用。
### 使用 `pytest.mark.parametrize` 进行参数化
您可以像以前一样使用 `parametrize` 装饰器。这将为每个参数化的测试实例创建一个新的测试用例。
```python theme={"theme":{"light":"catppuccin-latte","dark":"catppuccin-mocha"}}
@pytest.mark.langsmith(output_keys=["expected_sql"])
@pytest.mark.parametrize(
"user_query, expected_sql",
[
("Get all users from the customers table", "SELECT * FROM customers"),
("Get all users from the orders table", "SELECT * FROM orders"),
],
)
def test_sql_generation_parametrized(user_query, expected_sql):
sql = generate_sql(user_query)
assert sql == expected_sql
```
**注意:** 随着参数化列表的增长,您可能会考虑改用 `evaluate()`。这可以并行化评估,并使得控制单个实验和相应的数据集更加容易。
### 使用 `pytest-xdist` 进行并行化
您可以像往常一样使用 [pytest-xdist](https://pytest-xdist.readthedocs.io/en/stable/) 来并行化测试执行:
```bash pip theme={"theme":{"light":"catppuccin-latte","dark":"catppuccin-mocha"}}
pip install -U pytest-xdist
pytest -n auto tests
```
```bash uv theme={"theme":{"light":"catppuccin-latte","dark":"catppuccin-mocha"}}
uv add pytest-xdist
pytest -n auto tests
```
### 使用 `pytest-asyncio` 进行异步测试
`@pytest.mark.langsmith` 适用于同步或异步测试,因此您可以像以前一样运行异步测试。
### 使用 `pytest-watch` 进行监视模式
使用监视模式快速迭代您的测试。我们*强烈*建议仅在使用测试缓存(见下文)时启用此功能,以避免不必要的 LLM 调用:
```bash pip theme={"theme":{"light":"catppuccin-latte","dark":"catppuccin-mocha"}}
pip install pytest-watch
LANGSMITH_TEST_CACHE=tests/cassettes ptw tests/my_llm_tests
```
```bash uv theme={"theme":{"light":"catppuccin-latte","dark":"catppuccin-mocha"}}
uv add pytest-watch
LANGSMITH_TEST_CACHE=tests/cassettes ptw tests/my_llm_tests
```
## 丰富的输出
如果您想查看测试运行的 LangSmith 结果的丰富显示,可以指定 `--langsmith-output`:
```bash theme={"theme":{"light":"catppuccin-latte","dark":"catppuccin-mocha"}}
pytest --langsmith-output tests
```
**注意:** 在 `langsmith<=0.3.3` 中,此标志曾经是 `--output=langsmith`,但已更新以避免与其他 pytest 插件冲突。
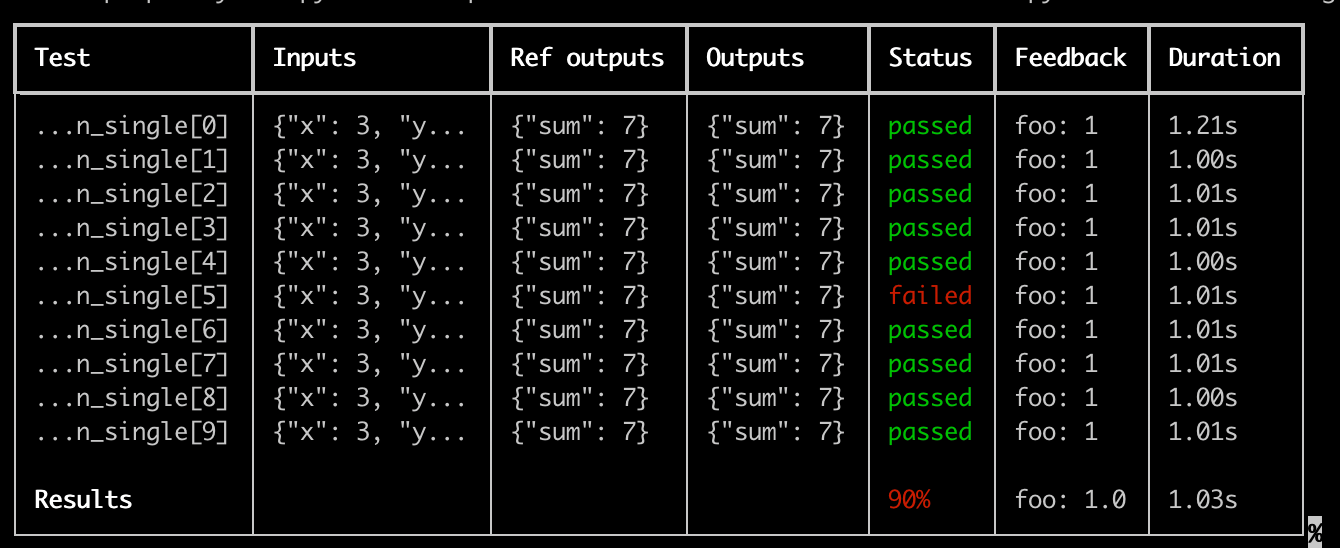
您将获得每个测试套件的一个漂亮的表格,该表格会随着结果上传到 LangSmith 而实时更新:
## 记录输入、输出和参考输出
每次运行测试时,我们都会将其同步到数据集示例并将其作为运行进行跟踪。有几种不同的方法可以跟踪示例输入、参考输出和运行输出。最简单的方法是使用 `log_inputs`、`log_outputs` 和 `log_reference_outputs` 方法。您可以在测试中的任何时间运行这些方法来更新该测试的示例和运行:
```python theme={"theme":{"light":"catppuccin-latte","dark":"catppuccin-mocha"}}
import pytest
from langsmith import testing as t
@pytest.mark.langsmith
def test_foo() -> None:
t.log_inputs({"a": 1, "b": 2})
t.log_reference_outputs({"foo": "bar"})
t.log_outputs({"foo": "baz"})
assert True
```
运行此测试将创建/更新一个名为 "test\_foo" 的示例,输入为 `{"a": 1, "b": 2}`,参考输出为 `{"foo": "bar"}`,并跟踪一个输出为 `{"foo": "baz"}` 的运行。
**注意**:如果您运行 `log_inputs`、`log_outputs` 或 `log_reference_outputs` 两次,之前的值将被覆盖。
定义示例输入和参考输出的另一种方式是通过 pytest 夹具/参数化。默认情况下,测试函数的任何参数都将作为相应示例的输入被记录。如果某些参数旨在表示参考输出,您可以使用 `@pytest.mark.langsmith(output_keys=["name_of_ref_output_arg"])` 指定它们应被记录为参考输出:
```python theme={"theme":{"light":"catppuccin-latte","dark":"catppuccin-mocha"}}
import pytest
@pytest.fixture
def c() -> int:
return 5
@pytest.fixture
def d() -> int:
return 6
@pytest.mark.langsmith(output_keys=["d"])
def test_cd(c: int, d: int) -> None:
result = 2 * c
t.log_outputs({"d": result}) # 记录运行输出
assert result == d
```
这将创建/同步一个名为 "test\_cd" 的示例,输入为 `{"c": 5}`,参考输出为 `{"d": 6}`,运行输出为 `{"d": 10}`。
## 记录反馈
默认情况下,LangSmith 会收集每个测试用例在 `pass` 反馈键下的通过/失败率。您可以使用 `log_feedback` 添加额外的反馈。
```python theme={"theme":{"light":"catppuccin-latte","dark":"catppuccin-mocha"}}
import openai
import pytest
from langsmith import wrappers
from langsmith import testing as t
oai_client = wrappers.wrap_openai(openai.OpenAI())
@pytest.mark.langsmith
def test_offtopic_input() -> None:
user_query = "whats up"
t.log_inputs({"user_query": user_query})
sql = generate_sql(user_query)
t.log_outputs({"sql": sql})
expected = "Sorry that is not a valid query."
t.log_reference_outputs({"sql": expected})
# 使用此上下文管理器来跟踪用于生成评估反馈的任何步骤
# 与主要应用程序逻辑分开
with t.trace_feedback():
instructions = (
"如果 ACTUAL 和 EXPECTED 答案在语义上等价,则返回 1,"
"否则返回 0。仅返回 0 或 1,不返回其他内容。"
)
grade = oai_client.chat.completions.create(
model="gpt-4.1-mini",
messages=[
{"role": "system", "content": instructions},
{"role": "user", "content": f"ACTUAL: {sql}\nEXPECTED: {expected}"},
],
)
score = float(grade.choices[0].message.content)
t.log_feedback(key="correct", score=score)
assert score
```
请注意 `trace_feedback()` 上下文管理器的使用。这使得 LLM 作为评判的调用与测试用例的其余部分分开跟踪。它不会出现在主要测试用例运行中,而是会出现在 `correct` 反馈键的跟踪中。
**注意**:确保与反馈跟踪关联的 `log_feedback` 调用发生在 `trace_feedback` 上下文中。这样我们就能够将反馈与跟踪关联起来,并且在 UI 中查看反馈时,您可以点击它来查看生成它的跟踪。
## 跟踪中间调用
LangSmith 将自动跟踪测试用例执行过程中发生的任何可跟踪的中间调用。
## 将测试分组到测试套件中
默认情况下,给定文件中的所有测试将作为一个单一的“测试套件”进行分组,并对应一个数据集。您可以通过将 `test_suite_name` 参数传递给 `@pytest.mark.langsmith` 来配置测试属于哪个测试套件,以便进行逐个分组,或者您可以设置 `LANGSMITH_TEST_SUITE` 环境变量,将一次执行中的所有测试分组到一个测试套件中:
```bash theme={"theme":{"light":"catppuccin-latte","dark":"catppuccin-mocha"}}
LANGSMITH_TEST_SUITE="SQL 应用测试" pytest tests/
```
我们通常建议设置 `LANGSMITH_TEST_SUITE` 以获得所有结果的统一视图。
## 命名实验
您可以使用 `LANGSMITH_EXPERIMENT` 环境变量来命名实验:
```bash theme={"theme":{"light":"catppuccin-latte","dark":"catppuccin-mocha"}}
LANGSMITH_TEST_SUITE="SQL 应用测试" LANGSMITH_EXPERIMENT="baseline" pytest tests/
```
## 实验元数据
您可以将自定义元数据附加到每次测试运行创建的实验(项目)中。这对于跟踪给定实验使用的模型、提示版本或环境非常有用。
**选项 1:夹具(推荐)**
在您的 `conftest.py` 中定义一个会话作用域的夹具:
```python theme={"theme":{"light":"catppuccin-latte","dark":"catppuccin-mocha"}}
# conftest.py
import os
import pytest
@pytest.fixture(scope="session")
def langsmith_experiment_metadata():
return {
"model": "gpt-4o",
"prompt_version": "v2.3",
"environment": os.environ.get("ENV", "local"),
}
```
该夹具是动态的(可以读取环境变量、调用函数等),并遵循 pytest 的 `conftest.py` 层次结构,因此可以按目录进行作用域限定。
**选项 2:环境变量**
将 `LANGSMITH_EXPERIMENT_METADATA` 设置为 JSON 字符串。这在您不想修改代码的 CI/CD 流水线中很有用:
```bash theme={"theme":{"light":"catppuccin-latte","dark":"catppuccin-mocha"}}
LANGSMITH_EXPERIMENT_METADATA='{"model":"gpt-4o","env":"staging"}' pytest tests/
```
如果同时设置了夹具和环境变量,则夹具优先。系统管理的元数据键(如 `revision_id` 和 git 信息)始终优先于用户提供的键。
此功能需要 `langsmith>=0.7.13`。
## 缓存
在 CI 中每次提交都调用 LLM 可能会很昂贵。为了节省时间和资源,LangSmith 允许您将 HTTP 请求缓存到磁盘。要启用缓存,请安装 `langsmith[pytest]` 并设置环境变量:`LANGSMITH_TEST_CACHE=/my/cache/path`:
```bash pip theme={"theme":{"light":"catppuccin-latte","dark":"catppuccin-mocha"}}
pip install -U "langsmith[pytest]"
LANGSMITH_TEST_CACHE=tests/cassettes pytest tests/my_llm_tests
```
```bash uv theme={"theme":{"light":"catppuccin-latte","dark":"catppuccin-mocha"}}
uv add "langsmith[pytest]"
LANGSMITH_TEST_CACHE=tests/cassettes pytest tests/my_llm_tests
```
所有请求都将被缓存到 `tests/cassettes`,并在后续运行时从那里加载。如果您将此检查到您的仓库中,您的 CI 也将能够使用缓存。
在 `langsmith>=0.4.10` 中,您可以像这样选择性地为单个 URL 或主机名的请求启用缓存:
```python theme={"theme":{"light":"catppuccin-latte","dark":"catppuccin-mocha"}}
@pytest.mark.langsmith(cached_hosts=["api.openai.com", "https://api.anthropic.com"])
def my_test():
...
```
## pytest 功能
`@pytest.mark.langsmith` 旨在不干扰您的工作,并能很好地与熟悉的 `pytest` 功能配合使用。
### 使用 `pytest.mark.parametrize` 进行参数化
您可以像以前一样使用 `parametrize` 装饰器。这将为每个参数化的测试实例创建一个新的测试用例。
```python theme={"theme":{"light":"catppuccin-latte","dark":"catppuccin-mocha"}}
@pytest.mark.langsmith(output_keys=["expected_sql"])
@pytest.mark.parametrize(
"user_query, expected_sql",
[
("Get all users from the customers table", "SELECT * FROM customers"),
("Get all users from the orders table", "SELECT * FROM orders"),
],
)
def test_sql_generation_parametrized(user_query, expected_sql):
sql = generate_sql(user_query)
assert sql == expected_sql
```
**注意:** 随着参数化列表的增长,您可能会考虑改用 `evaluate()`。这可以并行化评估,并使得控制单个实验和相应的数据集更加容易。
### 使用 `pytest-xdist` 进行并行化
您可以像往常一样使用 [pytest-xdist](https://pytest-xdist.readthedocs.io/en/stable/) 来并行化测试执行:
```bash pip theme={"theme":{"light":"catppuccin-latte","dark":"catppuccin-mocha"}}
pip install -U pytest-xdist
pytest -n auto tests
```
```bash uv theme={"theme":{"light":"catppuccin-latte","dark":"catppuccin-mocha"}}
uv add pytest-xdist
pytest -n auto tests
```
### 使用 `pytest-asyncio` 进行异步测试
`@pytest.mark.langsmith` 适用于同步或异步测试,因此您可以像以前一样运行异步测试。
### 使用 `pytest-watch` 进行监视模式
使用监视模式快速迭代您的测试。我们*强烈*建议仅在使用测试缓存(见下文)时启用此功能,以避免不必要的 LLM 调用:
```bash pip theme={"theme":{"light":"catppuccin-latte","dark":"catppuccin-mocha"}}
pip install pytest-watch
LANGSMITH_TEST_CACHE=tests/cassettes ptw tests/my_llm_tests
```
```bash uv theme={"theme":{"light":"catppuccin-latte","dark":"catppuccin-mocha"}}
uv add pytest-watch
LANGSMITH_TEST_CACHE=tests/cassettes ptw tests/my_llm_tests
```
## 丰富的输出
如果您想查看测试运行的 LangSmith 结果的丰富显示,可以指定 `--langsmith-output`:
```bash theme={"theme":{"light":"catppuccin-latte","dark":"catppuccin-mocha"}}
pytest --langsmith-output tests
```
**注意:** 在 `langsmith<=0.3.3` 中,此标志曾经是 `--output=langsmith`,但已更新以避免与其他 pytest 插件冲突。
您将获得每个测试套件的一个漂亮的表格,该表格会随着结果上传到 LangSmith 而实时更新:
 使用此功能的一些重要注意事项:
* 确保您已安装 `pip install -U "langsmith[pytest]"`
* 丰富的输出目前不适用于 `pytest-xdist`
自定义输出会移除所有标准的 pytest 输出。如果您试图调试一些意外行为,通常最好显示常规的 pytest 输出以获得完整的错误跟踪。
## 试运行模式
如果您想在不将结果同步到 LangSmith 的情况下运行测试,可以在环境中设置 `LANGSMITH_TEST_TRACKING=false`。
```bash theme={"theme":{"light":"catppuccin-latte","dark":"catppuccin-mocha"}}
LANGSMITH_TEST_TRACKING=false pytest tests/
```
测试将正常运行,但实验日志不会发送到 LangSmith。
## 期望
LangSmith 提供了一个 [expect](https://reference.langchain.com/python/langsmith/observability/sdk/expect/) 实用程序来帮助定义关于 LLM 输出的期望。例如:
```python theme={"theme":{"light":"catppuccin-latte","dark":"catppuccin-mocha"}}
from langsmith import expect
@pytest.mark.langsmith
def test_sql_generation_select_all():
user_query = "Get all users from the customers table"
sql = generate_sql(user_query)
expect(sql).to_contain("customers")
```
这会将二元“期望”分数记录到实验结果中,同时 `assert` 期望得到满足,可能触发测试失败。
`expect` 还提供了“模糊匹配”方法。例如:
```python theme={"theme":{"light":"catppuccin-latte","dark":"catppuccin-mocha"}}
@pytest.mark.langsmith(output_keys=["expectation"])
@pytest.mark.parametrize(
"query, expectation",
[
("what's the capital of France?", "Paris"),
],
)
def test_embedding_similarity(query, expectation):
prediction = my_chatbot(query)
expect.embedding_distance(
# 此步骤将距离记录为此运行的反馈
prediction=prediction, expectation=expectation
# 添加一个匹配器(在本例中为 'to_be_*'),记录 'expectation' 反馈
).to_be_less_than(0.5) # 可选的断言谓词
expect.edit_distance(
# 这计算两个字符串之间的归一化 Damerau-Levenshtein 距离
prediction=prediction, expectation=expectation
# 如果下面没有提供谓词,则不调用 'assert',但分数仍会被记录
)
```
此测试用例将被分配 4 个分数:
1. 预测与期望之间的 `embedding_distance`
2. 二元 `expectation` 分数(如果余弦距离小于 0.5 则为 1,否则为 0)
3. 预测与期望之间的 `edit_distance`
4. 整体测试通过/失败分数(二元)
`expect` 实用程序模仿了 [Jest](https://jestjs.io/docs/expect) 的 expect API,并附带一些现成的功能,使评估您的 LLM 更加容易。
## 遗留方法
#### `@test` / `@unit` 装饰器
标记测试用例的遗留方法是使用 `@test` 或 `@unit` 装饰器:
```python theme={"theme":{"light":"catppuccin-latte","dark":"catppuccin-mocha"}}
from langsmith import test
@test
def test_foo() -> None:
pass
```
***
使用此功能的一些重要注意事项:
* 确保您已安装 `pip install -U "langsmith[pytest]"`
* 丰富的输出目前不适用于 `pytest-xdist`
自定义输出会移除所有标准的 pytest 输出。如果您试图调试一些意外行为,通常最好显示常规的 pytest 输出以获得完整的错误跟踪。
## 试运行模式
如果您想在不将结果同步到 LangSmith 的情况下运行测试,可以在环境中设置 `LANGSMITH_TEST_TRACKING=false`。
```bash theme={"theme":{"light":"catppuccin-latte","dark":"catppuccin-mocha"}}
LANGSMITH_TEST_TRACKING=false pytest tests/
```
测试将正常运行,但实验日志不会发送到 LangSmith。
## 期望
LangSmith 提供了一个 [expect](https://reference.langchain.com/python/langsmith/observability/sdk/expect/) 实用程序来帮助定义关于 LLM 输出的期望。例如:
```python theme={"theme":{"light":"catppuccin-latte","dark":"catppuccin-mocha"}}
from langsmith import expect
@pytest.mark.langsmith
def test_sql_generation_select_all():
user_query = "Get all users from the customers table"
sql = generate_sql(user_query)
expect(sql).to_contain("customers")
```
这会将二元“期望”分数记录到实验结果中,同时 `assert` 期望得到满足,可能触发测试失败。
`expect` 还提供了“模糊匹配”方法。例如:
```python theme={"theme":{"light":"catppuccin-latte","dark":"catppuccin-mocha"}}
@pytest.mark.langsmith(output_keys=["expectation"])
@pytest.mark.parametrize(
"query, expectation",
[
("what's the capital of France?", "Paris"),
],
)
def test_embedding_similarity(query, expectation):
prediction = my_chatbot(query)
expect.embedding_distance(
# 此步骤将距离记录为此运行的反馈
prediction=prediction, expectation=expectation
# 添加一个匹配器(在本例中为 'to_be_*'),记录 'expectation' 反馈
).to_be_less_than(0.5) # 可选的断言谓词
expect.edit_distance(
# 这计算两个字符串之间的归一化 Damerau-Levenshtein 距离
prediction=prediction, expectation=expectation
# 如果下面没有提供谓词,则不调用 'assert',但分数仍会被记录
)
```
此测试用例将被分配 4 个分数:
1. 预测与期望之间的 `embedding_distance`
2. 二元 `expectation` 分数(如果余弦距离小于 0.5 则为 1,否则为 0)
3. 预测与期望之间的 `edit_distance`
4. 整体测试通过/失败分数(二元)
`expect` 实用程序模仿了 [Jest](https://jestjs.io/docs/expect) 的 expect API,并附带一些现成的功能,使评估您的 LLM 更加容易。
## 遗留方法
#### `@test` / `@unit` 装饰器
标记测试用例的遗留方法是使用 `@test` 或 `@unit` 装饰器:
```python theme={"theme":{"light":"catppuccin-latte","dark":"catppuccin-mocha"}}
from langsmith import test
@test
def test_foo() -> None:
pass
```
***
[Edit this page on GitHub](https://github.com/langchain-ai/docs/edit/main/src/i18n\zh-CN\langsmith\pytest.mdx) or [file an issue](https://github.com/langchain-ai/docs/issues/new/choose).
[Connect these docs](/use-these-docs) to Claude, VSCode, and more via MCP for real-time answers.