> ## Documentation Index
> Fetch the complete documentation index at: https://langchain-zh.cn/llms.txt
> Use this file to discover all available pages before exploring further.
# 设置自定义身份验证
在本教程中,我们将构建一个仅允许特定用户访问的聊天机器人。我们将从 LangGraph 模板开始,逐步添加基于令牌的安全性。最终,你将拥有一个在允许访问前会检查有效令牌的可用聊天机器人。
这是我们身份验证系列的第一部分:
1. 设置自定义身份验证(你在这里)- 控制谁可以访问你的机器人
2. [使对话私有化](/langsmith/resource-auth) - 让用户拥有私有对话
3. [连接身份验证提供程序](/langsmith/add-auth-server) - 添加真实的用户账户并使用 OAuth2 进行生产环境验证
本指南假设你对以下概念有基本了解:
* [**身份验证与访问控制**](/langsmith/auth)
* [**LangSmith**](/langsmith/home)
自定义身份验证仅适用于 LangSmith SaaS 部署或企业自托管部署。
## 1. 创建你的应用
使用 LangGraph 入门模板创建一个新的聊天机器人:
```bash pip theme={"theme":{"light":"catppuccin-latte","dark":"catppuccin-mocha"}}
pip install -U "langgraph-cli[inmem]"
langgraph new --template=new-langgraph-project-python custom-auth
cd custom-auth
```
```bash uv theme={"theme":{"light":"catppuccin-latte","dark":"catppuccin-mocha"}}
uv add "langgraph-cli[inmem]"
langgraph new --template=new-langgraph-project-python custom-auth
cd custom-auth
```
该模板为我们提供了一个占位符 LangGraph 应用。通过安装本地依赖项并运行开发服务器来尝试它:
```bash pip theme={"theme":{"light":"catppuccin-latte","dark":"catppuccin-mocha"}}
pip install -e .
langgraph dev
```
```bash uv theme={"theme":{"light":"catppuccin-latte","dark":"catppuccin-mocha"}}
uv add .
langgraph dev
```
```bash npm theme={"theme":{"light":"catppuccin-latte","dark":"catppuccin-mocha"}}
npx @langchain/langgraph-cli dev
```
服务器将启动并在你的浏览器中打开 [Studio](/langsmith/studio):
```
> - 🚀 API: http://127.0.0.1:2024
> - 🎨 Studio UI: https://smith.langchain.com/studio/?baseUrl=http://127.0.0.1:2024
> - 📚 API Docs: http://127.0.0.1:2024/docs
>
> 此内存服务器专为开发和测试设计。
> 生产环境请使用 LangSmith。
```
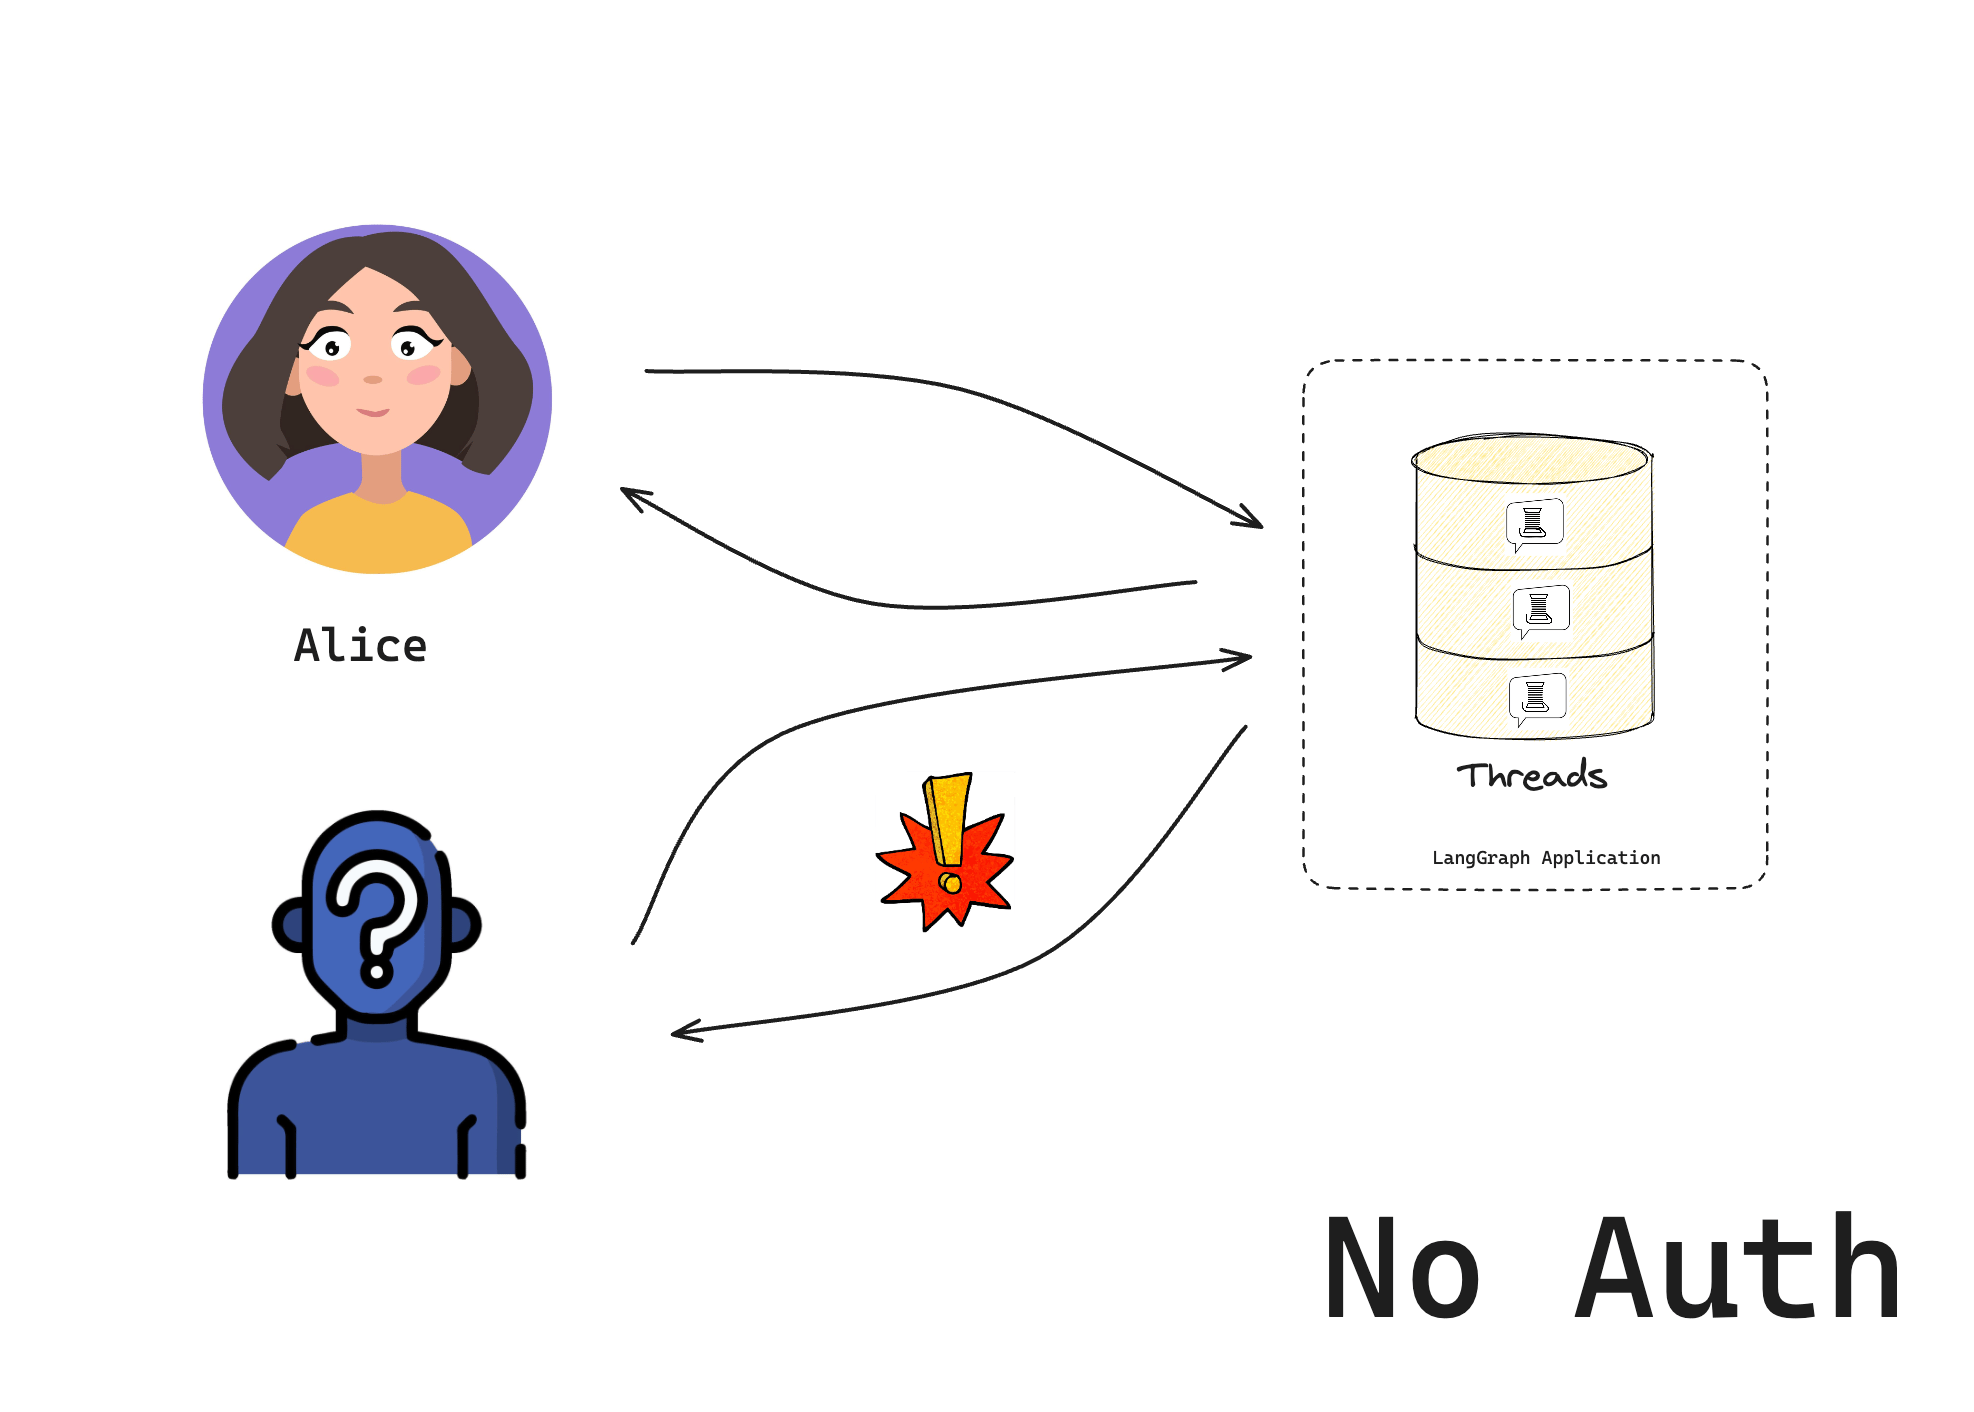
如果你将此应用自托管在公共互联网上,任何人都可以访问它。
 ## 2. 添加身份验证
现在你有了一个基础的 LangGraph 应用,接下来为其添加身份验证。
在本教程中,你将从一个硬编码的令牌开始,用于示例目的。在第三个教程中,你将实现一个“生产就绪”的身份验证方案。
[Auth](https://reference.langchain.com/python/langgraph-sdk/auth/Auth) 对象允许你注册一个身份验证函数,LangSmith 部署将在每个请求上运行此函数。该函数接收每个请求并决定是接受还是拒绝。
创建一个新文件 `src/security/auth.py`。你的代码将放在这里,用于检查用户是否被允许访问你的机器人:
```python {highlight={10,15-16}} title="src/security/auth.py" theme={"theme":{"light":"catppuccin-latte","dark":"catppuccin-mocha"}}
from langgraph_sdk import Auth
# 这是我们模拟的用户数据库。生产环境中请勿这样做
VALID_TOKENS = {
"user1-token": {"id": "user1", "name": "Alice"},
"user2-token": {"id": "user2", "name": "Bob"},
}
# "Auth" 对象是一个容器,LangGraph 将用它来标记我们的身份验证函数
auth = Auth()
# `authenticate` 装饰器告诉 LangGraph 将此函数作为中间件调用
# 用于每个请求。这将决定请求是否被允许
@auth.authenticate
async def get_current_user(authorization: str | None) -> Auth.types.MinimalUserDict:
"""检查用户的令牌是否有效。"""
assert authorization
scheme, token = authorization.split()
assert scheme.lower() == "bearer"
# 检查令牌是否有效
if token not in VALID_TOKENS:
raise Auth.exceptions.HTTPException(status_code=401, detail="Invalid token")
# 如果有效则返回用户信息
user_data = VALID_TOKENS[token]
return {
"identity": user_data["id"],
}
```
请注意,你的 [Auth.authenticate](https://reference.langchain.com/python/langgraph-sdk/auth/Auth/authenticate) 处理程序做了两件重要的事情:
1. 检查请求的 [Authorization 头部](https://developer.mozilla.org/en-US/docs/Web/HTTP/Headers/Authorization) 中是否提供了有效令牌
2. 返回用户的 [MinimalUserDict](https://reference.langchain.com/python/langgraph-sdk/auth/types/MinimalUserDict)
现在,通过将以下内容添加到 [langgraph.json](https://reference.langchain.com/python/cloud/reference/cli/#configuration-file) 配置中,告诉 LangGraph 使用身份验证:
```json {highlight={7-9}} title="langgraph.json" theme={"theme":{"light":"catppuccin-latte","dark":"catppuccin-mocha"}}
{
"dependencies": ["."],
"graphs": {
"agent": "./src/agent/graph.py:graph"
},
"env": ".env",
"auth": {
"path": "src/security/auth.py:auth"
}
}
```
## 3. 测试你的机器人
再次启动服务器以测试所有功能:
```bash theme={"theme":{"light":"catppuccin-latte","dark":"catppuccin-mocha"}}
langgraph dev --no-browser
```
如果你没有添加 `--no-browser`,Studio UI 将在浏览器中打开。默认情况下,即使使用自定义身份验证,我们也允许从 Studio 访问。这使得在 Studio 中开发和测试你的机器人更加容易。你可以通过在身份验证配置中设置 `disable_studio_auth: true` 来移除此替代身份验证选项:
```json theme={"theme":{"light":"catppuccin-latte","dark":"catppuccin-mocha"}}
{
"auth": {
"path": "src/security/auth.py:auth",
"disable_studio_auth": true
}
}
```
## 4. 与你的机器人聊天
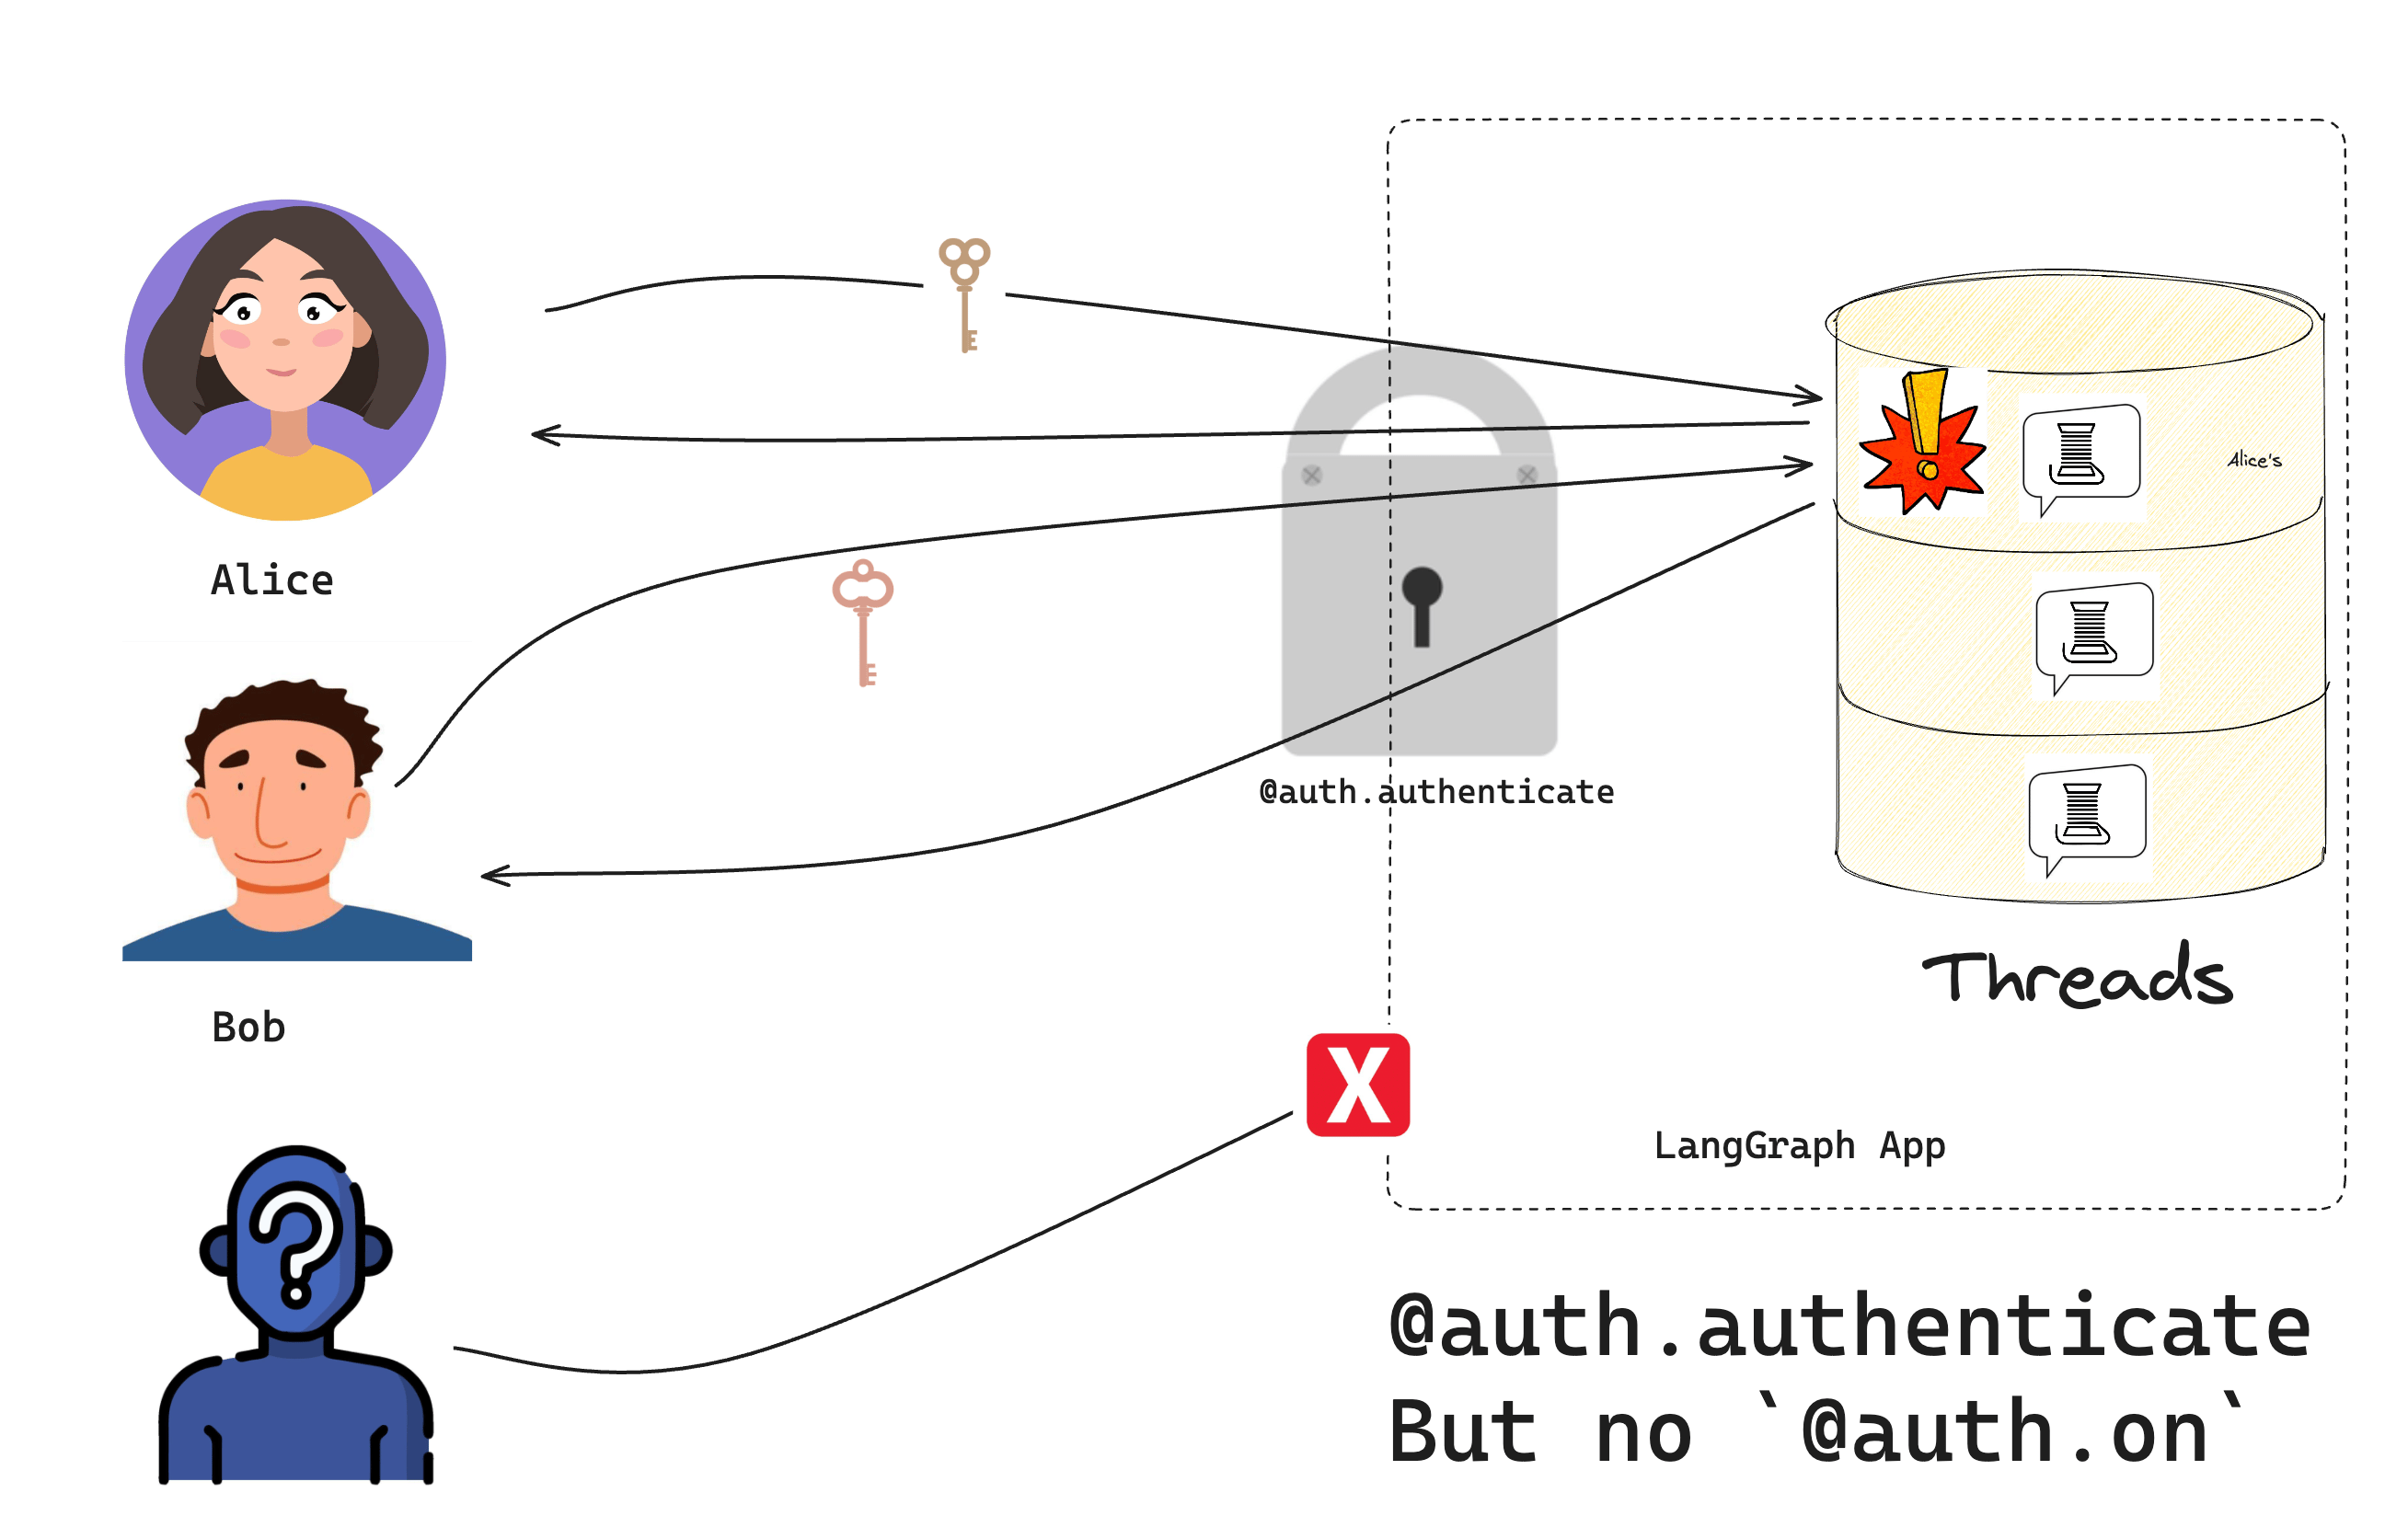
现在,你应该只有在请求头部提供有效令牌时才能访问机器人。然而,在下一部分教程中添加 [资源授权处理程序](/langsmith/auth#resource-specific-handlers) 之前,用户仍然能够访问彼此的资源。
## 2. 添加身份验证
现在你有了一个基础的 LangGraph 应用,接下来为其添加身份验证。
在本教程中,你将从一个硬编码的令牌开始,用于示例目的。在第三个教程中,你将实现一个“生产就绪”的身份验证方案。
[Auth](https://reference.langchain.com/python/langgraph-sdk/auth/Auth) 对象允许你注册一个身份验证函数,LangSmith 部署将在每个请求上运行此函数。该函数接收每个请求并决定是接受还是拒绝。
创建一个新文件 `src/security/auth.py`。你的代码将放在这里,用于检查用户是否被允许访问你的机器人:
```python {highlight={10,15-16}} title="src/security/auth.py" theme={"theme":{"light":"catppuccin-latte","dark":"catppuccin-mocha"}}
from langgraph_sdk import Auth
# 这是我们模拟的用户数据库。生产环境中请勿这样做
VALID_TOKENS = {
"user1-token": {"id": "user1", "name": "Alice"},
"user2-token": {"id": "user2", "name": "Bob"},
}
# "Auth" 对象是一个容器,LangGraph 将用它来标记我们的身份验证函数
auth = Auth()
# `authenticate` 装饰器告诉 LangGraph 将此函数作为中间件调用
# 用于每个请求。这将决定请求是否被允许
@auth.authenticate
async def get_current_user(authorization: str | None) -> Auth.types.MinimalUserDict:
"""检查用户的令牌是否有效。"""
assert authorization
scheme, token = authorization.split()
assert scheme.lower() == "bearer"
# 检查令牌是否有效
if token not in VALID_TOKENS:
raise Auth.exceptions.HTTPException(status_code=401, detail="Invalid token")
# 如果有效则返回用户信息
user_data = VALID_TOKENS[token]
return {
"identity": user_data["id"],
}
```
请注意,你的 [Auth.authenticate](https://reference.langchain.com/python/langgraph-sdk/auth/Auth/authenticate) 处理程序做了两件重要的事情:
1. 检查请求的 [Authorization 头部](https://developer.mozilla.org/en-US/docs/Web/HTTP/Headers/Authorization) 中是否提供了有效令牌
2. 返回用户的 [MinimalUserDict](https://reference.langchain.com/python/langgraph-sdk/auth/types/MinimalUserDict)
现在,通过将以下内容添加到 [langgraph.json](https://reference.langchain.com/python/cloud/reference/cli/#configuration-file) 配置中,告诉 LangGraph 使用身份验证:
```json {highlight={7-9}} title="langgraph.json" theme={"theme":{"light":"catppuccin-latte","dark":"catppuccin-mocha"}}
{
"dependencies": ["."],
"graphs": {
"agent": "./src/agent/graph.py:graph"
},
"env": ".env",
"auth": {
"path": "src/security/auth.py:auth"
}
}
```
## 3. 测试你的机器人
再次启动服务器以测试所有功能:
```bash theme={"theme":{"light":"catppuccin-latte","dark":"catppuccin-mocha"}}
langgraph dev --no-browser
```
如果你没有添加 `--no-browser`,Studio UI 将在浏览器中打开。默认情况下,即使使用自定义身份验证,我们也允许从 Studio 访问。这使得在 Studio 中开发和测试你的机器人更加容易。你可以通过在身份验证配置中设置 `disable_studio_auth: true` 来移除此替代身份验证选项:
```json theme={"theme":{"light":"catppuccin-latte","dark":"catppuccin-mocha"}}
{
"auth": {
"path": "src/security/auth.py:auth",
"disable_studio_auth": true
}
}
```
## 4. 与你的机器人聊天
现在,你应该只有在请求头部提供有效令牌时才能访问机器人。然而,在下一部分教程中添加 [资源授权处理程序](/langsmith/auth#resource-specific-handlers) 之前,用户仍然能够访问彼此的资源。
 在文件或笔记本中运行以下代码:
```python theme={"theme":{"light":"catppuccin-latte","dark":"catppuccin-mocha"}}
from langgraph_sdk import get_client
# 尝试不使用令牌(应该失败)
client = get_client(url="http://localhost:2024")
try:
thread = await client.threads.create()
print("❌ 没有令牌时本应失败!")
except Exception as e:
print("✅ 正确阻止了访问:", e)
# 尝试使用有效令牌
client = get_client(
url="http://localhost:2024", headers={"Authorization": "Bearer user1-token"}
)
# 创建线程并聊天
thread = await client.threads.create()
print(f"✅ 以 Alice 身份创建了线程:{thread['thread_id']}")
response = await client.runs.create(
thread_id=thread["thread_id"],
assistant_id="agent",
input={"messages": [{"role": "user", "content": "Hello!"}]},
)
print("✅ 机器人响应:")
print(response)
```
你应该看到:
1. 没有有效令牌,我们无法访问机器人
2. 使用有效令牌,我们可以创建线程并聊天
恭喜!你已经构建了一个只允许“已认证”用户访问的聊天机器人。虽然这个系统(还)没有实现生产就绪的安全方案,但我们已经学习了如何控制对机器人访问的基本机制。在下一个教程中,我们将学习如何为每个用户提供他们自己的私有对话。
## 后续步骤
现在你可以控制谁可以访问你的机器人,你可能想要:
1. 继续教程,前往 [使对话私有化](/langsmith/resource-auth) 以了解资源授权。
2. 阅读更多关于 [身份验证概念](/langsmith/auth) 的内容。
3. 查看 [Auth](https://reference.langchain.com/python/langgraph-sdk/auth/Auth)、[Auth.authenticate](https://reference.langchain.com/python/langgraph-sdk/auth/Auth/authenticate) 和 [MinimalUserDict](https://reference.langchain.com/python/langgraph-sdk/auth/types/MinimalUserDict) 的 API 参考以获取更多身份验证细节。
***
在文件或笔记本中运行以下代码:
```python theme={"theme":{"light":"catppuccin-latte","dark":"catppuccin-mocha"}}
from langgraph_sdk import get_client
# 尝试不使用令牌(应该失败)
client = get_client(url="http://localhost:2024")
try:
thread = await client.threads.create()
print("❌ 没有令牌时本应失败!")
except Exception as e:
print("✅ 正确阻止了访问:", e)
# 尝试使用有效令牌
client = get_client(
url="http://localhost:2024", headers={"Authorization": "Bearer user1-token"}
)
# 创建线程并聊天
thread = await client.threads.create()
print(f"✅ 以 Alice 身份创建了线程:{thread['thread_id']}")
response = await client.runs.create(
thread_id=thread["thread_id"],
assistant_id="agent",
input={"messages": [{"role": "user", "content": "Hello!"}]},
)
print("✅ 机器人响应:")
print(response)
```
你应该看到:
1. 没有有效令牌,我们无法访问机器人
2. 使用有效令牌,我们可以创建线程并聊天
恭喜!你已经构建了一个只允许“已认证”用户访问的聊天机器人。虽然这个系统(还)没有实现生产就绪的安全方案,但我们已经学习了如何控制对机器人访问的基本机制。在下一个教程中,我们将学习如何为每个用户提供他们自己的私有对话。
## 后续步骤
现在你可以控制谁可以访问你的机器人,你可能想要:
1. 继续教程,前往 [使对话私有化](/langsmith/resource-auth) 以了解资源授权。
2. 阅读更多关于 [身份验证概念](/langsmith/auth) 的内容。
3. 查看 [Auth](https://reference.langchain.com/python/langgraph-sdk/auth/Auth)、[Auth.authenticate](https://reference.langchain.com/python/langgraph-sdk/auth/Auth/authenticate) 和 [MinimalUserDict](https://reference.langchain.com/python/langgraph-sdk/auth/types/MinimalUserDict) 的 API 参考以获取更多身份验证细节。
***
[Edit this page on GitHub](https://github.com/langchain-ai/docs/edit/main/src/i18n\zh-CN\langsmith\set-up-custom-auth.mdx) or [file an issue](https://github.com/langchain-ai/docs/issues/new/choose).
[Connect these docs](/use-these-docs) to Claude, VSCode, and more via MCP for real-time answers.