> ## Documentation Index
> Fetch the complete documentation index at: https://langchain-zh.cn/llms.txt
> Use this file to discover all available pages before exploring further.
# 为规则配置 Webhook 通知
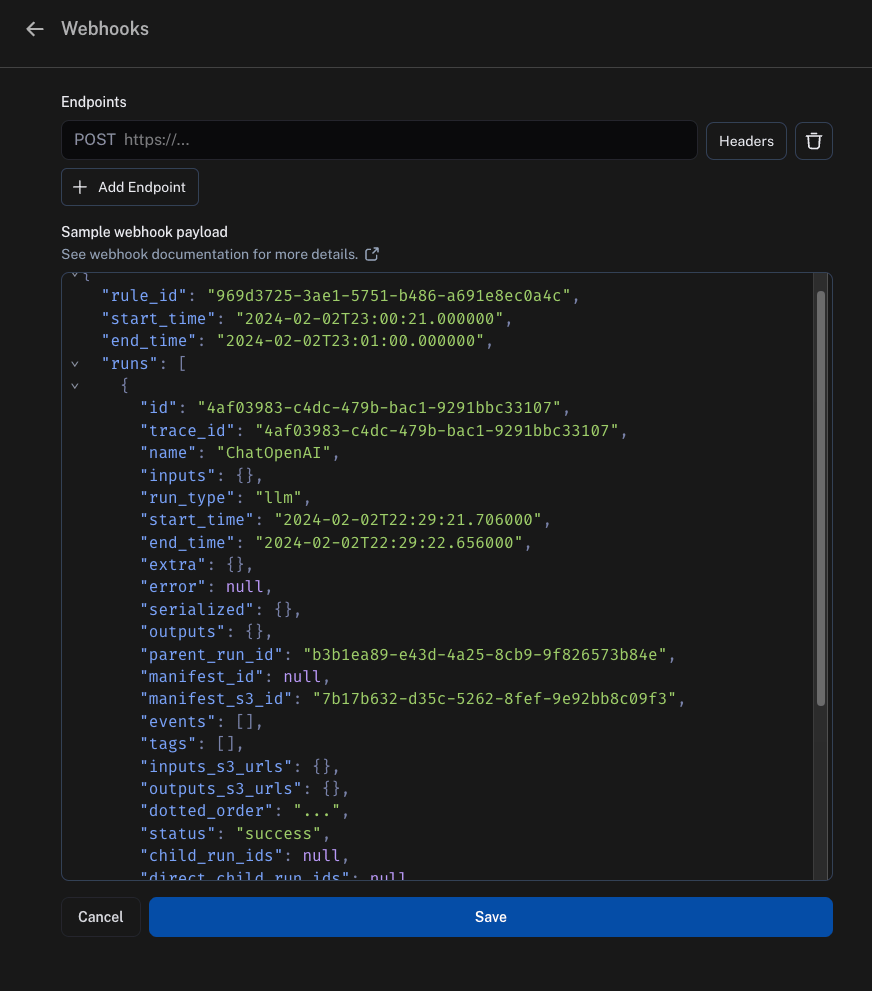
当您在自动化操作中添加 Webhook URL 后,每当您定义的规则匹配到任何新运行时,我们将向您的 Webhook 端点发送 POST 请求。
 ## Webhook 负载
我们发送到您的 Webhook 端点的负载包含:
* `"rule_id"`:这是触发此负载的自动化规则的 ID
* `"start_time"` 和 `"end_time"`:这是我们找到匹配运行的时间范围
* `"runs"`:这是一个运行数组,其中每个运行都是一个字典。如果您需要每个运行的更多信息,我们建议在您的端点中使用我们的 SDK 从 API 获取。
* `"feedback_stats"`:这是一个包含运行反馈统计信息的字典。该字段的示例负载如下所示。
```json theme={"theme":{"light":"catppuccin-latte","dark":"catppuccin-mocha"}}
"feedback_stats": {
"about_langchain": {
"n": 1,
"avg": 0.0,
"show_feedback_arrow": true,
"values": {}
},
"category": {
"n": 0,
"avg": null,
"show_feedback_arrow": true,
"values": {
"CONCEPTUAL": 1
}
},
"user_score": {
"n": 2,
"avg": 0.0,
"show_feedback_arrow": false,
"values": {}
},
"vagueness": {
"n": 1,
"avg": 0.0,
"show_feedback_arrow": true,
"values": {}
}
}
```
**从 S3 URL 获取数据**
根据您运行的新旧程度,`inputs_s3_urls` 和 `outputs_s3_urls` 字段可能包含指向实际数据的 S3 URL,而不是数据本身。
可以通过 `inputs_s3_urls` 和 `outputs_s3_urls` 中分别提供的 `ROOT.presigned_url` 来获取 `inputs` 和 `outputs`。
这是我们发送到您的 Webhook 端点的完整负载示例:
```json theme={"theme":{"light":"catppuccin-latte","dark":"catppuccin-mocha"}}
{
"rule_id": "d75d7417-0c57-4655-88fe-1db3cda3a47a",
"start_time": "2024-04-05T01:28:54.734491+00:00",
"end_time": "2024-04-05T01:28:56.492563+00:00",
"runs": [
{
"status": "success",
"is_root": true,
"trace_id": "6ab80f10-d79c-4fa2-b441-922ed6feb630",
"dotted_order": "20230505T051324571809Z6ab80f10-d79c-4fa2-b441-922ed6feb630",
"run_type": "tool",
"modified_at": "2024-04-05T01:28:54.145062",
"tenant_id": "2ebda79f-2946-4491-a9ad-d642f49e0815",
"end_time": "2024-04-05T01:28:54.085649",
"name": "Search",
"start_time": "2024-04-05T01:28:54.085646",
"id": "6ab80f10-d79c-4fa2-b441-922ed6feb630",
"session_id": "6a3be6a2-9a8c-4fc8-b4c6-a8983b286cc5",
"parent_run_ids": [],
"child_run_ids": null,
"direct_child_run_ids": null,
"total_tokens": 0,
"completion_tokens": 0,
"prompt_tokens": 0,
"total_cost": null,
"completion_cost": null,
"prompt_cost": null,
"first_token_time": null,
"app_path": "/o/2ebda79f-2946-4491-a9ad-d642f49e0815/projects/p/6a3be6a2-9a8c-4fc8-b4c6-a8983b286cc5/r/6ab80f10-d79c-4fa2-b441-922ed6feb630?trace_id=6ab80f10-d79c-4fa2-b441-922ed6feb630&start_time=2023-05-05T05:13:24.571809",
"in_dataset": false,
"last_queued_at": null,
"inputs": null,
"inputs_s3_urls": null,
"outputs": null,
"outputs_s3_urls": null,
"extra": null,
"events": null,
"feedback_stats": null,
"serialized": null,
"share_token": null
}
]
}
```
## 安全性
我们强烈建议您在 Webhook URL 中添加一个秘密查询字符串参数,并在任何传入请求中验证它。这确保了如果有人发现了您的 Webhook URL,您可以区分这些调用与真实的 Webhook 通知。
一个示例如下:
```
https://api.example.com/langsmith_webhook?secret=38ee77617c3a489ab6e871fbeb2ec87d
```
### Webhook 自定义 HTTP 头
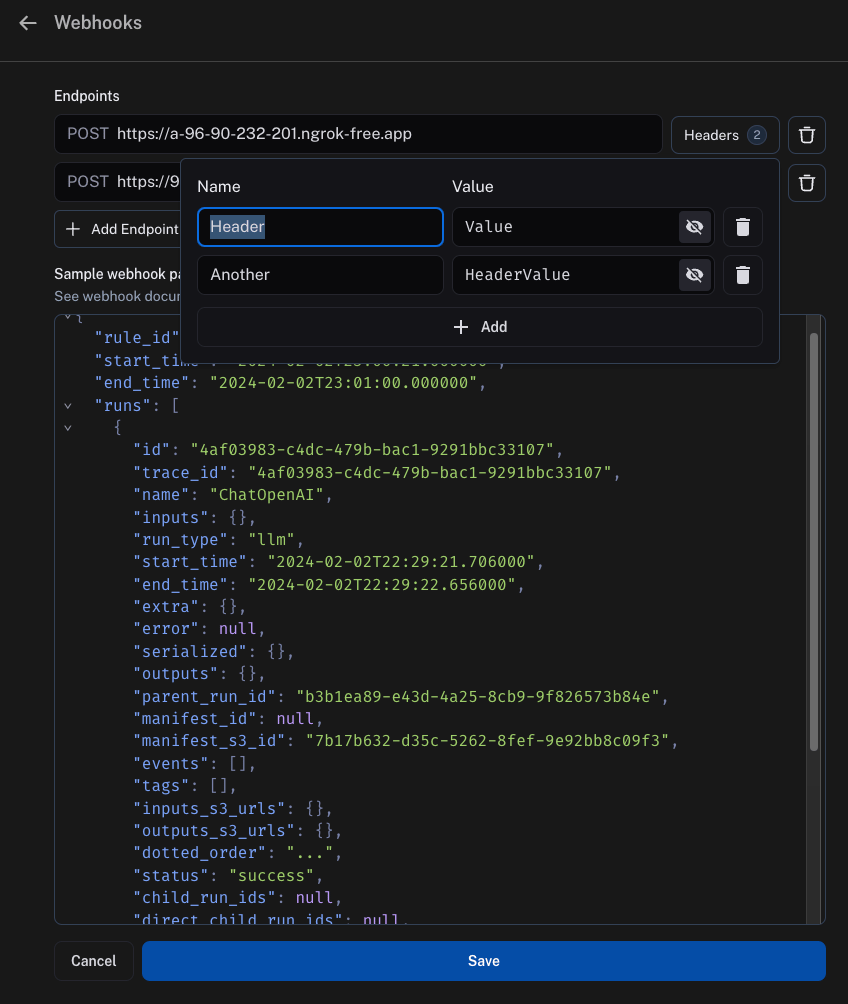
如果您希望随 Webhook 发送任何特定的头部信息,可以按 URL 进行配置。要进行设置,请点击 URL 字段旁边的 `Headers` 选项并添加您的头部。
头部信息以加密格式存储。
## Webhook 负载
我们发送到您的 Webhook 端点的负载包含:
* `"rule_id"`:这是触发此负载的自动化规则的 ID
* `"start_time"` 和 `"end_time"`:这是我们找到匹配运行的时间范围
* `"runs"`:这是一个运行数组,其中每个运行都是一个字典。如果您需要每个运行的更多信息,我们建议在您的端点中使用我们的 SDK 从 API 获取。
* `"feedback_stats"`:这是一个包含运行反馈统计信息的字典。该字段的示例负载如下所示。
```json theme={"theme":{"light":"catppuccin-latte","dark":"catppuccin-mocha"}}
"feedback_stats": {
"about_langchain": {
"n": 1,
"avg": 0.0,
"show_feedback_arrow": true,
"values": {}
},
"category": {
"n": 0,
"avg": null,
"show_feedback_arrow": true,
"values": {
"CONCEPTUAL": 1
}
},
"user_score": {
"n": 2,
"avg": 0.0,
"show_feedback_arrow": false,
"values": {}
},
"vagueness": {
"n": 1,
"avg": 0.0,
"show_feedback_arrow": true,
"values": {}
}
}
```
**从 S3 URL 获取数据**
根据您运行的新旧程度,`inputs_s3_urls` 和 `outputs_s3_urls` 字段可能包含指向实际数据的 S3 URL,而不是数据本身。
可以通过 `inputs_s3_urls` 和 `outputs_s3_urls` 中分别提供的 `ROOT.presigned_url` 来获取 `inputs` 和 `outputs`。
这是我们发送到您的 Webhook 端点的完整负载示例:
```json theme={"theme":{"light":"catppuccin-latte","dark":"catppuccin-mocha"}}
{
"rule_id": "d75d7417-0c57-4655-88fe-1db3cda3a47a",
"start_time": "2024-04-05T01:28:54.734491+00:00",
"end_time": "2024-04-05T01:28:56.492563+00:00",
"runs": [
{
"status": "success",
"is_root": true,
"trace_id": "6ab80f10-d79c-4fa2-b441-922ed6feb630",
"dotted_order": "20230505T051324571809Z6ab80f10-d79c-4fa2-b441-922ed6feb630",
"run_type": "tool",
"modified_at": "2024-04-05T01:28:54.145062",
"tenant_id": "2ebda79f-2946-4491-a9ad-d642f49e0815",
"end_time": "2024-04-05T01:28:54.085649",
"name": "Search",
"start_time": "2024-04-05T01:28:54.085646",
"id": "6ab80f10-d79c-4fa2-b441-922ed6feb630",
"session_id": "6a3be6a2-9a8c-4fc8-b4c6-a8983b286cc5",
"parent_run_ids": [],
"child_run_ids": null,
"direct_child_run_ids": null,
"total_tokens": 0,
"completion_tokens": 0,
"prompt_tokens": 0,
"total_cost": null,
"completion_cost": null,
"prompt_cost": null,
"first_token_time": null,
"app_path": "/o/2ebda79f-2946-4491-a9ad-d642f49e0815/projects/p/6a3be6a2-9a8c-4fc8-b4c6-a8983b286cc5/r/6ab80f10-d79c-4fa2-b441-922ed6feb630?trace_id=6ab80f10-d79c-4fa2-b441-922ed6feb630&start_time=2023-05-05T05:13:24.571809",
"in_dataset": false,
"last_queued_at": null,
"inputs": null,
"inputs_s3_urls": null,
"outputs": null,
"outputs_s3_urls": null,
"extra": null,
"events": null,
"feedback_stats": null,
"serialized": null,
"share_token": null
}
]
}
```
## 安全性
我们强烈建议您在 Webhook URL 中添加一个秘密查询字符串参数,并在任何传入请求中验证它。这确保了如果有人发现了您的 Webhook URL,您可以区分这些调用与真实的 Webhook 通知。
一个示例如下:
```
https://api.example.com/langsmith_webhook?secret=38ee77617c3a489ab6e871fbeb2ec87d
```
### Webhook 自定义 HTTP 头
如果您希望随 Webhook 发送任何特定的头部信息,可以按 URL 进行配置。要进行设置,请点击 URL 字段旁边的 `Headers` 选项并添加您的头部。
头部信息以加密格式存储。
 ### Webhook 投递
在向您的 Webhook 端点投递事件时,我们遵循以下准则:
* 如果无法连接到您的端点,我们会重试传输连接最多 2 次,然后宣布投递失败。
* 如果您的端点响应时间超过 5 秒,我们将宣布投递失败,并且不会重试。
* 如果您的端点在 5 秒内返回 5xx 状态码,我们会重试最多 2 次,并采用指数退避策略。
* 如果您的端点返回 4xx 状态码,我们将宣布投递失败,并且不会重试。
* 您的端点返回的响应体内容将被忽略。
## Modal 示例
### 设置
关于如何设置此功能的示例,我们将使用 [Modal](https://modal.com/)。Modal 为推理和微调提供自动扩展的 GPU,为代码代理提供安全的容器化环境,以及无服务器 Python Web 端点。这里我们将重点介绍 Web 端点。
首先,创建一个 Modal 账户。然后,在本地安装 Modal SDK:
```bash pip theme={"theme":{"light":"catppuccin-latte","dark":"catppuccin-mocha"}}
pip install modal
```
```bash uv theme={"theme":{"light":"catppuccin-latte","dark":"catppuccin-mocha"}}
uv add modal
```
要完成账户设置,请运行命令:
```shell theme={"theme":{"light":"catppuccin-latte","dark":"catppuccin-mocha"}}
modal setup
```
并按照说明操作。
### 密钥
接下来,您需要在 Modal 中设置一些密钥。
首先,LangSmith 需要通过传入一个密钥来向 Modal 进行身份验证。
最简单的方法是在查询参数中传递一个密钥。
为了验证此密钥,我们需要在 *Modal* 中添加一个密钥进行验证。
我们将通过 [创建 Modal 密钥](https://modal.com/docs/guide/secrets) 来实现。
为此,让我们将我们的密钥命名为 `ls-webhook`,并设置一个名为 `LS_WEBHOOK` 的环境变量。
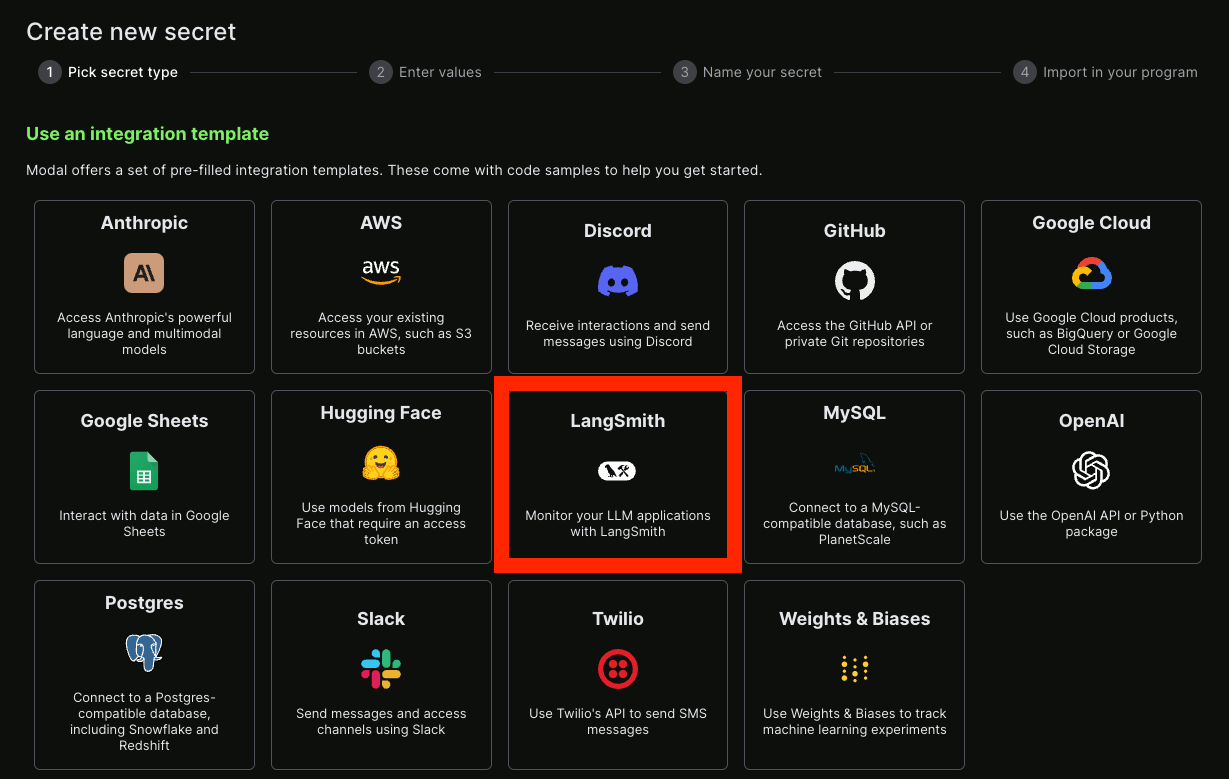
我们还可以设置一个 LangSmith 密钥——幸运的是,已经有一个集成模板了!
### Webhook 投递
在向您的 Webhook 端点投递事件时,我们遵循以下准则:
* 如果无法连接到您的端点,我们会重试传输连接最多 2 次,然后宣布投递失败。
* 如果您的端点响应时间超过 5 秒,我们将宣布投递失败,并且不会重试。
* 如果您的端点在 5 秒内返回 5xx 状态码,我们会重试最多 2 次,并采用指数退避策略。
* 如果您的端点返回 4xx 状态码,我们将宣布投递失败,并且不会重试。
* 您的端点返回的响应体内容将被忽略。
## Modal 示例
### 设置
关于如何设置此功能的示例,我们将使用 [Modal](https://modal.com/)。Modal 为推理和微调提供自动扩展的 GPU,为代码代理提供安全的容器化环境,以及无服务器 Python Web 端点。这里我们将重点介绍 Web 端点。
首先,创建一个 Modal 账户。然后,在本地安装 Modal SDK:
```bash pip theme={"theme":{"light":"catppuccin-latte","dark":"catppuccin-mocha"}}
pip install modal
```
```bash uv theme={"theme":{"light":"catppuccin-latte","dark":"catppuccin-mocha"}}
uv add modal
```
要完成账户设置,请运行命令:
```shell theme={"theme":{"light":"catppuccin-latte","dark":"catppuccin-mocha"}}
modal setup
```
并按照说明操作。
### 密钥
接下来,您需要在 Modal 中设置一些密钥。
首先,LangSmith 需要通过传入一个密钥来向 Modal 进行身份验证。
最简单的方法是在查询参数中传递一个密钥。
为了验证此密钥,我们需要在 *Modal* 中添加一个密钥进行验证。
我们将通过 [创建 Modal 密钥](https://modal.com/docs/guide/secrets) 来实现。
为此,让我们将我们的密钥命名为 `ls-webhook`,并设置一个名为 `LS_WEBHOOK` 的环境变量。
我们还可以设置一个 LangSmith 密钥——幸运的是,已经有一个集成模板了!
 ### 服务
之后,您可以创建一个 Python 文件作为您的端点。
下面是一个示例,附有解释说明:
```python theme={"theme":{"light":"catppuccin-latte","dark":"catppuccin-mocha"}}
from fastapi import HTTPException, status, Request, Query
from modal import Secret, Stub, web_endpoint, Image
stub = Stub("auth-example", image=Image.debian_slim().pip_install("langsmith"))
@stub.function(
secrets=[Secret.from_name("ls-webhook"), Secret.from_name("my-langsmith-secret")]
)
# 我们希望这是一个 `POST` 端点,因为我们将在此处发布数据
@web_endpoint(method="POST")
# 我们设置一个 `secret` 查询参数
def f(data: dict, secret: str = Query(...)):
# 您可以在 Modal 函数内部导入本地没有的依赖项
from langsmith import Client
# 首先,验证我们传递的密钥
import os
if secret != os.environ["LS_WEBHOOK"]:
raise HTTPException(
status_code=status.HTTP_401_UNAUTHORIZED,
detail="Incorrect bearer token",
headers={"WWW-Authenticate": "Bearer"},
)
# 这里是我们放置 Webhook 内部逻辑的地方
ls_client = Client()
runs = data["runs"]
ids = [r["id"] for r in runs]
feedback = list(ls_client.list_feedback(run_ids=ids))
for r, f in zip(runs, feedback):
try:
ls_client.create_example(
inputs=r["inputs"],
outputs={"output": f.correction},
dataset_name="classifier-github-issues",
)
except Exception:
raise ValueError(f"{r} and {f}")
# 函数体
return "success!"
```
现在我们可以使用 `modal deploy ...` 轻松部署此代码(参见 [管理 Modal 部署](https://modal.com/docs/guide/managing-deployments))。
您现在应该会看到类似以下内容:
```
✓ Created objects.
├── 🔨 Created mount /Users/harrisonchase/workplace/langsmith-docs/example-webhook.py
├── 🔨 Created mount PythonPackage:langsmith
└── 🔨 Created f => https://hwchase17--auth-example-f.modal.run
✓ App deployed! 🎉
View Deployment: https://modal.com/apps/hwchase17/auth-example
```
需要记住的重要信息是 `https://hwchase17--auth-example-f.modal.run` —— 我们创建的运行函数。
注意:这不是最终的部署 URL,请确保不要误用。
### 连接
现在我们可以将上面创建的函数 URL 添加为 Webhook。
我们必须记住还要将密钥作为查询参数传递。
将所有内容组合起来,它应该看起来像:
```
https://hwchase17--auth-example-f-dev.modal.run?secret={SECRET}
```
将 `{SECRET}` 替换为您创建的用于访问 Modal 服务的密钥。
***
### 服务
之后,您可以创建一个 Python 文件作为您的端点。
下面是一个示例,附有解释说明:
```python theme={"theme":{"light":"catppuccin-latte","dark":"catppuccin-mocha"}}
from fastapi import HTTPException, status, Request, Query
from modal import Secret, Stub, web_endpoint, Image
stub = Stub("auth-example", image=Image.debian_slim().pip_install("langsmith"))
@stub.function(
secrets=[Secret.from_name("ls-webhook"), Secret.from_name("my-langsmith-secret")]
)
# 我们希望这是一个 `POST` 端点,因为我们将在此处发布数据
@web_endpoint(method="POST")
# 我们设置一个 `secret` 查询参数
def f(data: dict, secret: str = Query(...)):
# 您可以在 Modal 函数内部导入本地没有的依赖项
from langsmith import Client
# 首先,验证我们传递的密钥
import os
if secret != os.environ["LS_WEBHOOK"]:
raise HTTPException(
status_code=status.HTTP_401_UNAUTHORIZED,
detail="Incorrect bearer token",
headers={"WWW-Authenticate": "Bearer"},
)
# 这里是我们放置 Webhook 内部逻辑的地方
ls_client = Client()
runs = data["runs"]
ids = [r["id"] for r in runs]
feedback = list(ls_client.list_feedback(run_ids=ids))
for r, f in zip(runs, feedback):
try:
ls_client.create_example(
inputs=r["inputs"],
outputs={"output": f.correction},
dataset_name="classifier-github-issues",
)
except Exception:
raise ValueError(f"{r} and {f}")
# 函数体
return "success!"
```
现在我们可以使用 `modal deploy ...` 轻松部署此代码(参见 [管理 Modal 部署](https://modal.com/docs/guide/managing-deployments))。
您现在应该会看到类似以下内容:
```
✓ Created objects.
├── 🔨 Created mount /Users/harrisonchase/workplace/langsmith-docs/example-webhook.py
├── 🔨 Created mount PythonPackage:langsmith
└── 🔨 Created f => https://hwchase17--auth-example-f.modal.run
✓ App deployed! 🎉
View Deployment: https://modal.com/apps/hwchase17/auth-example
```
需要记住的重要信息是 `https://hwchase17--auth-example-f.modal.run` —— 我们创建的运行函数。
注意:这不是最终的部署 URL,请确保不要误用。
### 连接
现在我们可以将上面创建的函数 URL 添加为 Webhook。
我们必须记住还要将密钥作为查询参数传递。
将所有内容组合起来,它应该看起来像:
```
https://hwchase17--auth-example-f-dev.modal.run?secret={SECRET}
```
将 `{SECRET}` 替换为您创建的用于访问 Modal 服务的密钥。
***
[Edit this page on GitHub](https://github.com/langchain-ai/docs/edit/main/src/i18n\zh-CN\langsmith\webhooks.mdx) or [file an issue](https://github.com/langchain-ai/docs/issues/new/choose).
[Connect these docs](/use-these-docs) to Claude, VSCode, and more via MCP for real-time answers.