> ## Documentation Index
> Fetch the complete documentation index at: https://langchain-zh.cn/llms.txt
> Use this file to discover all available pages before exploring further.
# LangSmith Studio
在本地使用 LangChain 构建智能体时,可视化智能体内部发生的情况、实时与其交互并在问题出现时进行调试非常有帮助。**LangSmith Studio** 是一个免费的可视化界面,用于从您的本地机器开发和测试 LangChain 智能体。
Studio 连接到您本地运行的智能体,向您展示智能体执行的每一步:发送给模型的提示、工具调用及其结果,以及最终输出。您可以测试不同的输入,检查中间状态,并在无需额外代码或部署的情况下迭代智能体的行为。
本文档介绍了如何为您的本地 LangChain 智能体设置 Studio。
## 前置条件
开始之前,请确保您拥有以下内容:
* **一个 LangSmith 账户**:在 [smith.langchain.com](https://smith.langchain.com) 注册(免费)或登录。
* **一个 LangSmith API 密钥**:遵循 [创建 API 密钥](/langsmith/create-account-api-key#create-an-api-key) 指南。
* 如果您不希望数据被 [追踪](/langsmith/observability-concepts#traces) 到 LangSmith,请在应用程序的 `.env` 文件中设置 `LANGSMITH_TRACING=false`。禁用追踪后,没有数据会离开您的本地服务器。
## 设置本地 Agent 服务器
### 1. 安装 LangGraph CLI
[LangGraph CLI](/langsmith/cli) 提供了一个本地开发服务器(也称为 [Agent Server](/langsmith/agent-server)),它将您的智能体连接到 Studio。
```shell theme={"theme":{"light":"catppuccin-latte","dark":"catppuccin-mocha"}}
# Python >= 3.11 is required.
pip install --upgrade "langgraph-cli[inmem]"
```
### 2. 准备您的智能体
如果您已经有 LangChain 智能体,可以直接使用它。此示例使用一个简单的邮件智能体:
```python title="agent.py" theme={"theme":{"light":"catppuccin-latte","dark":"catppuccin-mocha"}}
from langchain.agents import create_agent
def send_email(to: str, subject: str, body: str):
"""Send an email"""
email = {
"to": to,
"subject": subject,
"body": body
}
# ... email sending logic
return f"Email sent to {to}"
agent = create_agent(
"gpt-5.2",
tools=[send_email],
system_prompt="You are an email assistant. Always use the send_email tool.",
)
```
### 3. 环境变量
Studio 需要 LangSmith API 密钥来连接您的本地智能体。在项目的根目录创建一个 `.env` 文件,并从 [LangSmith](https://smith.langchain.com/settings) 添加您的 API 密钥。
确保您的 `.env` 文件未提交到版本控制系统,例如 Git。
```bash .env theme={"theme":{"light":"catppuccin-latte","dark":"catppuccin-mocha"}}
LANGSMITH_API_KEY=lsv2...
```
### 4. 创建 LangGraph 配置文件
LangGraph CLI 使用配置文件来定位您的智能体并管理依赖项。在应用的目录中创建一个 `langgraph.json` 文件:
```json title="langgraph.json" theme={"theme":{"light":"catppuccin-latte","dark":"catppuccin-mocha"}}
{
"dependencies": ["."],
"graphs": {
"agent": "./src/agent.py:agent"
},
"env": ".env"
}
```
The [`create_agent`](https://reference.langchain.com/python/langchain/agents/factory/create_agent) function automatically returns a compiled LangGraph graph, which is what the `graphs` key expects in the configuration file.
For detailed explanations of each key in the JSON object of the configuration file, refer to the [LangGraph configuration file reference](/langsmith/cli#configuration-file).
At this point, the project structure will look like this:
```bash theme={"theme":{"light":"catppuccin-latte","dark":"catppuccin-mocha"}}
my-app/
├── src
│ └── agent.py
├── .env
└── langgraph.json
```
### 5. 安装依赖项
从根目录安装您的项目依赖项:
```shell pip theme={"theme":{"light":"catppuccin-latte","dark":"catppuccin-mocha"}}
pip install langchain langchain-openai
```
```shell uv theme={"theme":{"light":"catppuccin-latte","dark":"catppuccin-mocha"}}
uv add langchain langchain-openai
```
### 6. 在 Studio 中查看您的智能体
启动开发服务器以将您的智能体连接到 Studio:
```shell theme={"theme":{"light":"catppuccin-latte","dark":"catppuccin-mocha"}}
langgraph dev
```
Safari 阻止对 Studio 的 `localhost` 连接。要解决此问题,请运行上述命令并加上 `--tunnel` 参数,通过安全隧道访问 Studio。
Once the server is running, your agent is accessible both via API at `http://127.0.0.1:2024` and through the Studio UI at `https://smith.langchain.com/studio/?baseUrl=http://127.0.0.1:2024`:
With Studio connected to your local agent, you can iterate quickly on your agent's behavior. Run a test input, inspect the full execution trace including prompts, tool arguments, return values, and token/latency metrics. When something goes wrong, Studio captures exceptions with the surrounding state to help you understand what happened.
The development server supports hot-reloading—make changes to prompts or tool signatures in your code, and Studio reflects them immediately. Re-run conversation threads from any step to test your changes without starting over. This workflow scales from simple single-tool agents to complex multi-node graphs.
For more information on how to run Studio, refer to the following guides in the [LangSmith docs](/langsmith/home):
* [运行应用程序](/langsmith/use-studio#run-application)
* [管理助手](/langsmith/use-studio#manage-assistants)
* [管理线程](/langsmith/use-studio#manage-threads)
* [迭代提示](/langsmith/observability-studio)
* [调试 LangSmith 跟踪](/langsmith/observability-studio#debug-langsmith-traces)
* [向数据集添加节点](/langsmith/observability-studio#add-node-to-dataset)
## 视频指南
有关本地和已部署代理的更多信息,请参阅[设置本地代理服务器](/oss/python/langchain/studio#set-up-local-agent-server)和[部署](/oss/python/langchain/deploy)。
***
[Edit this page on GitHub](https://github.com/langchain-ai/docs/edit/main/src/i18n\zh-CN\oss\langchain\studio.mdx) or [file an issue](https://github.com/langchain-ai/docs/issues/new/choose).
[Connect these docs](/use-these-docs) to Claude, VSCode, and more via MCP for real-time answers.
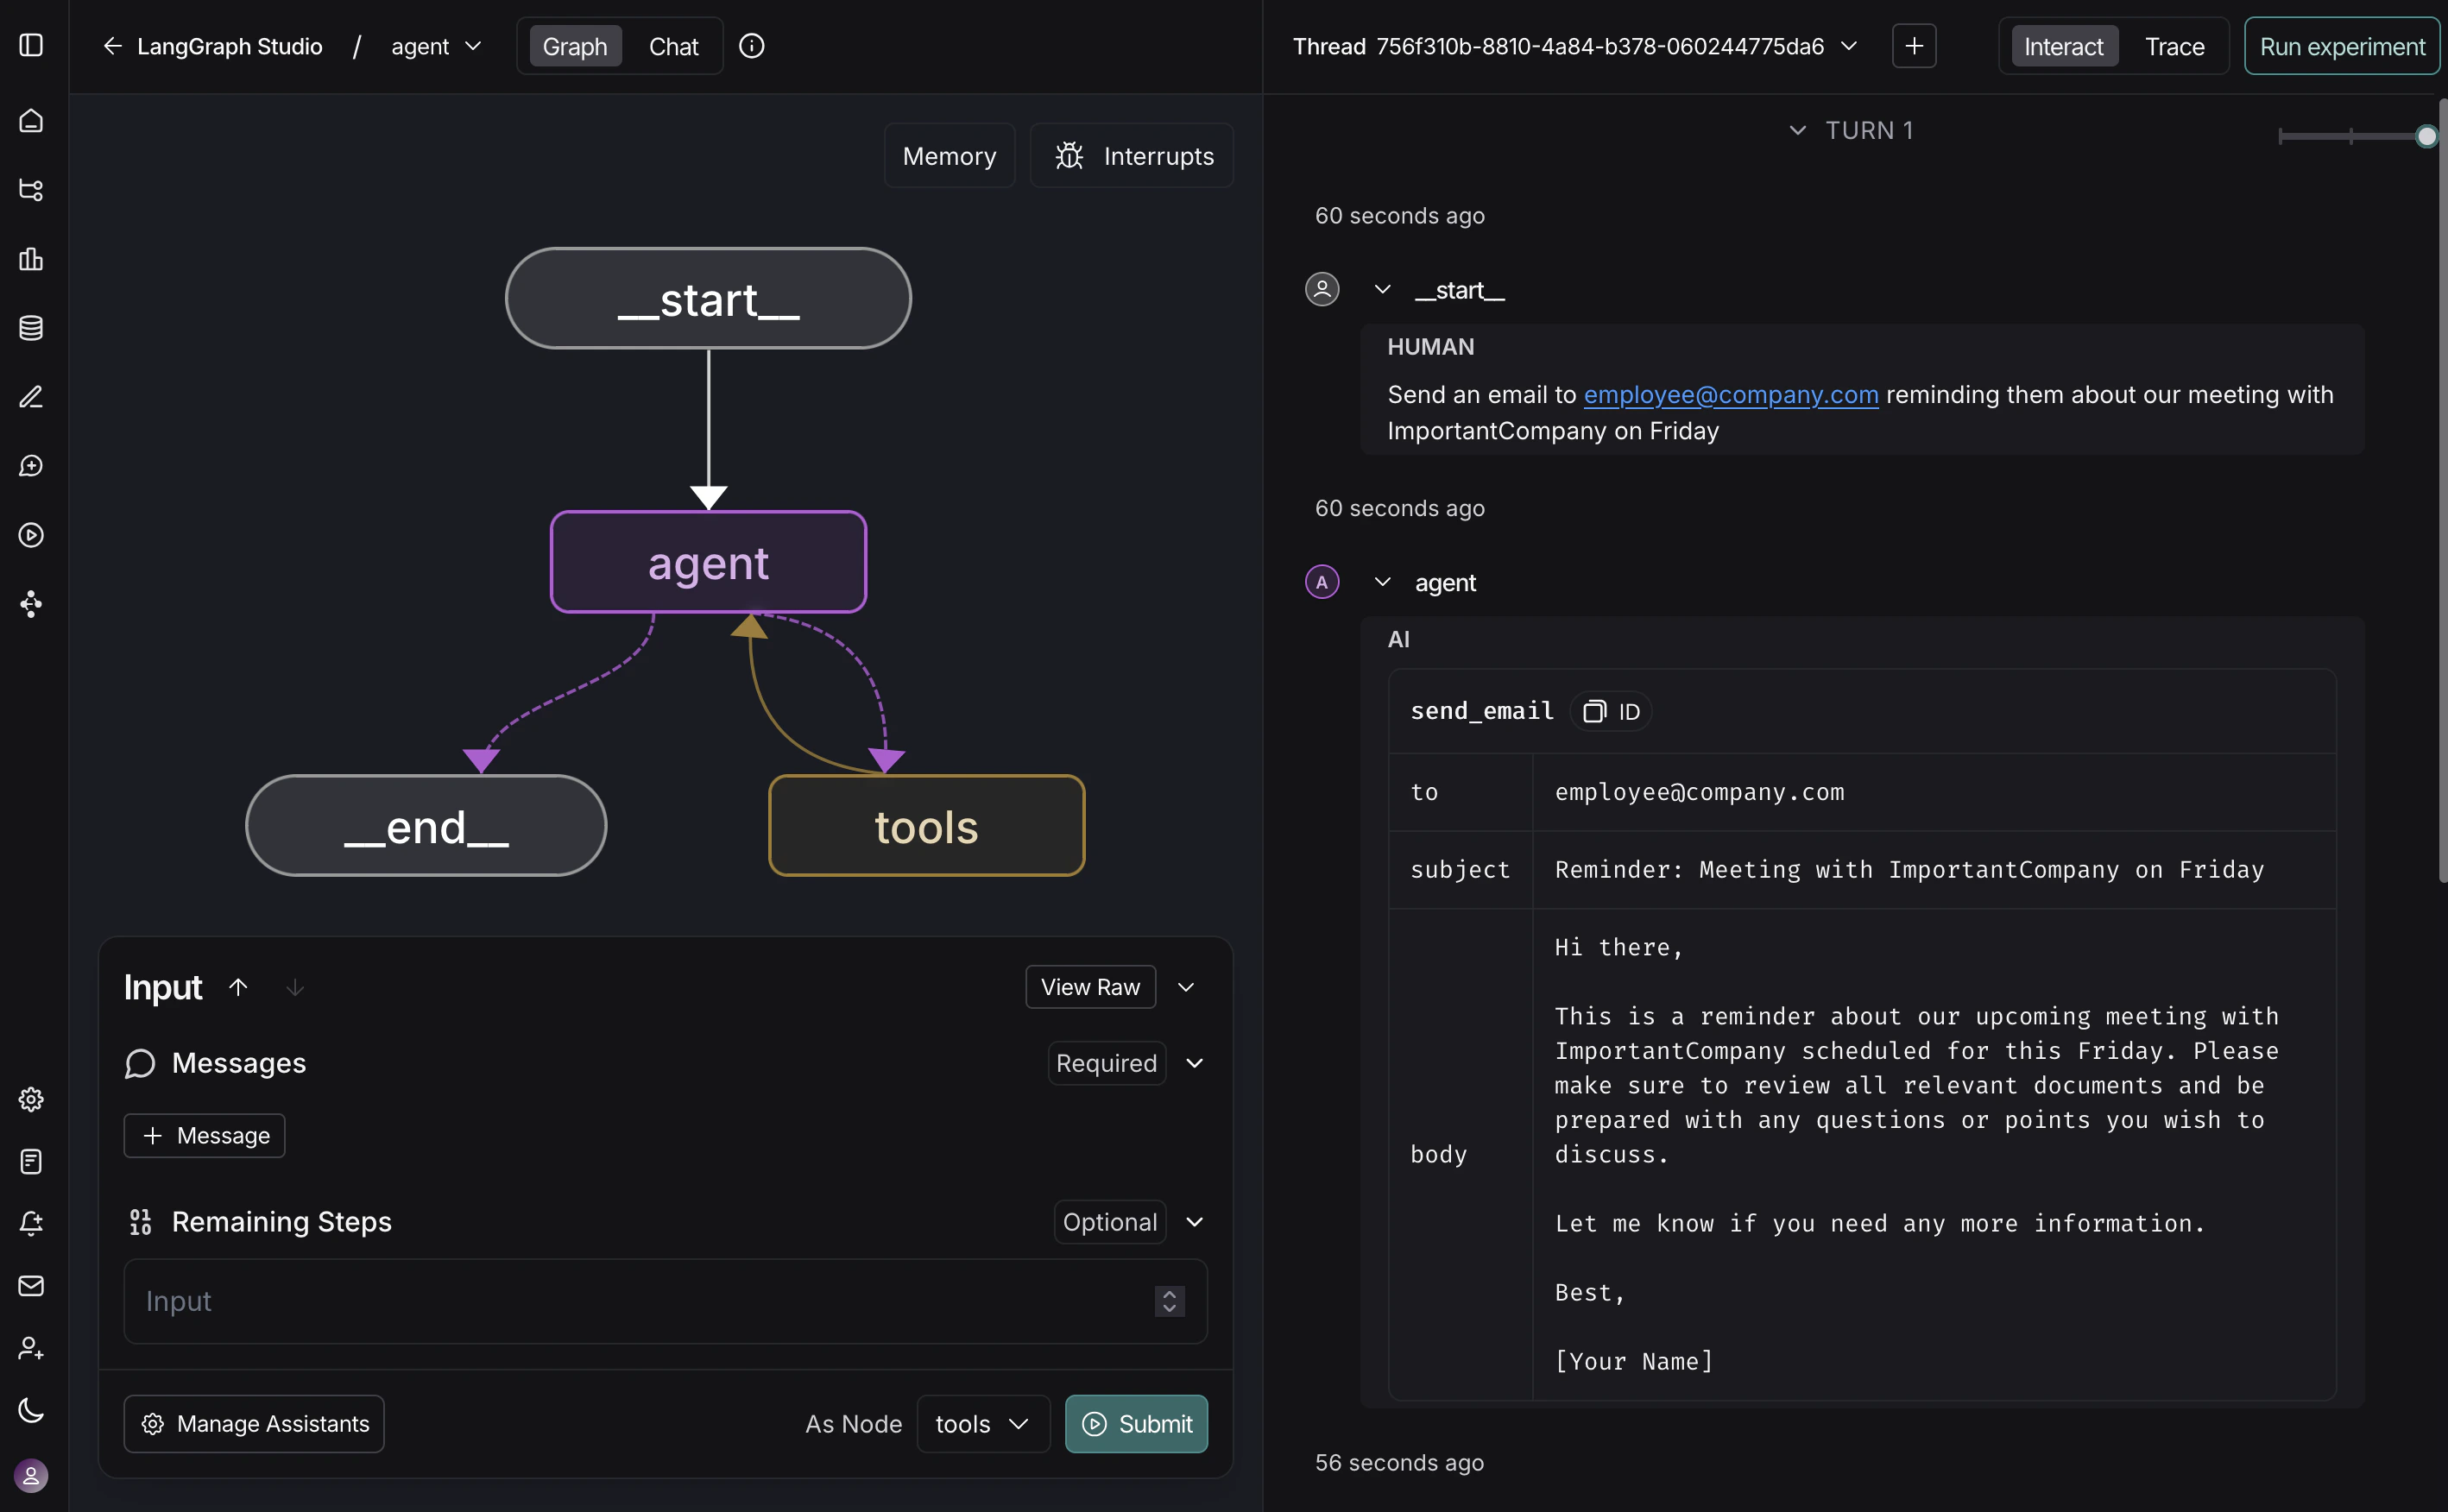 With Studio connected to your local agent, you can iterate quickly on your agent's behavior. Run a test input, inspect the full execution trace including prompts, tool arguments, return values, and token/latency metrics. When something goes wrong, Studio captures exceptions with the surrounding state to help you understand what happened.
The development server supports hot-reloading—make changes to prompts or tool signatures in your code, and Studio reflects them immediately. Re-run conversation threads from any step to test your changes without starting over. This workflow scales from simple single-tool agents to complex multi-node graphs.
For more information on how to run Studio, refer to the following guides in the [LangSmith docs](/langsmith/home):
* [运行应用程序](/langsmith/use-studio#run-application)
* [管理助手](/langsmith/use-studio#manage-assistants)
* [管理线程](/langsmith/use-studio#manage-threads)
* [迭代提示](/langsmith/observability-studio)
* [调试 LangSmith 跟踪](/langsmith/observability-studio#debug-langsmith-traces)
* [向数据集添加节点](/langsmith/observability-studio#add-node-to-dataset)
## 视频指南
With Studio connected to your local agent, you can iterate quickly on your agent's behavior. Run a test input, inspect the full execution trace including prompts, tool arguments, return values, and token/latency metrics. When something goes wrong, Studio captures exceptions with the surrounding state to help you understand what happened.
The development server supports hot-reloading—make changes to prompts or tool signatures in your code, and Studio reflects them immediately. Re-run conversation threads from any step to test your changes without starting over. This workflow scales from simple single-tool agents to complex multi-node graphs.
For more information on how to run Studio, refer to the following guides in the [LangSmith docs](/langsmith/home):
* [运行应用程序](/langsmith/use-studio#run-application)
* [管理助手](/langsmith/use-studio#manage-assistants)
* [管理线程](/langsmith/use-studio#manage-threads)
* [迭代提示](/langsmith/observability-studio)
* [调试 LangSmith 跟踪](/langsmith/observability-studio#debug-langsmith-traces)
* [向数据集添加节点](/langsmith/observability-studio#add-node-to-dataset)
## 视频指南