> ## Documentation Index
> Fetch the complete documentation index at: https://langchain-zh.cn/llms.txt
> Use this file to discover all available pages before exploring further.
# 持久性
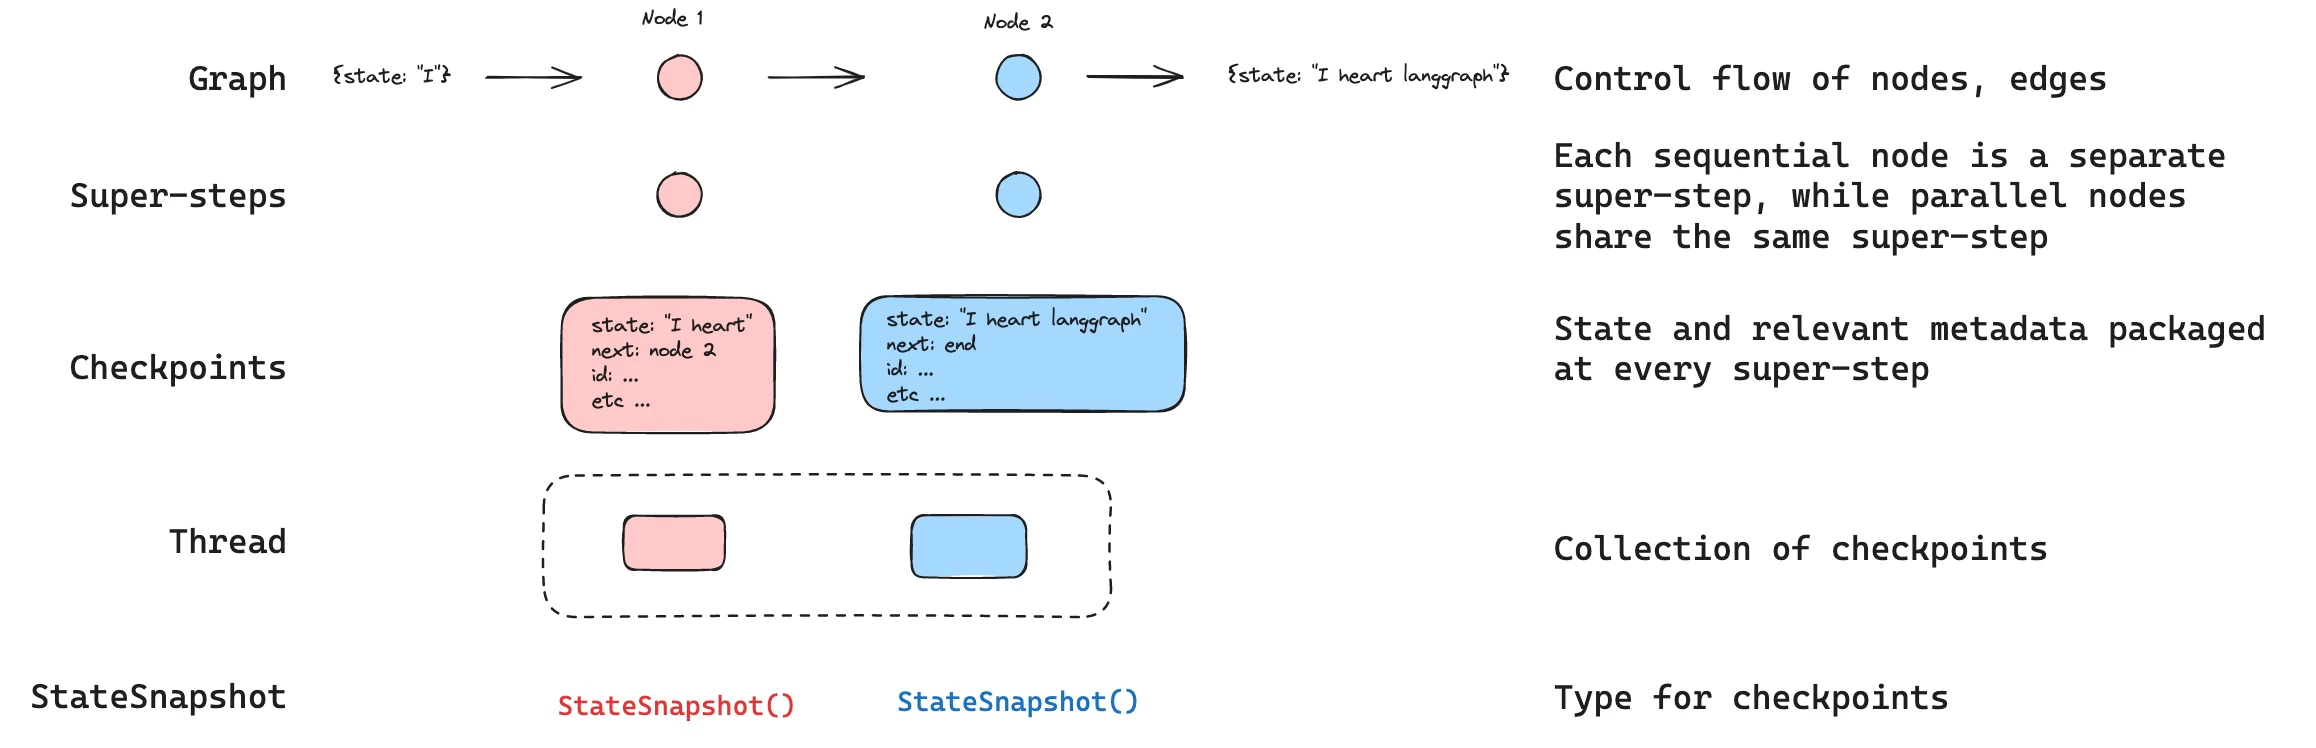
LangGraph 拥有一个内置的持久化层,它将图状态保存为检查点。当你使用检查器编译图时,执行过程中的每一步都会保存图状态的快照,并按线程组织。这支持人机协作工作流、对话记忆、时间旅行调试和容错执行。
 **Agent Server 自动处理检查点**
当使用 [Agent Server](/langsmith/agent-server) 时,你不需要手动实现或配置检查器。服务器在后台为你处理所有持久化基础设施。
## 为什么使用持久性
以下功能需要持久性:
* **人机协作**:检查器通过允许人类检查、中断和批准图步骤来促进 [人机协作工作流](/oss/python/langgraph/interrupts)。这些工作流需要检查器,因为人必须能够在任何时间点查看图的状态,并且图必须能够在人对状态进行任何更新后恢复执行。有关示例,请参阅 [中断](/oss/python/langgraph/interrupts)。
* **记忆**:检查器允许在交互之间保留 ["记忆"](/oss/python/concepts/memory)。在重复的人类交互(如对话)的情况下,任何后续消息都可以发送到该线程,该线程将保留对之前消息的记忆。有关如何使用检查器添加和管理对话记忆的信息,请参阅 [添加记忆](/oss/python/langgraph/add-memory)。
* **时间旅行**:检查器允许 ["时间旅行"](/oss/python/langgraph/use-time-travel),允许用户重播之前的图执行以审查和/或调试特定的图步骤。此外,检查器使得在任意检查点分叉图状态以探索替代轨迹成为可能。
* **容错**:检查点提供容错和错误恢复:如果某个超级步骤中一个或多个节点失败,你可以从最后一个成功步骤重新启动图。
* **待处理的写入**:当图节点在给定 [超级步骤](#super-steps) 的执行过程中失败时,LangGraph 会存储该超级步骤中任何其他成功完成的节点的待处理检查点写入。当你从该超级步骤恢复图执行时,你不会重新运行成功的节点。
## 核心概念
### 线程
线程是检查器保存的每个检查点分配的唯一 ID 或线程标识符。它包含一系列 [运行](/langsmith/assistants#execution) 的累积状态。当运行被执行时,助手底层图的 [状态](/oss/python/langgraph/graph-api#state) 将被持久化到线程中。
调用带有检查器的图时,你**必须**在配置的 `configurable` 部分指定 `thread_id`:
```python theme={"theme":{"light":"catppuccin-latte","dark":"catppuccin-mocha"}}
{"configurable": {"thread_id": "1"}}
```
可以检索线程的当前和历史状态。要持久化状态,必须在执行运行之前创建线程。LangSmith API 提供了几个用于创建和管理线程和线程状态的端点。有关更多详细信息,请参阅 [API 参考](https://reference.langchain.com/python/langsmith/)。
检查器使用 `thread_id` 作为存储和检索检查点的主键。如果没有它,检查器无法保存状态或在 [中断](/oss/python/langgraph/interrupts) 后恢复执行,因为检查器使用 `thread_id` 来加载保存的状态。
### 检查点
线程在特定时间点的状态称为检查点。检查点是每个 [超级步骤](#super-steps) 保存的图状态快照,由 `StateSnapshot` 对象表示(有关完整字段参考,请参阅 [StateSnapshot 字段](#statesnapshot-fields))。
#### 超级步骤
LangGraph 在每个 **超级步骤** 边界创建检查点。超级步骤是图的单个“滴答”,其中为该步骤调度的所有节点执行(可能并行)。对于像 `START -> A -> B -> END` 这样的顺序图,输入、节点 A 和节点 B 有单独的超级步骤——每个之后生成一个检查点。理解超级步骤边界对于 [时间旅行](/oss/python/langgraph/use-time-travel) 很重要,因为你只能从检查点(即超级步骤边界)恢复执行。
检查点被持久化并可用于稍后恢复线程的状态。
让我们看看当简单图按如下方式调用时会保存哪些检查点:
```python theme={"theme":{"light":"catppuccin-latte","dark":"catppuccin-mocha"}}
from langgraph.graph import StateGraph, START, END
from langgraph.checkpoint.memory import InMemorySaver
from langchain_core.runnables import RunnableConfig
from typing import Annotated
from typing_extensions import TypedDict
from operator import add
class State(TypedDict):
foo: str
bar: Annotated[list[str], add]
def node_a(state: State):
return {"foo": "a", "bar": ["a"]}
def node_b(state: State):
return {"foo": "b", "bar": ["b"]}
workflow = StateGraph(State)
workflow.add_node(node_a)
workflow.add_node(node_b)
workflow.add_edge(START, "node_a")
workflow.add_edge("node_a", "node_b")
workflow.add_edge("node_b", END)
checkpointer = InMemorySaver()
graph = workflow.compile(checkpointer=checkpointer)
config: RunnableConfig = {"configurable": {"thread_id": "1"}}
graph.invoke({"foo": "", "bar":[]}, config)
```
运行图后,我们期望看到正好 4 个检查点:
* 空检查点,下一个要执行的节点为 \[`START`]
* 检查点包含用户输入 `{'foo': '', 'bar': []}` 和下一个要执行的节点 `node_a`
* 检查点包含 `node_a` 的输出 `{'foo': 'a', 'bar': ['a']}` 和下一个要执行的节点 `node_b`
* 检查点包含 `node_b` 的输出 `{'foo': 'b', 'bar': ['a', 'b']}` 且没有下一个要执行的节点
注意,由于我们对 `bar` 通道有一个归约器,所以 `bar` 通道值包含来自两个节点的输出。
#### 检查点命名空间
每个检查点都有一个 `checkpoint_ns`(检查点命名空间)字段,用于标识它属于哪个图或子图:
* **`""`**(空字符串):检查点属于父(根)图。
* **`"node_name:uuid"`**:检查点属于作为给定节点调用的子图。对于嵌套子图,命名空间用 `|` 分隔符连接(例如,`"outer_node:uuid|inner_node:uuid"`)。
你可以在节点内通过配置访问检查点命名空间:
```python theme={"theme":{"light":"catppuccin-latte","dark":"catppuccin-mocha"}}
from langchain_core.runnables import RunnableConfig
def my_node(state: State, config: RunnableConfig):
checkpoint_ns = config["configurable"]["checkpoint_ns"]
# "" 表示父图,"node_name:uuid" 表示子图
```
有关与子图状态和检查点一起工作的更多详细信息,请参阅 [子图](/oss/python/langgraph/use-subgraphs)。
## 获取和更新状态
### 获取状态
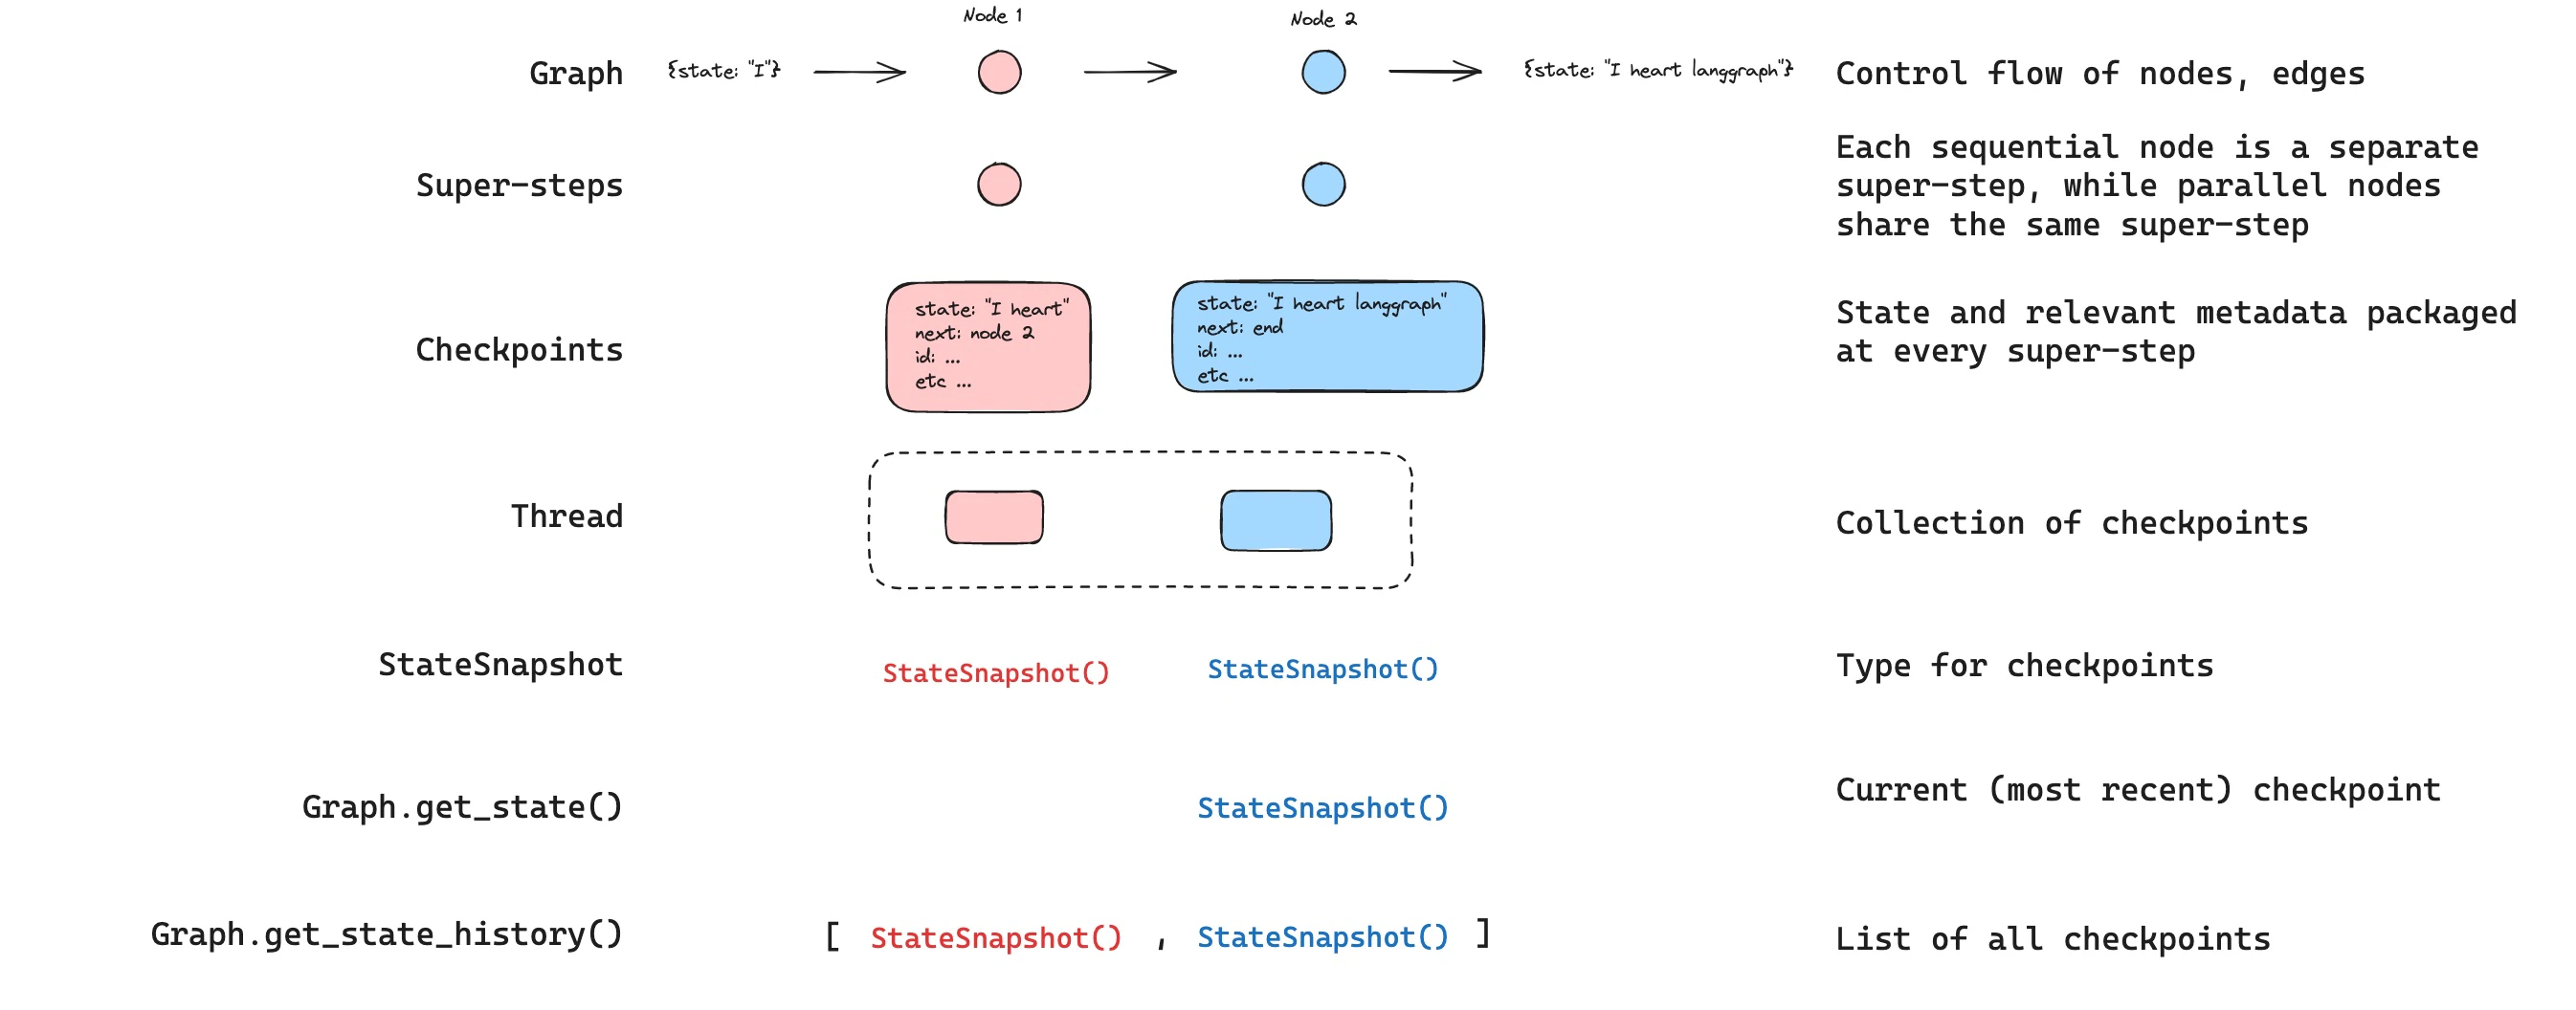
在与保存的图状态交互时,你**必须**指定 [线程标识符](#threads)。你可以通过调用 `graph.get_state(config)` 查看图的 *最新* 状态。这将返回一个 `StateSnapshot` 对象,对应于配置中提供的线程 ID 关联的最新检查点,或者如果提供,则对应于线程的检查点 ID 关联的检查点。
```python theme={"theme":{"light":"catppuccin-latte","dark":"catppuccin-mocha"}}
# 获取最新状态快照
config = {"configurable": {"thread_id": "1"}}
graph.get_state(config)
# 获取特定 checkpoint_id 的状态快照
config = {"configurable": {"thread_id": "1", "checkpoint_id": "1ef663ba-28fe-6528-8002-5a559208592c"}}
graph.get_state(config)
```
在我们的示例中,`get_state` 的输出看起来像这样:
```
StateSnapshot(
values={'foo': 'b', 'bar': ['a', 'b']},
next=(),
config={'configurable': {'thread_id': '1', 'checkpoint_ns': '', 'checkpoint_id': '1ef663ba-28fe-6528-8002-5a559208592c'}},
metadata={'source': 'loop', 'writes': {'node_b': {'foo': 'b', 'bar': ['b']}}, 'step': 2},
created_at='2024-08-29T19:19:38.821749+00:00',
parent_config={'configurable': {'thread_id': '1', 'checkpoint_ns': '', 'checkpoint_id': '1ef663ba-28f9-6ec4-8001-31981c2c39f8'}}, tasks=()
)
```
#### StateSnapshot 字段
| 字段 | 类型 | 描述 |
| --------------- | ------------------------ | --------------------------------------------------------------------------------------------- |
| `values` | `dict` | 此检查点的状态通道值。 |
| `next` | `tuple[str, ...]` | 下一个要执行的节点名称。空 `()` 表示图已完成。 |
| `config` | `dict` | 包含 `thread_id`、`checkpoint_ns` 和 `checkpoint_id`。 |
| `metadata` | `dict` | 执行元数据。包含 `source`(`"input"`、`"loop"` 或 `"update"`)、`writes`(节点输出)和 `step`(超级步骤计数器)。 |
| `created_at` | `str` | 创建此检查点的 ISO 8601 时间戳。 |
| `parent_config` | `dict \| None` | 前一个检查点的配置。第一个检查点为 `None`。 |
| `tasks` | `tuple[PregelTask, ...]` | 此步骤要执行的任务。每个任务都有 `id`、`name`、`error`、`interrupts`,以及可选的 `state`(子图快照,当使用 `subgraphs=True` 时)。 |
### 获取状态历史
你可以通过调用 [`graph.get_state_history(config)`](https://reference.langchain.com/python/langgraph/graphs/#langgraph.graph.state.CompiledStateGraph.get_state_history) 获取给定线程的图执行完整历史记录。这将返回与配置中提供的线程 ID 关联的 `StateSnapshot` 对象列表。重要的是,检查点将按时间顺序排列,最新的检查点 / `StateSnapshot` 位于列表中的第一位。
```python theme={"theme":{"light":"catppuccin-latte","dark":"catppuccin-mocha"}}
config = {"configurable": {"thread_id": "1"}}
list(graph.get_state_history(config))
```
在我们的示例中,[`get_state_history`](https://reference.langchain.com/python/langgraph/graphs/#langgraph.graph.state.CompiledStateGraph.get_state_history) 的输出看起来像这样:
```
[
StateSnapshot(
values={'foo': 'b', 'bar': ['a', 'b']},
next=(),
config={'configurable': {'thread_id': '1', 'checkpoint_ns': '', 'checkpoint_id': '1ef663ba-28fe-6528-8002-5a559208592c'}},
metadata={'source': 'loop', 'writes': {'node_b': {'foo': 'b', 'bar': ['b']}}, 'step': 2},
created_at='2024-08-29T19:19:38.821749+00:00',
parent_config={'configurable': {'thread_id': '1', 'checkpoint_ns': '', 'checkpoint_id': '1ef663ba-28f9-6ec4-8001-31981c2c39f8'}},
tasks=(),
),
StateSnapshot(
values={'foo': 'a', 'bar': ['a']},
next=('node_b',),
config={'configurable': {'thread_id': '1', 'checkpoint_ns': '', 'checkpoint_id': '1ef663ba-28f9-6ec4-8001-31981c2c39f8'}},
metadata={'source': 'loop', 'writes': {'node_a': {'foo': 'a', 'bar': ['a']}}, 'step': 1},
created_at='2024-08-29T19:19:38.819946+00:00',
parent_config={'configurable': {'thread_id': '1', 'checkpoint_ns': '', 'checkpoint_id': '1ef663ba-28f4-6b4a-8000-ca575a13d36a'}},
tasks=(PregelTask(id='6fb7314f-f114-5413-a1f3-d37dfe98ff44', name='node_b', error=None, interrupts=()),),
),
StateSnapshot(
values={'foo': '', 'bar': []},
next=('node_a',),
config={'configurable': {'thread_id': '1', 'checkpoint_ns': '', 'checkpoint_id': '1ef663ba-28f4-6b4a-8000-ca575a13d36a'}},
metadata={'source': 'loop', 'writes': None, 'step': 0},
created_at='2024-08-29T19:19:38.817813+00:00',
parent_config={'configurable': {'thread_id': '1', 'checkpoint_ns': '', 'checkpoint_id': '1ef663ba-28f0-6c66-bfff-6723431e8481'}},
tasks=(PregelTask(id='f1b14528-5ee5-579c-949b-23ef9bfbed58', name='node_a', error=None, interrupts=()),),
),
StateSnapshot(
values={'bar': []},
next=('__start__',),
config={'configurable': {'thread_id': '1', 'checkpoint_ns': '', 'checkpoint_id': '1ef663ba-28f0-6c66-bfff-6723431e8481'}},
metadata={'source': 'input', 'writes': {'foo': ''}, 'step': -1},
created_at='2024-08-29T19:19:38.816205+00:00',
parent_config=None,
tasks=(PregelTask(id='6d27aa2e-d72b-5504-a36f-8620e54a76dd', name='__start__', error=None, interrupts=()),),
)
]
```
**Agent Server 自动处理检查点**
当使用 [Agent Server](/langsmith/agent-server) 时,你不需要手动实现或配置检查器。服务器在后台为你处理所有持久化基础设施。
## 为什么使用持久性
以下功能需要持久性:
* **人机协作**:检查器通过允许人类检查、中断和批准图步骤来促进 [人机协作工作流](/oss/python/langgraph/interrupts)。这些工作流需要检查器,因为人必须能够在任何时间点查看图的状态,并且图必须能够在人对状态进行任何更新后恢复执行。有关示例,请参阅 [中断](/oss/python/langgraph/interrupts)。
* **记忆**:检查器允许在交互之间保留 ["记忆"](/oss/python/concepts/memory)。在重复的人类交互(如对话)的情况下,任何后续消息都可以发送到该线程,该线程将保留对之前消息的记忆。有关如何使用检查器添加和管理对话记忆的信息,请参阅 [添加记忆](/oss/python/langgraph/add-memory)。
* **时间旅行**:检查器允许 ["时间旅行"](/oss/python/langgraph/use-time-travel),允许用户重播之前的图执行以审查和/或调试特定的图步骤。此外,检查器使得在任意检查点分叉图状态以探索替代轨迹成为可能。
* **容错**:检查点提供容错和错误恢复:如果某个超级步骤中一个或多个节点失败,你可以从最后一个成功步骤重新启动图。
* **待处理的写入**:当图节点在给定 [超级步骤](#super-steps) 的执行过程中失败时,LangGraph 会存储该超级步骤中任何其他成功完成的节点的待处理检查点写入。当你从该超级步骤恢复图执行时,你不会重新运行成功的节点。
## 核心概念
### 线程
线程是检查器保存的每个检查点分配的唯一 ID 或线程标识符。它包含一系列 [运行](/langsmith/assistants#execution) 的累积状态。当运行被执行时,助手底层图的 [状态](/oss/python/langgraph/graph-api#state) 将被持久化到线程中。
调用带有检查器的图时,你**必须**在配置的 `configurable` 部分指定 `thread_id`:
```python theme={"theme":{"light":"catppuccin-latte","dark":"catppuccin-mocha"}}
{"configurable": {"thread_id": "1"}}
```
可以检索线程的当前和历史状态。要持久化状态,必须在执行运行之前创建线程。LangSmith API 提供了几个用于创建和管理线程和线程状态的端点。有关更多详细信息,请参阅 [API 参考](https://reference.langchain.com/python/langsmith/)。
检查器使用 `thread_id` 作为存储和检索检查点的主键。如果没有它,检查器无法保存状态或在 [中断](/oss/python/langgraph/interrupts) 后恢复执行,因为检查器使用 `thread_id` 来加载保存的状态。
### 检查点
线程在特定时间点的状态称为检查点。检查点是每个 [超级步骤](#super-steps) 保存的图状态快照,由 `StateSnapshot` 对象表示(有关完整字段参考,请参阅 [StateSnapshot 字段](#statesnapshot-fields))。
#### 超级步骤
LangGraph 在每个 **超级步骤** 边界创建检查点。超级步骤是图的单个“滴答”,其中为该步骤调度的所有节点执行(可能并行)。对于像 `START -> A -> B -> END` 这样的顺序图,输入、节点 A 和节点 B 有单独的超级步骤——每个之后生成一个检查点。理解超级步骤边界对于 [时间旅行](/oss/python/langgraph/use-time-travel) 很重要,因为你只能从检查点(即超级步骤边界)恢复执行。
检查点被持久化并可用于稍后恢复线程的状态。
让我们看看当简单图按如下方式调用时会保存哪些检查点:
```python theme={"theme":{"light":"catppuccin-latte","dark":"catppuccin-mocha"}}
from langgraph.graph import StateGraph, START, END
from langgraph.checkpoint.memory import InMemorySaver
from langchain_core.runnables import RunnableConfig
from typing import Annotated
from typing_extensions import TypedDict
from operator import add
class State(TypedDict):
foo: str
bar: Annotated[list[str], add]
def node_a(state: State):
return {"foo": "a", "bar": ["a"]}
def node_b(state: State):
return {"foo": "b", "bar": ["b"]}
workflow = StateGraph(State)
workflow.add_node(node_a)
workflow.add_node(node_b)
workflow.add_edge(START, "node_a")
workflow.add_edge("node_a", "node_b")
workflow.add_edge("node_b", END)
checkpointer = InMemorySaver()
graph = workflow.compile(checkpointer=checkpointer)
config: RunnableConfig = {"configurable": {"thread_id": "1"}}
graph.invoke({"foo": "", "bar":[]}, config)
```
运行图后,我们期望看到正好 4 个检查点:
* 空检查点,下一个要执行的节点为 \[`START`]
* 检查点包含用户输入 `{'foo': '', 'bar': []}` 和下一个要执行的节点 `node_a`
* 检查点包含 `node_a` 的输出 `{'foo': 'a', 'bar': ['a']}` 和下一个要执行的节点 `node_b`
* 检查点包含 `node_b` 的输出 `{'foo': 'b', 'bar': ['a', 'b']}` 且没有下一个要执行的节点
注意,由于我们对 `bar` 通道有一个归约器,所以 `bar` 通道值包含来自两个节点的输出。
#### 检查点命名空间
每个检查点都有一个 `checkpoint_ns`(检查点命名空间)字段,用于标识它属于哪个图或子图:
* **`""`**(空字符串):检查点属于父(根)图。
* **`"node_name:uuid"`**:检查点属于作为给定节点调用的子图。对于嵌套子图,命名空间用 `|` 分隔符连接(例如,`"outer_node:uuid|inner_node:uuid"`)。
你可以在节点内通过配置访问检查点命名空间:
```python theme={"theme":{"light":"catppuccin-latte","dark":"catppuccin-mocha"}}
from langchain_core.runnables import RunnableConfig
def my_node(state: State, config: RunnableConfig):
checkpoint_ns = config["configurable"]["checkpoint_ns"]
# "" 表示父图,"node_name:uuid" 表示子图
```
有关与子图状态和检查点一起工作的更多详细信息,请参阅 [子图](/oss/python/langgraph/use-subgraphs)。
## 获取和更新状态
### 获取状态
在与保存的图状态交互时,你**必须**指定 [线程标识符](#threads)。你可以通过调用 `graph.get_state(config)` 查看图的 *最新* 状态。这将返回一个 `StateSnapshot` 对象,对应于配置中提供的线程 ID 关联的最新检查点,或者如果提供,则对应于线程的检查点 ID 关联的检查点。
```python theme={"theme":{"light":"catppuccin-latte","dark":"catppuccin-mocha"}}
# 获取最新状态快照
config = {"configurable": {"thread_id": "1"}}
graph.get_state(config)
# 获取特定 checkpoint_id 的状态快照
config = {"configurable": {"thread_id": "1", "checkpoint_id": "1ef663ba-28fe-6528-8002-5a559208592c"}}
graph.get_state(config)
```
在我们的示例中,`get_state` 的输出看起来像这样:
```
StateSnapshot(
values={'foo': 'b', 'bar': ['a', 'b']},
next=(),
config={'configurable': {'thread_id': '1', 'checkpoint_ns': '', 'checkpoint_id': '1ef663ba-28fe-6528-8002-5a559208592c'}},
metadata={'source': 'loop', 'writes': {'node_b': {'foo': 'b', 'bar': ['b']}}, 'step': 2},
created_at='2024-08-29T19:19:38.821749+00:00',
parent_config={'configurable': {'thread_id': '1', 'checkpoint_ns': '', 'checkpoint_id': '1ef663ba-28f9-6ec4-8001-31981c2c39f8'}}, tasks=()
)
```
#### StateSnapshot 字段
| 字段 | 类型 | 描述 |
| --------------- | ------------------------ | --------------------------------------------------------------------------------------------- |
| `values` | `dict` | 此检查点的状态通道值。 |
| `next` | `tuple[str, ...]` | 下一个要执行的节点名称。空 `()` 表示图已完成。 |
| `config` | `dict` | 包含 `thread_id`、`checkpoint_ns` 和 `checkpoint_id`。 |
| `metadata` | `dict` | 执行元数据。包含 `source`(`"input"`、`"loop"` 或 `"update"`)、`writes`(节点输出)和 `step`(超级步骤计数器)。 |
| `created_at` | `str` | 创建此检查点的 ISO 8601 时间戳。 |
| `parent_config` | `dict \| None` | 前一个检查点的配置。第一个检查点为 `None`。 |
| `tasks` | `tuple[PregelTask, ...]` | 此步骤要执行的任务。每个任务都有 `id`、`name`、`error`、`interrupts`,以及可选的 `state`(子图快照,当使用 `subgraphs=True` 时)。 |
### 获取状态历史
你可以通过调用 [`graph.get_state_history(config)`](https://reference.langchain.com/python/langgraph/graphs/#langgraph.graph.state.CompiledStateGraph.get_state_history) 获取给定线程的图执行完整历史记录。这将返回与配置中提供的线程 ID 关联的 `StateSnapshot` 对象列表。重要的是,检查点将按时间顺序排列,最新的检查点 / `StateSnapshot` 位于列表中的第一位。
```python theme={"theme":{"light":"catppuccin-latte","dark":"catppuccin-mocha"}}
config = {"configurable": {"thread_id": "1"}}
list(graph.get_state_history(config))
```
在我们的示例中,[`get_state_history`](https://reference.langchain.com/python/langgraph/graphs/#langgraph.graph.state.CompiledStateGraph.get_state_history) 的输出看起来像这样:
```
[
StateSnapshot(
values={'foo': 'b', 'bar': ['a', 'b']},
next=(),
config={'configurable': {'thread_id': '1', 'checkpoint_ns': '', 'checkpoint_id': '1ef663ba-28fe-6528-8002-5a559208592c'}},
metadata={'source': 'loop', 'writes': {'node_b': {'foo': 'b', 'bar': ['b']}}, 'step': 2},
created_at='2024-08-29T19:19:38.821749+00:00',
parent_config={'configurable': {'thread_id': '1', 'checkpoint_ns': '', 'checkpoint_id': '1ef663ba-28f9-6ec4-8001-31981c2c39f8'}},
tasks=(),
),
StateSnapshot(
values={'foo': 'a', 'bar': ['a']},
next=('node_b',),
config={'configurable': {'thread_id': '1', 'checkpoint_ns': '', 'checkpoint_id': '1ef663ba-28f9-6ec4-8001-31981c2c39f8'}},
metadata={'source': 'loop', 'writes': {'node_a': {'foo': 'a', 'bar': ['a']}}, 'step': 1},
created_at='2024-08-29T19:19:38.819946+00:00',
parent_config={'configurable': {'thread_id': '1', 'checkpoint_ns': '', 'checkpoint_id': '1ef663ba-28f4-6b4a-8000-ca575a13d36a'}},
tasks=(PregelTask(id='6fb7314f-f114-5413-a1f3-d37dfe98ff44', name='node_b', error=None, interrupts=()),),
),
StateSnapshot(
values={'foo': '', 'bar': []},
next=('node_a',),
config={'configurable': {'thread_id': '1', 'checkpoint_ns': '', 'checkpoint_id': '1ef663ba-28f4-6b4a-8000-ca575a13d36a'}},
metadata={'source': 'loop', 'writes': None, 'step': 0},
created_at='2024-08-29T19:19:38.817813+00:00',
parent_config={'configurable': {'thread_id': '1', 'checkpoint_ns': '', 'checkpoint_id': '1ef663ba-28f0-6c66-bfff-6723431e8481'}},
tasks=(PregelTask(id='f1b14528-5ee5-579c-949b-23ef9bfbed58', name='node_a', error=None, interrupts=()),),
),
StateSnapshot(
values={'bar': []},
next=('__start__',),
config={'configurable': {'thread_id': '1', 'checkpoint_ns': '', 'checkpoint_id': '1ef663ba-28f0-6c66-bfff-6723431e8481'}},
metadata={'source': 'input', 'writes': {'foo': ''}, 'step': -1},
created_at='2024-08-29T19:19:38.816205+00:00',
parent_config=None,
tasks=(PregelTask(id='6d27aa2e-d72b-5504-a36f-8620e54a76dd', name='__start__', error=None, interrupts=()),),
)
]
```
 #### 查找特定检查点
你可以过滤状态历史以查找符合特定标准的检查点:
```python theme={"theme":{"light":"catppuccin-latte","dark":"catppuccin-mocha"}}
history = list(graph.get_state_history(config))
# 查找特定节点执行前的检查点
before_node_b = next(s for s in history if s.next == ("node_b",))
# 按步骤号查找检查点
step_2 = next(s for s in history if s.metadata["step"] == 2)
# 查找由 update_state 创建的检查点
forks = [s for s in history if s.metadata["source"] == "update"]
# 查找发生中断的检查点
interrupted = next(
s for s in history
if s.tasks and any(t.interrupts for t in s.tasks)
)
```
### 重放
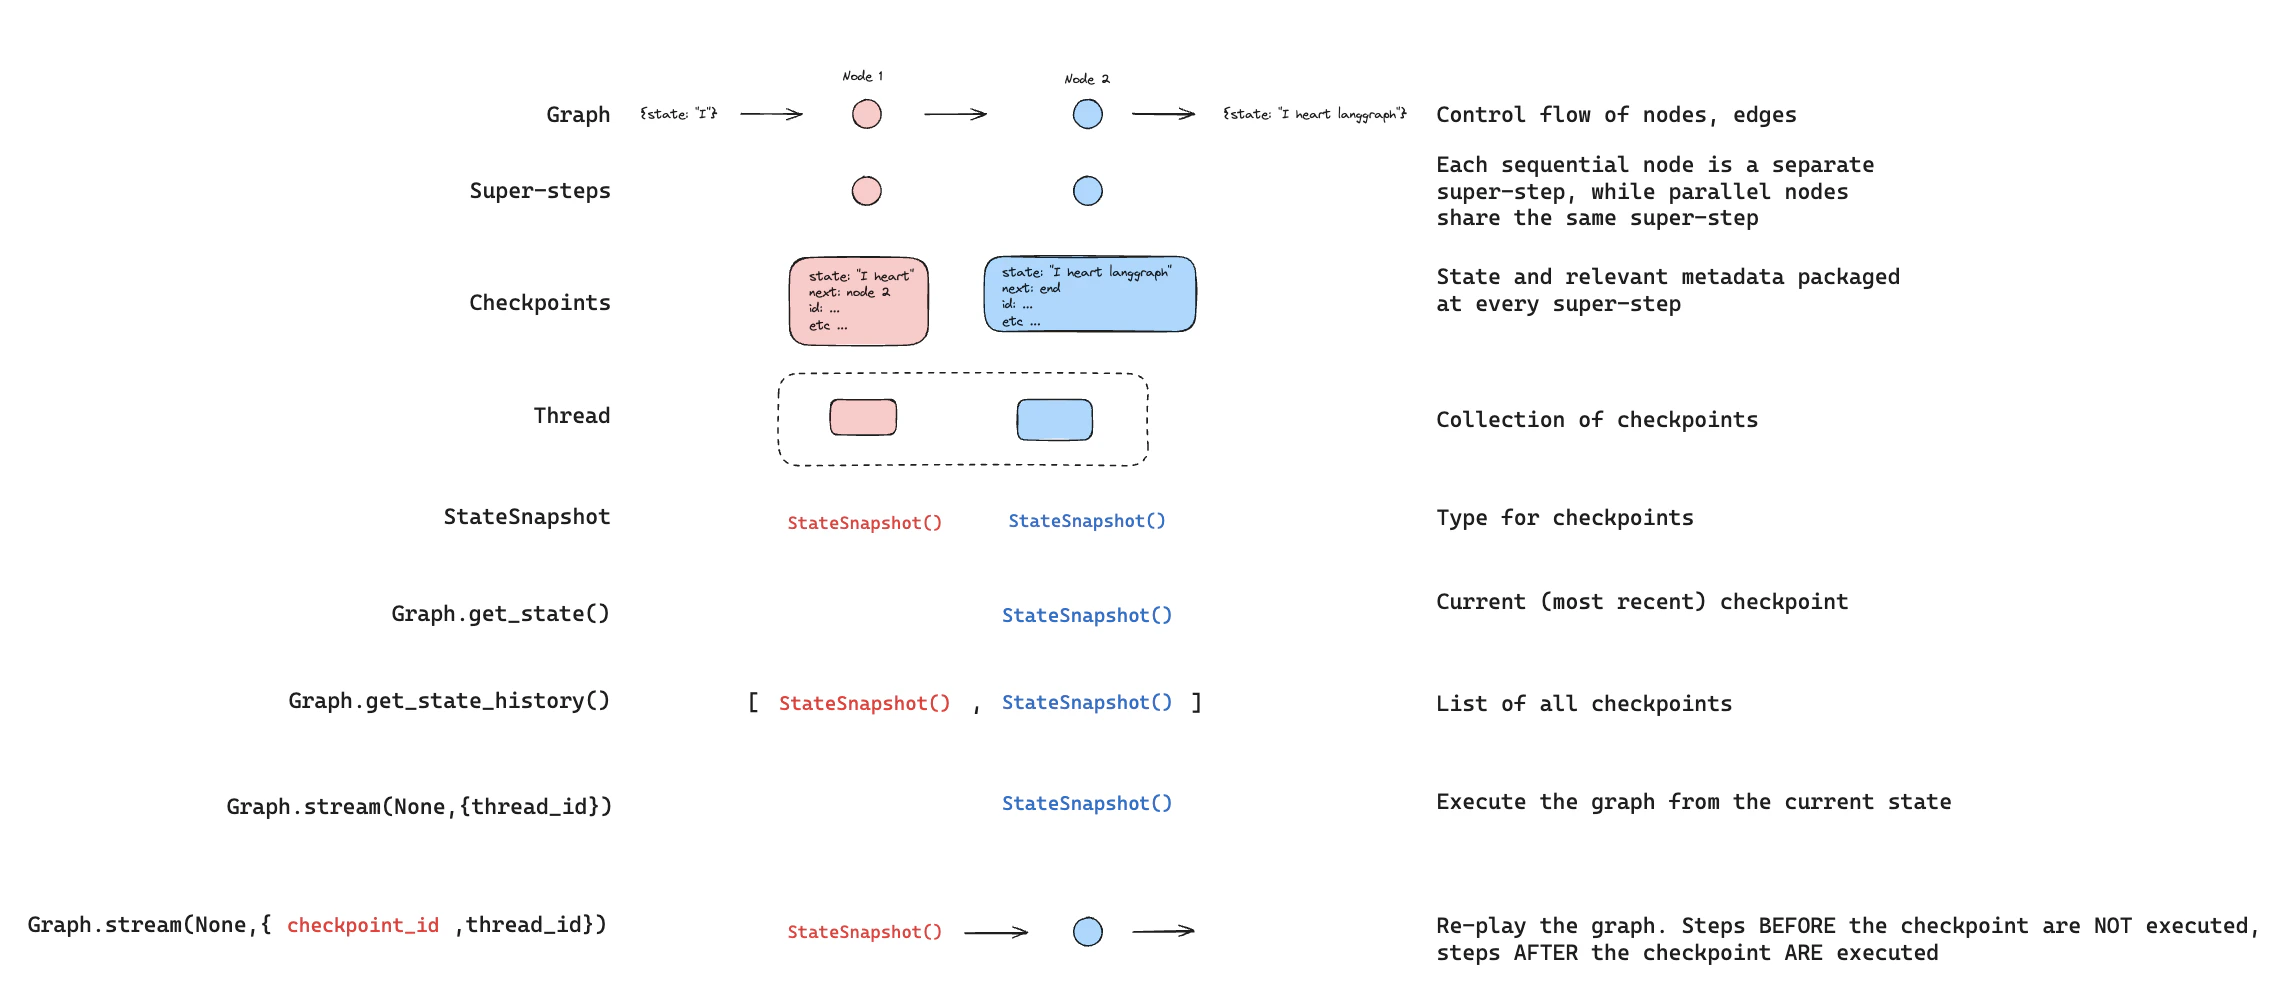
重放从先前的检查点重新执行步骤。使用先前的 `checkpoint_id` 调用图以重新运行该检查点之后的节点。检查点之前的节点会被跳过(它们的结果已保存)。检查点之后的节点会重新执行,包括任何 LLM 调用、API 请求或 [中断](/oss/python/langgraph/interrupts) —— 在重放期间总是会被重新触发。
有关重放过去执行的完整详细信息和代码示例,请参阅 [时间旅行](/oss/python/langgraph/use-time-travel)。
#### 查找特定检查点
你可以过滤状态历史以查找符合特定标准的检查点:
```python theme={"theme":{"light":"catppuccin-latte","dark":"catppuccin-mocha"}}
history = list(graph.get_state_history(config))
# 查找特定节点执行前的检查点
before_node_b = next(s for s in history if s.next == ("node_b",))
# 按步骤号查找检查点
step_2 = next(s for s in history if s.metadata["step"] == 2)
# 查找由 update_state 创建的检查点
forks = [s for s in history if s.metadata["source"] == "update"]
# 查找发生中断的检查点
interrupted = next(
s for s in history
if s.tasks and any(t.interrupts for t in s.tasks)
)
```
### 重放
重放从先前的检查点重新执行步骤。使用先前的 `checkpoint_id` 调用图以重新运行该检查点之后的节点。检查点之前的节点会被跳过(它们的结果已保存)。检查点之后的节点会重新执行,包括任何 LLM 调用、API 请求或 [中断](/oss/python/langgraph/interrupts) —— 在重放期间总是会被重新触发。
有关重放过去执行的完整详细信息和代码示例,请参阅 [时间旅行](/oss/python/langgraph/use-time-travel)。
 ### 更新状态
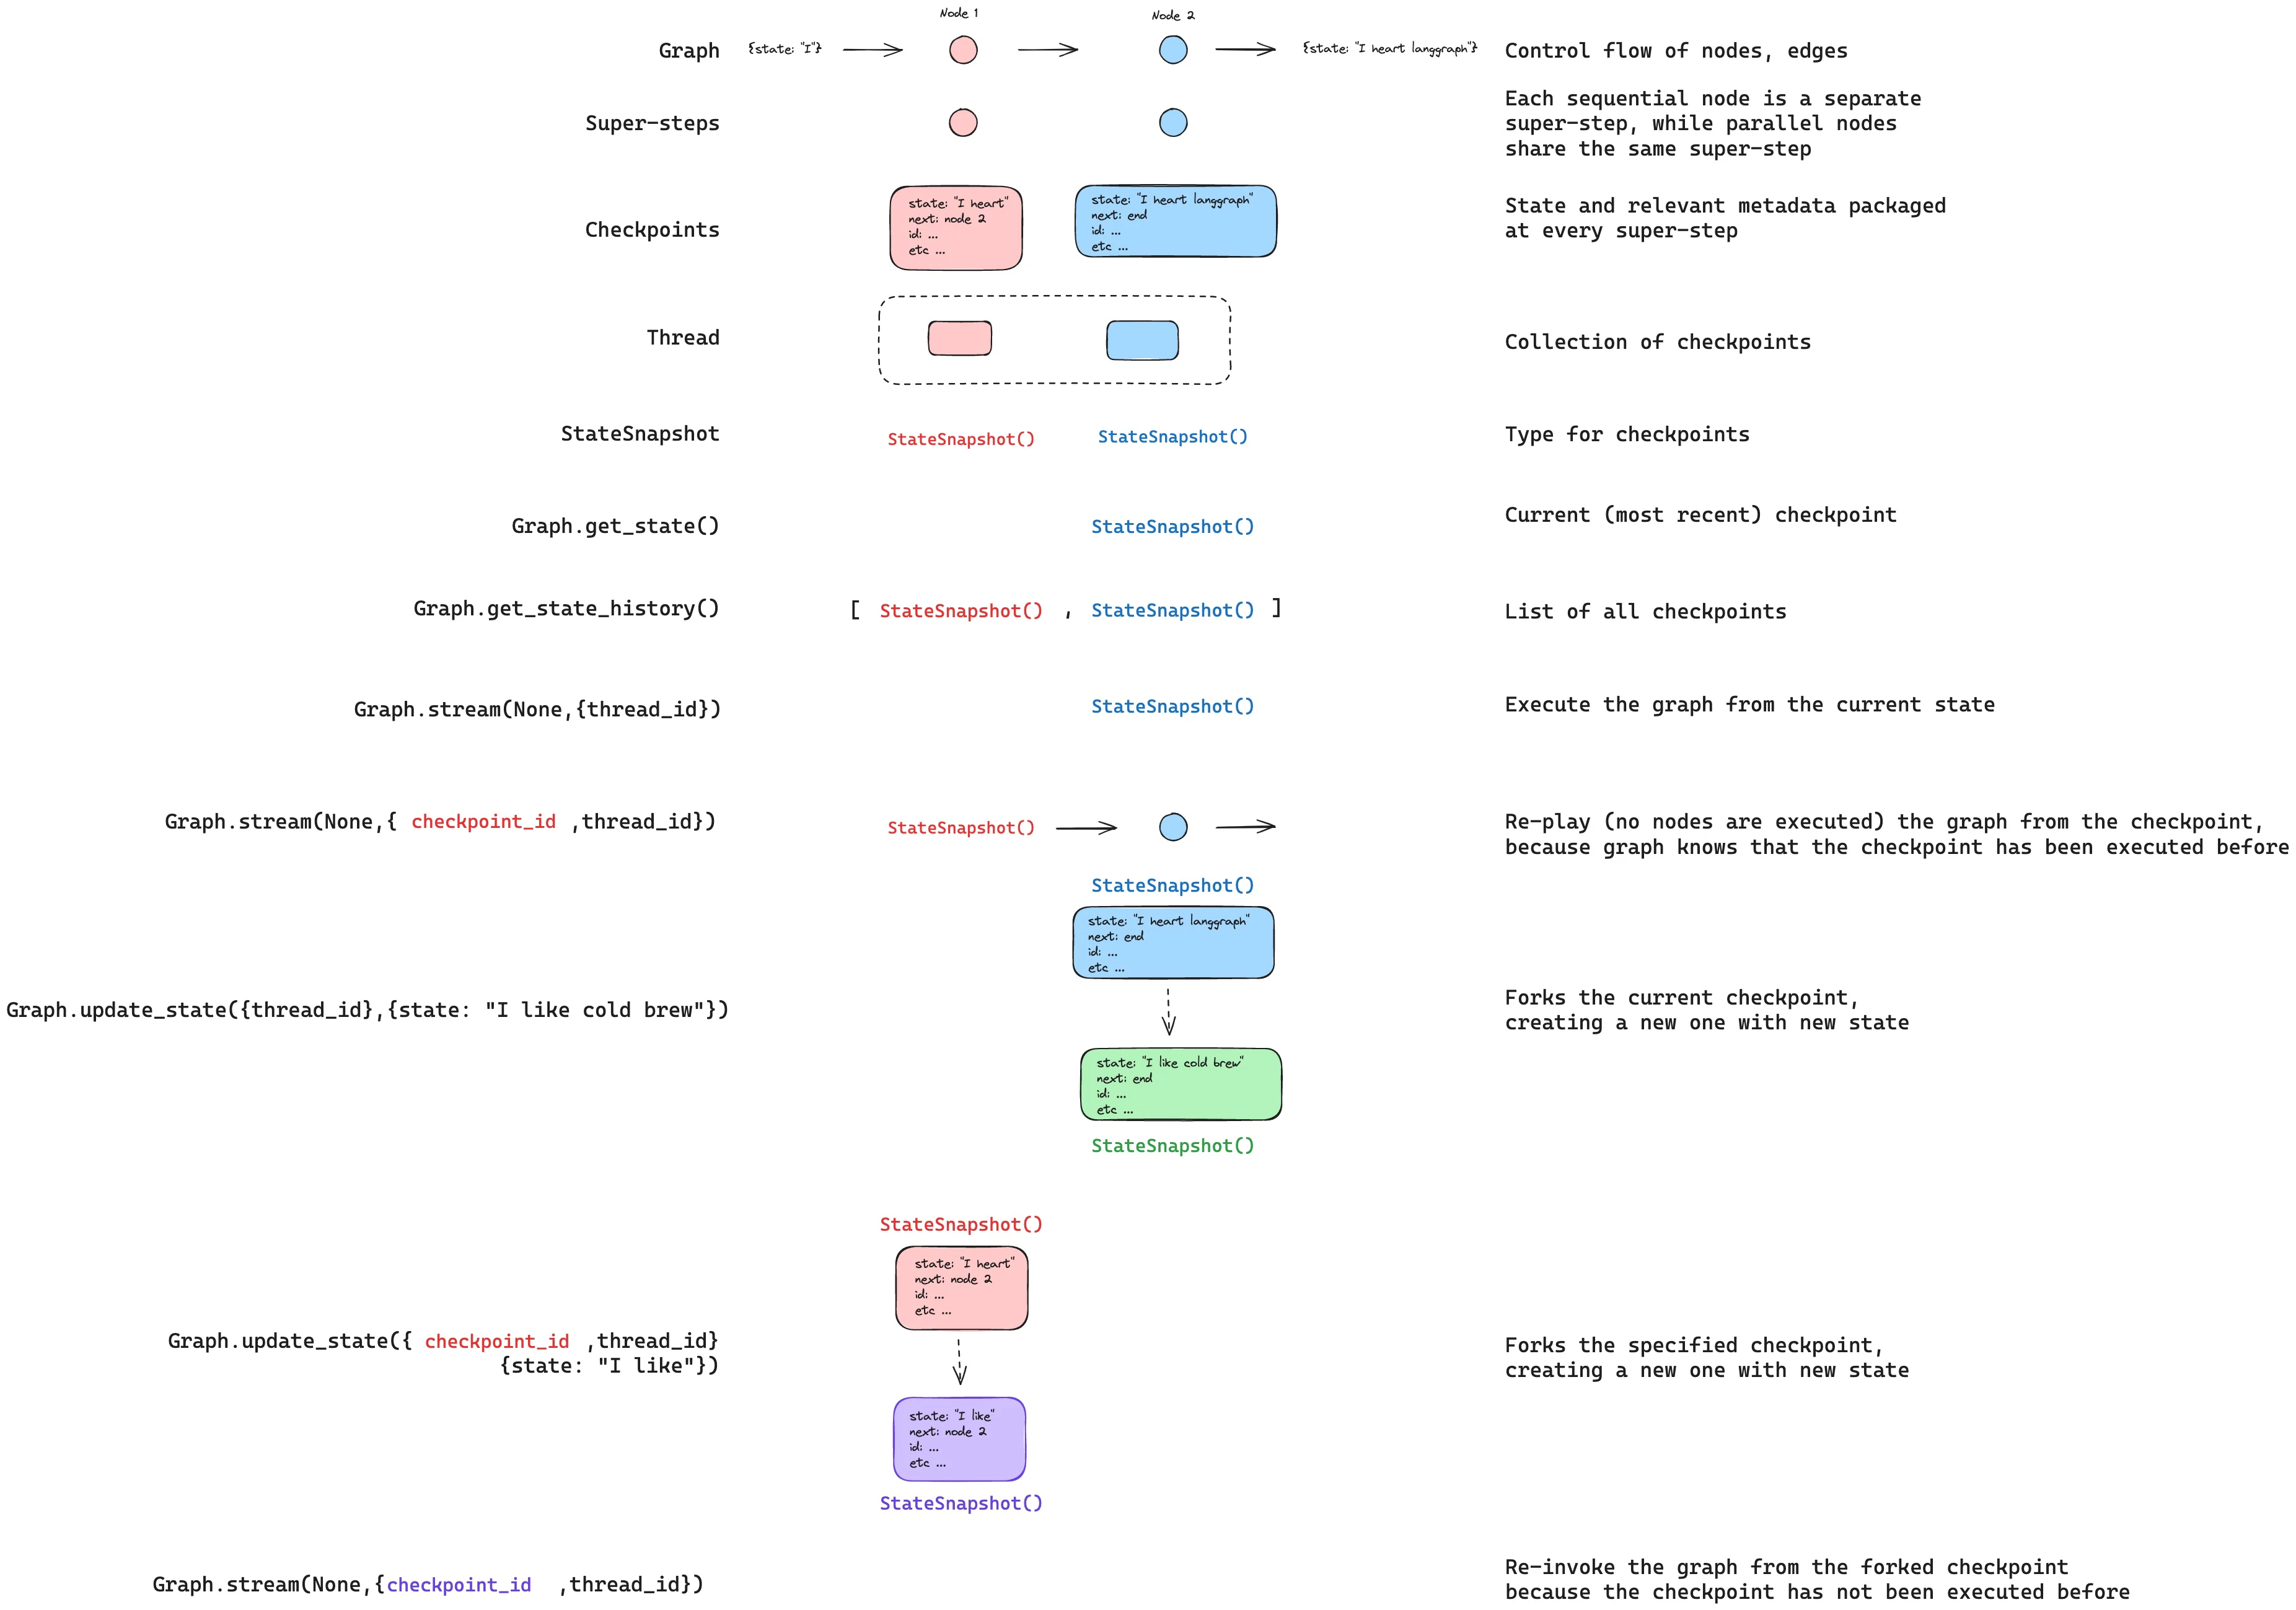
你可以使用 [`update_state`](https://reference.langchain.com/python/langgraph/graphs/#langgraph.graph.state.CompiledStateGraph.update_state) 编辑图状态。这会创建一个具有更新值的新检查点 —— 它不会修改原始检查点。更新被视为与节点更新相同:当定义时,值会通过 [归约](/oss/python/langgraph/graph-api#reducers) 函数传递,因此具有归约器的通道会 *累积* 值而不是覆盖它们。
你可以选择指定 `as_node` 来控制更新被视为来自哪个节点,这会影响下一个执行哪个节点。有关详细信息,请参阅 [时间旅行:`as_node`](/oss/python/langgraph/use-time-travel#control-which-node-runs-next-with-as_node)。
### 更新状态
你可以使用 [`update_state`](https://reference.langchain.com/python/langgraph/graphs/#langgraph.graph.state.CompiledStateGraph.update_state) 编辑图状态。这会创建一个具有更新值的新检查点 —— 它不会修改原始检查点。更新被视为与节点更新相同:当定义时,值会通过 [归约](/oss/python/langgraph/graph-api#reducers) 函数传递,因此具有归约器的通道会 *累积* 值而不是覆盖它们。
你可以选择指定 `as_node` 来控制更新被视为来自哪个节点,这会影响下一个执行哪个节点。有关详细信息,请参阅 [时间旅行:`as_node`](/oss/python/langgraph/use-time-travel#control-which-node-runs-next-with-as_node)。
 ## 内存存储
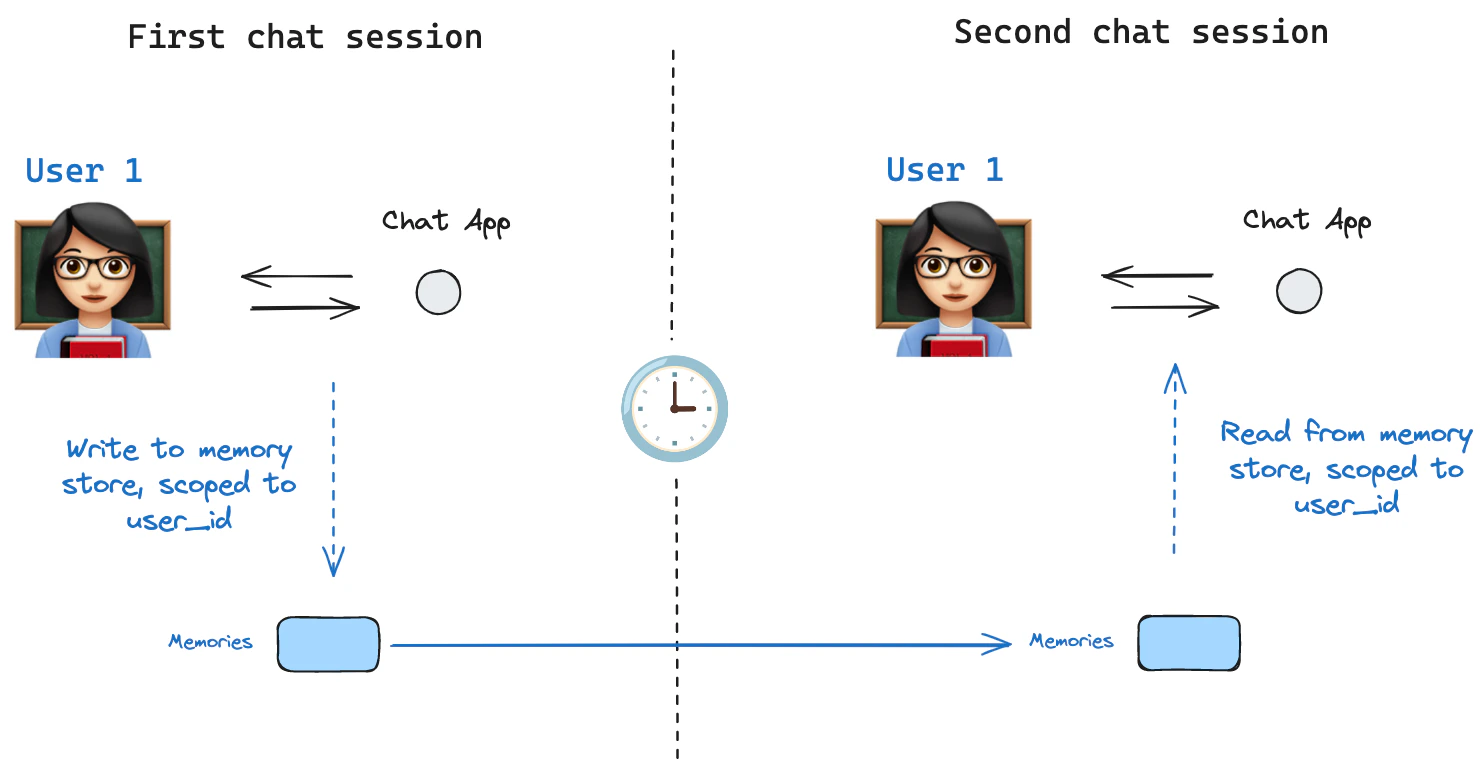 [状态模式](/oss/python/langgraph/graph-api#schema) 指定了一组键,随着图的执行会被填充。如上所述,状态可以在每个图步骤由检查器写入线程,从而实现状态持久化。
如果我们想在不同线程之间保留一些信息怎么办?考虑聊天机器人的情况,我们希望在与该用户的 *所有* 聊天对话(例如,线程)中保留关于该用户的特定信息!
仅靠检查器,我们无法在线程之间共享信息。这激发了对 [`Store`](https://reference.langchain.com/python/langgraph/store/) 接口的需求。作为一个说明,我们可以定义一个 `InMemoryStore` 来跨线程存储有关用户的信息。我们只需像以前一样用检查器编译我们的图,并传递存储。
**LangGraph API 自动处理存储**
当使用 LangGraph API 时,你不需要手动实现或配置存储。API 在后台为你处理所有存储基础设施。
[InMemoryStore](https://reference.langchain.com/python/langchain-core/stores/InMemoryStore) 适用于开发和测试。对于生产环境,请使用持久化存储,如 `PostgresStore` 或 `RedisStore`。所有实现都扩展了 [BaseStore](https://reference.langchain.com/python/langchain-core/stores/BaseStore),这是节点函数签名中使用的类型注解。
### 基本用法
首先,让我们在不使用 LangGraph 的情况下孤立地展示这一点。
```python theme={"theme":{"light":"catppuccin-latte","dark":"catppuccin-mocha"}}
from langgraph.store.memory import InMemoryStore
store = InMemoryStore()
```
记忆通过 `tuple` 进行命名空间划分,在这个特定示例中将是 `(, "memories")`。命名空间可以是任何长度并代表任何内容,不必是用户特定的。
```python theme={"theme":{"light":"catppuccin-latte","dark":"catppuccin-mocha"}}
user_id = "1"
namespace_for_memory = (user_id, "memories")
```
我们使用 `store.put` 方法将记忆保存到存储中的命名空间。当我们这样做时,我们指定如上定义的命名空间,以及记忆的键值对:键只是记忆的唯一标识符(`memory_id`),值(字典)是记忆本身。
```python theme={"theme":{"light":"catppuccin-latte","dark":"catppuccin-mocha"}}
memory_id = str(uuid.uuid4())
memory = {"food_preference" : "I like pizza"}
store.put(namespace_for_memory, memory_id, memory)
```
我们可以使用 `store.search` 方法读取命名空间中的记忆,该方法将返回给定用户的所有记忆作为列表。最新的记忆在列表的最后。
```python theme={"theme":{"light":"catppuccin-latte","dark":"catppuccin-mocha"}}
memories = store.search(namespace_for_memory)
memories[-1].dict()
{'value': {'food_preference': 'I like pizza'},
'key': '07e0caf4-1631-47b7-b15f-65515d4c1843',
'namespace': ['1', 'memories'],
'created_at': '2024-10-02T17:22:31.590602+00:00',
'updated_at': '2024-10-02T17:22:31.590605+00:00'}
```
每种记忆类型都是一个 Python 类 ([`Item`](https://langchain-ai.github.io/langgraph/reference/store/#langgraph.store.base.Item)),具有某些属性。我们可以通过上面的 `.dict` 将其转换为字典来访问它。
它具有的属性是:
* `value`: 该记忆的值(本身是一个字典)
* `key`: 此命名空间中此记忆的唯一键
* `namespace`: 字符串元组,此记忆类型的命名空间
虽然类型是 `tuple[str, ...]`,但在转换为 JSON 时可能会序列化为列表(例如,`['1', 'memories']`)。
* `created_at`: 创建此记忆的时间戳
* `updated_at`: 更新此记忆的时间戳
### 语义搜索
除了简单的检索外,存储还支持语义搜索,允许你基于含义而不是精确匹配来查找记忆。为此,请配置存储以使用嵌入模型:
```python theme={"theme":{"light":"catppuccin-latte","dark":"catppuccin-mocha"}}
from langchain.embeddings import init_embeddings
store = InMemoryStore(
index={
"embed": init_embeddings("openai:text-embedding-3-small"), # 嵌入提供者
"dims": 1536, # 嵌入维度
"fields": ["food_preference", "$"] # 要嵌入的字段
}
)
```
现在进行搜索时,你可以使用自然语言查询来查找相关记忆:
```python theme={"theme":{"light":"catppuccin-latte","dark":"catppuccin-mocha"}}
# 查找关于食物偏好的记忆
# (这可以在将记忆放入存储后进行)
memories = store.search(
namespace_for_memory,
query="What does the user like to eat?",
limit=3 # 返回前 3 个匹配项
)
```
你可以通过配置 `fields` 参数或在存储记忆时指定 `index` 参数来控制你的记忆的哪些部分被嵌入:
```python theme={"theme":{"light":"catppuccin-latte","dark":"catppuccin-mocha"}}
# 存储要嵌入的特定字段
store.put(
namespace_for_memory,
str(uuid.uuid4()),
{
"food_preference": "I love Italian cuisine",
"context": "Discussing dinner plans"
},
index=["food_preference"] # 仅嵌入 "food_preferences" 字段
)
# 不嵌入存储(仍可检索,但不可搜索)
store.put(
namespace_for_memory,
str(uuid.uuid4()),
{"system_info": "Last updated: 2024-01-01"},
index=False
)
```
### 在 LangGraph 中使用
有了所有这些,我们在 LangGraph 中使用存储。存储与检查器协同工作:检查器将状态保存到线程,如上所述,而存储允许我们存储任意信息以供 *跨* 线程访问。我们使用检查器和存储一起编译图,如下所示。
```python theme={"theme":{"light":"catppuccin-latte","dark":"catppuccin-mocha"}}
from dataclasses import dataclass
from langgraph.checkpoint.memory import InMemorySaver
@dataclass
class Context:
user_id: str
# 我们需要这个,因为我们希望启用线程(对话)
checkpointer = InMemorySaver()
# ... 定义图 ...
# 使用检查器和存储编译图
builder = StateGraph(MessagesState, context_schema=Context)
# ... 添加节点和边 ...
graph = builder.compile(checkpointer=checkpointer, store=store)
```
我们像以前一样使用 `thread_id` 调用图,同时也使用 `user_id`,我们将用它来将我们的记忆命名空间到此特定用户,就像上面展示的那样。
```python theme={"theme":{"light":"catppuccin-latte","dark":"catppuccin-mocha"}}
# 调用图
config = {"configurable": {"thread_id": "1"}}
# 首先让我们只是向 AI 打招呼
for update in graph.stream(
{"messages": [{"role": "user", "content": "hi"}]},
config,
stream_mode="updates",
context=Context(user_id="1"),
):
print(update)
```
你可以在 *任何节点* 中使用 `Runtime` 对象访问存储和 `user_id`。`Runtime` 会在你将其作为参数添加到节点函数时由 LangGraph 自动注入。以下是你可能如何使用它来保存记忆:
```python theme={"theme":{"light":"catppuccin-latte","dark":"catppuccin-mocha"}}
from langgraph.runtime import Runtime
from dataclasses import dataclass
@dataclass
class Context:
user_id: str
async def update_memory(state: MessagesState, runtime: Runtime[Context]):
# 从运行时上下文获取用户 id
user_id = runtime.context.user_id
# 命名空间记忆
namespace = (user_id, "memories")
# ... 分析对话并创建新记忆
# 创建新记忆 ID
memory_id = str(uuid.uuid4())
# 我们创建新记忆
await runtime.store.aput(namespace, memory_id, {"memory": memory})
```
正如上面展示的,我们也可以在任何节点中访问存储并使用 `store.search` 方法获取记忆。回想一下,记忆作为可转换为字典的对象列表返回。
```python theme={"theme":{"light":"catppuccin-latte","dark":"catppuccin-mocha"}}
memories[-1].dict()
{'value': {'food_preference': 'I like pizza'},
'key': '07e0caf4-1631-47b7-b15f-65515d4c1843',
'namespace': ['1', 'memories'],
'created_at': '2024-10-02T17:22:31.590602+00:00',
'updated_at': '2024-10-02T17:22:31.590605+00:00'}
```
我们可以访问记忆并在模型调用中使用它们。
```python theme={"theme":{"light":"catppuccin-latte","dark":"catppuccin-mocha"}}
from dataclasses import dataclass
from langgraph.runtime import Runtime
@dataclass
class Context:
user_id: str
async def call_model(state: MessagesState, runtime: Runtime[Context]):
# 从运行时上下文获取用户 id
user_id = runtime.context.user_id
# 命名空间记忆
namespace = (user_id, "memories")
# 基于最新消息搜索
memories = await runtime.store.asearch(
namespace,
query=state["messages"][-1].content,
limit=3
)
info = "\n".join([d.value["memory"] for d in memories])
# ... 在模型调用中使用记忆
```
如果我们创建新线程,只要 `user_id` 相同,我们仍然可以访问相同的记忆。
```python theme={"theme":{"light":"catppuccin-latte","dark":"catppuccin-mocha"}}
# 在新线程上调用图
config = {"configurable": {"thread_id": "2"}}
# 让我们再次打招呼
for update in graph.stream(
{"messages": [{"role": "user", "content": "hi, tell me about my memories"}]},
config,
stream_mode="updates",
context=Context(user_id="1"),
):
print(update)
```
当我们使用 LangSmith 时,无论是本地(例如,在 [Studio](/langsmith/studio) 中)还是 [托管的 LangSmith](/langsmith/platform-setup),基础存储默认可用,无需在图编译期间指定。然而,要启用语义搜索,你**确实**需要在 `langgraph.json` 文件中配置索引设置。例如:
```json theme={"theme":{"light":"catppuccin-latte","dark":"catppuccin-mocha"}}
{
...
"store": {
"index": {
"embed": "openai:text-embeddings-3-small",
"dims": 1536,
"fields": ["$"]
}
}
}
```
有关更多详细信息和配置选项,请参阅 [部署指南](/langsmith/semantic-search)。
## 检查器库
在底层,检查点由符合 [`BaseCheckpointSaver`](https://reference.langchain.com/python/langgraph/checkpoints/#langgraph.checkpoint.base.BaseCheckpointSaver) 接口的检查器对象提供支持。LangGraph 提供了几种检查器实现,均通过独立的、可安装的库实现。
有关可用提供商,请参阅 [检查器集成](/oss/python/integrations/checkpointers/index)。
* `langgraph-checkpoint`: 检查器保存器的基础接口 ([`BaseCheckpointSaver`](https://reference.langchain.com/python/langgraph/checkpoints/#langgraph.checkpoint.base.BaseCheckpointSaver)) 和序列化/反序列化接口 ([`SerializerProtocol`](https://reference.langchain.com/python/langgraph/checkpoints/#langgraph.checkpoint.serde.base.SerializerProtocol))。包括用于实验的内存检查器实现 ([`InMemorySaver`](https://reference.langchain.com/python/langgraph/checkpoints/#langgraph.checkpoint.memory.InMemorySaver))。LangGraph 随附 `langgraph-checkpoint`。
* `langgraph-checkpoint-sqlite`: 使用 SQLite 数据库 ([`SqliteSaver`](https://reference.langchain.com/python/langgraph/checkpoints/#langgraph.checkpoint.sqlite.SqliteSaver) / [`AsyncSqliteSaver`](https://reference.langchain.com/python/langgraph/checkpoints/#langgraph.checkpoint.sqlite.aio.AsyncSqliteSaver)) 的 LangGraph 检查器实现。适用于实验和本地工作流。需要单独安装。
* `langgraph-checkpoint-postgres`: 使用 Postgres 数据库 ([`PostgresSaver`](https://reference.langchain.com/python/langgraph/checkpoints/#langgraph.checkpoint.postgres.PostgresSaver) / [`AsyncPostgresSaver`](https://reference.langchain.com/python/langgraph/checkpoints/#langgraph.checkpoint.postgres.aio.AsyncPostgresSaver)) 的高级检查器,在 LangSmith 中使用。适用于在生产环境中使用。需要单独安装。
* `langgraph-checkpoint-cosmosdb`: 使用 Azure Cosmos DB (`CosmosDBSaver` / `AsyncCosmosDBSaver`) 的 LangGraph 检查器实现。适用于在 Azure 上进行生产使用。支持同步和异步操作。需要单独安装。
### 检查器接口
每个检查器都符合 [`BaseCheckpointSaver`](https://reference.langchain.com/python/langgraph/checkpoints/#langgraph.checkpoint.base.BaseCheckpointSaver) 接口并实现以下方法:
* `.put` - 存储其配置和元数据的检查点。
* `.put_writes` - 存储链接到检查点的中间写入(即 [待处理写入](#pending-writes))。
* `.get_tuple` - 使用给定配置(`thread_id` 和 `checkpoint_id`)获取检查点元组。这用于在 `graph.get_state()` 中填充 `StateSnapshot`。
* `.list` - 列出符合给定配置和筛选条件的检查点。这用于在 `graph.get_state_history()` 中填充状态历史。
如果检查器与异步图执行一起使用(即通过 `.ainvoke`、`.astream`、`.abatch` 执行图),则将使用上述方法的异步版本(`.aput`、`.aput_writes`、`.aget_tuple`、`.alist`)。
对于异步运行你的图,你可以使用 [`InMemorySaver`](https://reference.langchain.com/python/langgraph/checkpoints/#langgraph.checkpoint.memory.InMemorySaver),或 Sqlite/Postgres 检查器的异步版本 -- [`AsyncSqliteSaver`](https://reference.langchain.com/python/langgraph/checkpoints/#langgraph.checkpoint.sqlite.aio.AsyncSqliteSaver) / [`AsyncPostgresSaver`](https://reference.langchain.com/python/langgraph/checkpoints/#langgraph.checkpoint.postgres.aio.AsyncPostgresSaver) 检查器。
### 序列化器
当检查器保存图状态时,它们需要序列化状态中的通道值。这是使用序列化器对象完成的。
`langgraph_checkpoint` 定义了 [protocol](https://reference.langchain.com/python/langgraph/checkpoints/#langgraph.checkpoint.serde.base.SerializerProtocol) 以实现序列化器,提供了一个默认实现 ([`JsonPlusSerializer`](https://reference.langchain.com/python/langgraph/checkpoints/#langgraph.checkpoint.serde.jsonplus.JsonPlusSerializer)),可处理各种类型,包括 LangChain 和 LangGraph 原语、日期时间、枚举等。
#### 使用 `pickle` 进行序列化
默认序列化器 [`JsonPlusSerializer`](https://reference.langchain.com/python/langgraph/checkpoints/#langgraph.checkpoint.serde.jsonplus.JsonPlusSerializer) 在底层使用 ormsgpack 和 JSON,这不适合所有类型的对象。
如果你想回退到 pickle 以处理当前 msgpack 编码器不支持的对象(例如 Pandas 数据框),
你可以使用 [`JsonPlusSerializer`](https://reference.langchain.com/python/langgraph/checkpoints/#langgraph.checkpoint.serde.jsonplus.JsonPlusSerializer) 的 `pickle_fallback` 参数:
```python theme={"theme":{"light":"catppuccin-latte","dark":"catppuccin-mocha"}}
from langgraph.checkpoint.memory import InMemorySaver
from langgraph.checkpoint.serde.jsonplus import JsonPlusSerializer
# ... 定义图 ...
graph.compile(
checkpointer=InMemorySaver(serde=JsonPlusSerializer(pickle_fallback=True))
)
```
#### 加密
检查器可以选择加密所有持久化状态。要启用此功能,请将 [`EncryptedSerializer`](https://reference.langchain.com/python/langgraph/checkpoints/#langgraph.checkpoint.serde.encrypted.EncryptedSerializer) 实例传递给任何 [`BaseCheckpointSaver`](https://reference.langchain.com/python/langgraph/checkpoints/#langgraph.checkpoint.base.BaseCheckpointSaver) 实现的 `serde` 参数。创建加密序列化器的最简单方法是使用 [`from_pycryptodome_aes`](https://reference.langchain.com/python/langgraph/checkpoints/#langgraph.checkpoint.serde.encrypted.EncryptedSerializer.from_pycryptodome_aes),它从 `LANGGRAPH_AES_KEY` 环境变量读取 AES 密钥(或接受 `key` 参数):
```python theme={"theme":{"light":"catppuccin-latte","dark":"catppuccin-mocha"}}
import sqlite3
from langgraph.checkpoint.serde.encrypted import EncryptedSerializer
from langgraph.checkpoint.sqlite import SqliteSaver
serde = EncryptedSerializer.from_pycryptodome_aes() # 读取 LANGGRAPH_AES_KEY
checkpointer = SqliteSaver(sqlite3.connect("checkpoint.db"), serde=serde)
```
```python theme={"theme":{"light":"catppuccin-latte","dark":"catppuccin-mocha"}}
from langgraph.checkpoint.serde.encrypted import EncryptedSerializer
from langgraph.checkpoint.postgres import PostgresSaver
serde = EncryptedSerializer.from_pycryptodome_aes()
checkpointer = PostgresSaver.from_conn_string("postgresql://...", serde=serde)
checkpointer.setup()
```
在 LangSmith 上运行时,只要存在 `LANGGRAPH_AES_KEY`,加密就会自动启用,因此你只需要提供环境变量。可以使用其他加密方案,方法是实现 [`CipherProtocol`](https://reference.langchain.com/python/langgraph/checkpoints/#langgraph.checkpoint.serde.base.CipherProtocol) 并将其提供给 [`EncryptedSerializer`](https://reference.langchain.com/python/langgraph/checkpoints/#langgraph.checkpoint.serde.encrypted.EncryptedSerializer)。
***
[状态模式](/oss/python/langgraph/graph-api#schema) 指定了一组键,随着图的执行会被填充。如上所述,状态可以在每个图步骤由检查器写入线程,从而实现状态持久化。
如果我们想在不同线程之间保留一些信息怎么办?考虑聊天机器人的情况,我们希望在与该用户的 *所有* 聊天对话(例如,线程)中保留关于该用户的特定信息!
仅靠检查器,我们无法在线程之间共享信息。这激发了对 [`Store`](https://reference.langchain.com/python/langgraph/store/) 接口的需求。作为一个说明,我们可以定义一个 `InMemoryStore` 来跨线程存储有关用户的信息。我们只需像以前一样用检查器编译我们的图,并传递存储。
**LangGraph API 自动处理存储**
当使用 LangGraph API 时,你不需要手动实现或配置存储。API 在后台为你处理所有存储基础设施。
[InMemoryStore](https://reference.langchain.com/python/langchain-core/stores/InMemoryStore) 适用于开发和测试。对于生产环境,请使用持久化存储,如 `PostgresStore` 或 `RedisStore`。所有实现都扩展了 [BaseStore](https://reference.langchain.com/python/langchain-core/stores/BaseStore),这是节点函数签名中使用的类型注解。
### 基本用法
首先,让我们在不使用 LangGraph 的情况下孤立地展示这一点。
```python theme={"theme":{"light":"catppuccin-latte","dark":"catppuccin-mocha"}}
from langgraph.store.memory import InMemoryStore
store = InMemoryStore()
```
记忆通过 `tuple` 进行命名空间划分,在这个特定示例中将是 `(, "memories")`。命名空间可以是任何长度并代表任何内容,不必是用户特定的。
```python theme={"theme":{"light":"catppuccin-latte","dark":"catppuccin-mocha"}}
user_id = "1"
namespace_for_memory = (user_id, "memories")
```
我们使用 `store.put` 方法将记忆保存到存储中的命名空间。当我们这样做时,我们指定如上定义的命名空间,以及记忆的键值对:键只是记忆的唯一标识符(`memory_id`),值(字典)是记忆本身。
```python theme={"theme":{"light":"catppuccin-latte","dark":"catppuccin-mocha"}}
memory_id = str(uuid.uuid4())
memory = {"food_preference" : "I like pizza"}
store.put(namespace_for_memory, memory_id, memory)
```
我们可以使用 `store.search` 方法读取命名空间中的记忆,该方法将返回给定用户的所有记忆作为列表。最新的记忆在列表的最后。
```python theme={"theme":{"light":"catppuccin-latte","dark":"catppuccin-mocha"}}
memories = store.search(namespace_for_memory)
memories[-1].dict()
{'value': {'food_preference': 'I like pizza'},
'key': '07e0caf4-1631-47b7-b15f-65515d4c1843',
'namespace': ['1', 'memories'],
'created_at': '2024-10-02T17:22:31.590602+00:00',
'updated_at': '2024-10-02T17:22:31.590605+00:00'}
```
每种记忆类型都是一个 Python 类 ([`Item`](https://langchain-ai.github.io/langgraph/reference/store/#langgraph.store.base.Item)),具有某些属性。我们可以通过上面的 `.dict` 将其转换为字典来访问它。
它具有的属性是:
* `value`: 该记忆的值(本身是一个字典)
* `key`: 此命名空间中此记忆的唯一键
* `namespace`: 字符串元组,此记忆类型的命名空间
虽然类型是 `tuple[str, ...]`,但在转换为 JSON 时可能会序列化为列表(例如,`['1', 'memories']`)。
* `created_at`: 创建此记忆的时间戳
* `updated_at`: 更新此记忆的时间戳
### 语义搜索
除了简单的检索外,存储还支持语义搜索,允许你基于含义而不是精确匹配来查找记忆。为此,请配置存储以使用嵌入模型:
```python theme={"theme":{"light":"catppuccin-latte","dark":"catppuccin-mocha"}}
from langchain.embeddings import init_embeddings
store = InMemoryStore(
index={
"embed": init_embeddings("openai:text-embedding-3-small"), # 嵌入提供者
"dims": 1536, # 嵌入维度
"fields": ["food_preference", "$"] # 要嵌入的字段
}
)
```
现在进行搜索时,你可以使用自然语言查询来查找相关记忆:
```python theme={"theme":{"light":"catppuccin-latte","dark":"catppuccin-mocha"}}
# 查找关于食物偏好的记忆
# (这可以在将记忆放入存储后进行)
memories = store.search(
namespace_for_memory,
query="What does the user like to eat?",
limit=3 # 返回前 3 个匹配项
)
```
你可以通过配置 `fields` 参数或在存储记忆时指定 `index` 参数来控制你的记忆的哪些部分被嵌入:
```python theme={"theme":{"light":"catppuccin-latte","dark":"catppuccin-mocha"}}
# 存储要嵌入的特定字段
store.put(
namespace_for_memory,
str(uuid.uuid4()),
{
"food_preference": "I love Italian cuisine",
"context": "Discussing dinner plans"
},
index=["food_preference"] # 仅嵌入 "food_preferences" 字段
)
# 不嵌入存储(仍可检索,但不可搜索)
store.put(
namespace_for_memory,
str(uuid.uuid4()),
{"system_info": "Last updated: 2024-01-01"},
index=False
)
```
### 在 LangGraph 中使用
有了所有这些,我们在 LangGraph 中使用存储。存储与检查器协同工作:检查器将状态保存到线程,如上所述,而存储允许我们存储任意信息以供 *跨* 线程访问。我们使用检查器和存储一起编译图,如下所示。
```python theme={"theme":{"light":"catppuccin-latte","dark":"catppuccin-mocha"}}
from dataclasses import dataclass
from langgraph.checkpoint.memory import InMemorySaver
@dataclass
class Context:
user_id: str
# 我们需要这个,因为我们希望启用线程(对话)
checkpointer = InMemorySaver()
# ... 定义图 ...
# 使用检查器和存储编译图
builder = StateGraph(MessagesState, context_schema=Context)
# ... 添加节点和边 ...
graph = builder.compile(checkpointer=checkpointer, store=store)
```
我们像以前一样使用 `thread_id` 调用图,同时也使用 `user_id`,我们将用它来将我们的记忆命名空间到此特定用户,就像上面展示的那样。
```python theme={"theme":{"light":"catppuccin-latte","dark":"catppuccin-mocha"}}
# 调用图
config = {"configurable": {"thread_id": "1"}}
# 首先让我们只是向 AI 打招呼
for update in graph.stream(
{"messages": [{"role": "user", "content": "hi"}]},
config,
stream_mode="updates",
context=Context(user_id="1"),
):
print(update)
```
你可以在 *任何节点* 中使用 `Runtime` 对象访问存储和 `user_id`。`Runtime` 会在你将其作为参数添加到节点函数时由 LangGraph 自动注入。以下是你可能如何使用它来保存记忆:
```python theme={"theme":{"light":"catppuccin-latte","dark":"catppuccin-mocha"}}
from langgraph.runtime import Runtime
from dataclasses import dataclass
@dataclass
class Context:
user_id: str
async def update_memory(state: MessagesState, runtime: Runtime[Context]):
# 从运行时上下文获取用户 id
user_id = runtime.context.user_id
# 命名空间记忆
namespace = (user_id, "memories")
# ... 分析对话并创建新记忆
# 创建新记忆 ID
memory_id = str(uuid.uuid4())
# 我们创建新记忆
await runtime.store.aput(namespace, memory_id, {"memory": memory})
```
正如上面展示的,我们也可以在任何节点中访问存储并使用 `store.search` 方法获取记忆。回想一下,记忆作为可转换为字典的对象列表返回。
```python theme={"theme":{"light":"catppuccin-latte","dark":"catppuccin-mocha"}}
memories[-1].dict()
{'value': {'food_preference': 'I like pizza'},
'key': '07e0caf4-1631-47b7-b15f-65515d4c1843',
'namespace': ['1', 'memories'],
'created_at': '2024-10-02T17:22:31.590602+00:00',
'updated_at': '2024-10-02T17:22:31.590605+00:00'}
```
我们可以访问记忆并在模型调用中使用它们。
```python theme={"theme":{"light":"catppuccin-latte","dark":"catppuccin-mocha"}}
from dataclasses import dataclass
from langgraph.runtime import Runtime
@dataclass
class Context:
user_id: str
async def call_model(state: MessagesState, runtime: Runtime[Context]):
# 从运行时上下文获取用户 id
user_id = runtime.context.user_id
# 命名空间记忆
namespace = (user_id, "memories")
# 基于最新消息搜索
memories = await runtime.store.asearch(
namespace,
query=state["messages"][-1].content,
limit=3
)
info = "\n".join([d.value["memory"] for d in memories])
# ... 在模型调用中使用记忆
```
如果我们创建新线程,只要 `user_id` 相同,我们仍然可以访问相同的记忆。
```python theme={"theme":{"light":"catppuccin-latte","dark":"catppuccin-mocha"}}
# 在新线程上调用图
config = {"configurable": {"thread_id": "2"}}
# 让我们再次打招呼
for update in graph.stream(
{"messages": [{"role": "user", "content": "hi, tell me about my memories"}]},
config,
stream_mode="updates",
context=Context(user_id="1"),
):
print(update)
```
当我们使用 LangSmith 时,无论是本地(例如,在 [Studio](/langsmith/studio) 中)还是 [托管的 LangSmith](/langsmith/platform-setup),基础存储默认可用,无需在图编译期间指定。然而,要启用语义搜索,你**确实**需要在 `langgraph.json` 文件中配置索引设置。例如:
```json theme={"theme":{"light":"catppuccin-latte","dark":"catppuccin-mocha"}}
{
...
"store": {
"index": {
"embed": "openai:text-embeddings-3-small",
"dims": 1536,
"fields": ["$"]
}
}
}
```
有关更多详细信息和配置选项,请参阅 [部署指南](/langsmith/semantic-search)。
## 检查器库
在底层,检查点由符合 [`BaseCheckpointSaver`](https://reference.langchain.com/python/langgraph/checkpoints/#langgraph.checkpoint.base.BaseCheckpointSaver) 接口的检查器对象提供支持。LangGraph 提供了几种检查器实现,均通过独立的、可安装的库实现。
有关可用提供商,请参阅 [检查器集成](/oss/python/integrations/checkpointers/index)。
* `langgraph-checkpoint`: 检查器保存器的基础接口 ([`BaseCheckpointSaver`](https://reference.langchain.com/python/langgraph/checkpoints/#langgraph.checkpoint.base.BaseCheckpointSaver)) 和序列化/反序列化接口 ([`SerializerProtocol`](https://reference.langchain.com/python/langgraph/checkpoints/#langgraph.checkpoint.serde.base.SerializerProtocol))。包括用于实验的内存检查器实现 ([`InMemorySaver`](https://reference.langchain.com/python/langgraph/checkpoints/#langgraph.checkpoint.memory.InMemorySaver))。LangGraph 随附 `langgraph-checkpoint`。
* `langgraph-checkpoint-sqlite`: 使用 SQLite 数据库 ([`SqliteSaver`](https://reference.langchain.com/python/langgraph/checkpoints/#langgraph.checkpoint.sqlite.SqliteSaver) / [`AsyncSqliteSaver`](https://reference.langchain.com/python/langgraph/checkpoints/#langgraph.checkpoint.sqlite.aio.AsyncSqliteSaver)) 的 LangGraph 检查器实现。适用于实验和本地工作流。需要单独安装。
* `langgraph-checkpoint-postgres`: 使用 Postgres 数据库 ([`PostgresSaver`](https://reference.langchain.com/python/langgraph/checkpoints/#langgraph.checkpoint.postgres.PostgresSaver) / [`AsyncPostgresSaver`](https://reference.langchain.com/python/langgraph/checkpoints/#langgraph.checkpoint.postgres.aio.AsyncPostgresSaver)) 的高级检查器,在 LangSmith 中使用。适用于在生产环境中使用。需要单独安装。
* `langgraph-checkpoint-cosmosdb`: 使用 Azure Cosmos DB (`CosmosDBSaver` / `AsyncCosmosDBSaver`) 的 LangGraph 检查器实现。适用于在 Azure 上进行生产使用。支持同步和异步操作。需要单独安装。
### 检查器接口
每个检查器都符合 [`BaseCheckpointSaver`](https://reference.langchain.com/python/langgraph/checkpoints/#langgraph.checkpoint.base.BaseCheckpointSaver) 接口并实现以下方法:
* `.put` - 存储其配置和元数据的检查点。
* `.put_writes` - 存储链接到检查点的中间写入(即 [待处理写入](#pending-writes))。
* `.get_tuple` - 使用给定配置(`thread_id` 和 `checkpoint_id`)获取检查点元组。这用于在 `graph.get_state()` 中填充 `StateSnapshot`。
* `.list` - 列出符合给定配置和筛选条件的检查点。这用于在 `graph.get_state_history()` 中填充状态历史。
如果检查器与异步图执行一起使用(即通过 `.ainvoke`、`.astream`、`.abatch` 执行图),则将使用上述方法的异步版本(`.aput`、`.aput_writes`、`.aget_tuple`、`.alist`)。
对于异步运行你的图,你可以使用 [`InMemorySaver`](https://reference.langchain.com/python/langgraph/checkpoints/#langgraph.checkpoint.memory.InMemorySaver),或 Sqlite/Postgres 检查器的异步版本 -- [`AsyncSqliteSaver`](https://reference.langchain.com/python/langgraph/checkpoints/#langgraph.checkpoint.sqlite.aio.AsyncSqliteSaver) / [`AsyncPostgresSaver`](https://reference.langchain.com/python/langgraph/checkpoints/#langgraph.checkpoint.postgres.aio.AsyncPostgresSaver) 检查器。
### 序列化器
当检查器保存图状态时,它们需要序列化状态中的通道值。这是使用序列化器对象完成的。
`langgraph_checkpoint` 定义了 [protocol](https://reference.langchain.com/python/langgraph/checkpoints/#langgraph.checkpoint.serde.base.SerializerProtocol) 以实现序列化器,提供了一个默认实现 ([`JsonPlusSerializer`](https://reference.langchain.com/python/langgraph/checkpoints/#langgraph.checkpoint.serde.jsonplus.JsonPlusSerializer)),可处理各种类型,包括 LangChain 和 LangGraph 原语、日期时间、枚举等。
#### 使用 `pickle` 进行序列化
默认序列化器 [`JsonPlusSerializer`](https://reference.langchain.com/python/langgraph/checkpoints/#langgraph.checkpoint.serde.jsonplus.JsonPlusSerializer) 在底层使用 ormsgpack 和 JSON,这不适合所有类型的对象。
如果你想回退到 pickle 以处理当前 msgpack 编码器不支持的对象(例如 Pandas 数据框),
你可以使用 [`JsonPlusSerializer`](https://reference.langchain.com/python/langgraph/checkpoints/#langgraph.checkpoint.serde.jsonplus.JsonPlusSerializer) 的 `pickle_fallback` 参数:
```python theme={"theme":{"light":"catppuccin-latte","dark":"catppuccin-mocha"}}
from langgraph.checkpoint.memory import InMemorySaver
from langgraph.checkpoint.serde.jsonplus import JsonPlusSerializer
# ... 定义图 ...
graph.compile(
checkpointer=InMemorySaver(serde=JsonPlusSerializer(pickle_fallback=True))
)
```
#### 加密
检查器可以选择加密所有持久化状态。要启用此功能,请将 [`EncryptedSerializer`](https://reference.langchain.com/python/langgraph/checkpoints/#langgraph.checkpoint.serde.encrypted.EncryptedSerializer) 实例传递给任何 [`BaseCheckpointSaver`](https://reference.langchain.com/python/langgraph/checkpoints/#langgraph.checkpoint.base.BaseCheckpointSaver) 实现的 `serde` 参数。创建加密序列化器的最简单方法是使用 [`from_pycryptodome_aes`](https://reference.langchain.com/python/langgraph/checkpoints/#langgraph.checkpoint.serde.encrypted.EncryptedSerializer.from_pycryptodome_aes),它从 `LANGGRAPH_AES_KEY` 环境变量读取 AES 密钥(或接受 `key` 参数):
```python theme={"theme":{"light":"catppuccin-latte","dark":"catppuccin-mocha"}}
import sqlite3
from langgraph.checkpoint.serde.encrypted import EncryptedSerializer
from langgraph.checkpoint.sqlite import SqliteSaver
serde = EncryptedSerializer.from_pycryptodome_aes() # 读取 LANGGRAPH_AES_KEY
checkpointer = SqliteSaver(sqlite3.connect("checkpoint.db"), serde=serde)
```
```python theme={"theme":{"light":"catppuccin-latte","dark":"catppuccin-mocha"}}
from langgraph.checkpoint.serde.encrypted import EncryptedSerializer
from langgraph.checkpoint.postgres import PostgresSaver
serde = EncryptedSerializer.from_pycryptodome_aes()
checkpointer = PostgresSaver.from_conn_string("postgresql://...", serde=serde)
checkpointer.setup()
```
在 LangSmith 上运行时,只要存在 `LANGGRAPH_AES_KEY`,加密就会自动启用,因此你只需要提供环境变量。可以使用其他加密方案,方法是实现 [`CipherProtocol`](https://reference.langchain.com/python/langgraph/checkpoints/#langgraph.checkpoint.serde.base.CipherProtocol) 并将其提供给 [`EncryptedSerializer`](https://reference.langchain.com/python/langgraph/checkpoints/#langgraph.checkpoint.serde.encrypted.EncryptedSerializer)。
***
[Edit this page on GitHub](https://github.com/langchain-ai/docs/edit/main/src/i18n\zh-CN\oss\langgraph\persistence.mdx) or [file an issue](https://github.com/langchain-ai/docs/issues/new/choose).
[Connect these docs](/use-these-docs) to Claude, VSCode, and more via MCP for real-time answers.