> ## Documentation Index
> Fetch the complete documentation index at: https://langchain-zh.cn/llms.txt
> Use this file to discover all available pages before exploring further.
# LangSmith Studio
在本地使用 LangChain 构建智能体时,可视化智能体的内部运行过程、实时与其交互并在问题发生时进行调试会非常有帮助。**LangSmith Studio** 是一个免费的视觉界面,用于从本地机器开发和测试你的 LangChain 智能体。
Studio 会连接到本地运行的智能体,向你展示智能体执行的每个步骤:发送给模型的提示、工具调用及其结果,以及最终输出。你可以测试不同的输入、检查中间状态,并迭代优化智能体的行为,而无需编写额外的代码或进行部署。
本页介绍如何为你的本地 LangChain 智能体设置 Studio。
## 前提条件
开始之前,请确保你已满足以下条件:
* **一个 LangSmith 账户**:在 [smith.langchain.com](https://smith.langchain.com) 免费注册或登录。
* **一个 LangSmith API 密钥**:请按照[创建 API 密钥](/langsmith/create-account-api-key#create-an-api-key)指南操作。
* 如果你不希望数据被[追踪](/langsmith/observability-concepts#traces)到 LangSmith,请在应用程序的 `.env` 文件中设置 `LANGSMITH_TRACING=false`。禁用追踪后,数据不会离开你的本地服务器。
## 设置本地智能体服务器
### 1. 安装 LangGraph CLI
[LangGraph CLI](/langsmith/cli) 提供了一个本地开发服务器(也称为[智能体服务器](/langsmith/agent-server)),用于将你的智能体连接到 Studio。
```shell theme={"theme":{"light":"catppuccin-latte","dark":"catppuccin-mocha"}}
# 需要 Python >= 3.11。
pip install --upgrade "langgraph-cli[inmem]"
```
### 2. 准备你的智能体
如果你已经有一个 LangChain 智能体,可以直接使用它。以下示例使用一个简单的邮件智能体:
```python title="agent.py" theme={"theme":{"light":"catppuccin-latte","dark":"catppuccin-mocha"}}
from langchain.agents import create_agent
def send_email(to: str, subject: str, body: str):
"""发送邮件"""
email = {
"to": to,
"subject": subject,
"body": body
}
# ... 邮件发送逻辑
return f"邮件已发送至 {to}"
agent = create_agent(
"gpt-4.1",
tools=[send_email],
system_prompt="你是一个邮件助手。请始终使用 send_email 工具。",
)
```
### 3. 环境变量
Studio 需要一个 LangSmith API 密钥来连接你的本地智能体。在项目根目录下创建一个 `.env` 文件,并添加从 [LangSmith](https://smith.langchain.com/settings) 获取的 API 密钥。
请确保你的 `.env` 文件不会被提交到版本控制系统(如 Git)。
```bash .env theme={"theme":{"light":"catppuccin-latte","dark":"catppuccin-mocha"}}
LANGSMITH_API_KEY=lsv2...
```
### 4. 创建 LangGraph 配置文件
LangGraph CLI 使用配置文件来定位你的智能体并管理依赖项。在你的应用目录中创建一个 `langgraph.json` 文件:
```json title="langgraph.json" theme={"theme":{"light":"catppuccin-latte","dark":"catppuccin-mocha"}}
{
"dependencies": ["."],
"graphs": {
"agent": "./src/agent.py:agent"
},
"env": ".env"
}
```
[`create_agent`](https://reference.langchain.com/python/langchain/agents/factory/create_agent) 函数会自动返回一个已编译的 LangGraph 图,这正是配置文件中 `graphs` 键所期望的内容。
有关配置文件中 JSON 对象每个键的详细说明,请参阅 [LangGraph 配置文件参考](/langsmith/cli#configuration-file)。
此时,项目结构将如下所示:
```bash theme={"theme":{"light":"catppuccin-latte","dark":"catppuccin-mocha"}}
my-app/
├── src
│ └── agent.py
├── .env
└── langgraph.json
```
### 5. 安装依赖项
从根目录安装项目依赖项:
```shell pip theme={"theme":{"light":"catppuccin-latte","dark":"catppuccin-mocha"}}
pip install langchain langchain-openai
```
```shell uv theme={"theme":{"light":"catppuccin-latte","dark":"catppuccin-mocha"}}
uv add langchain langchain-openai
```
### 6. 在 Studio 中查看你的智能体
启动开发服务器,将你的智能体连接到 Studio:
```shell theme={"theme":{"light":"catppuccin-latte","dark":"catppuccin-mocha"}}
langgraph dev
```
Safari 浏览器会阻止到 Studio 的 `localhost` 连接。要解决此问题,请使用 `--tunnel` 参数运行上述命令,通过安全隧道访问 Studio。你需要在 Studio UI 中点击 **Connect to a local server** 手动将隧道 URL 添加到允许的来源中。具体步骤请参阅[故障排除指南](/langsmith/troubleshooting-studio#safari-connection-issues)。
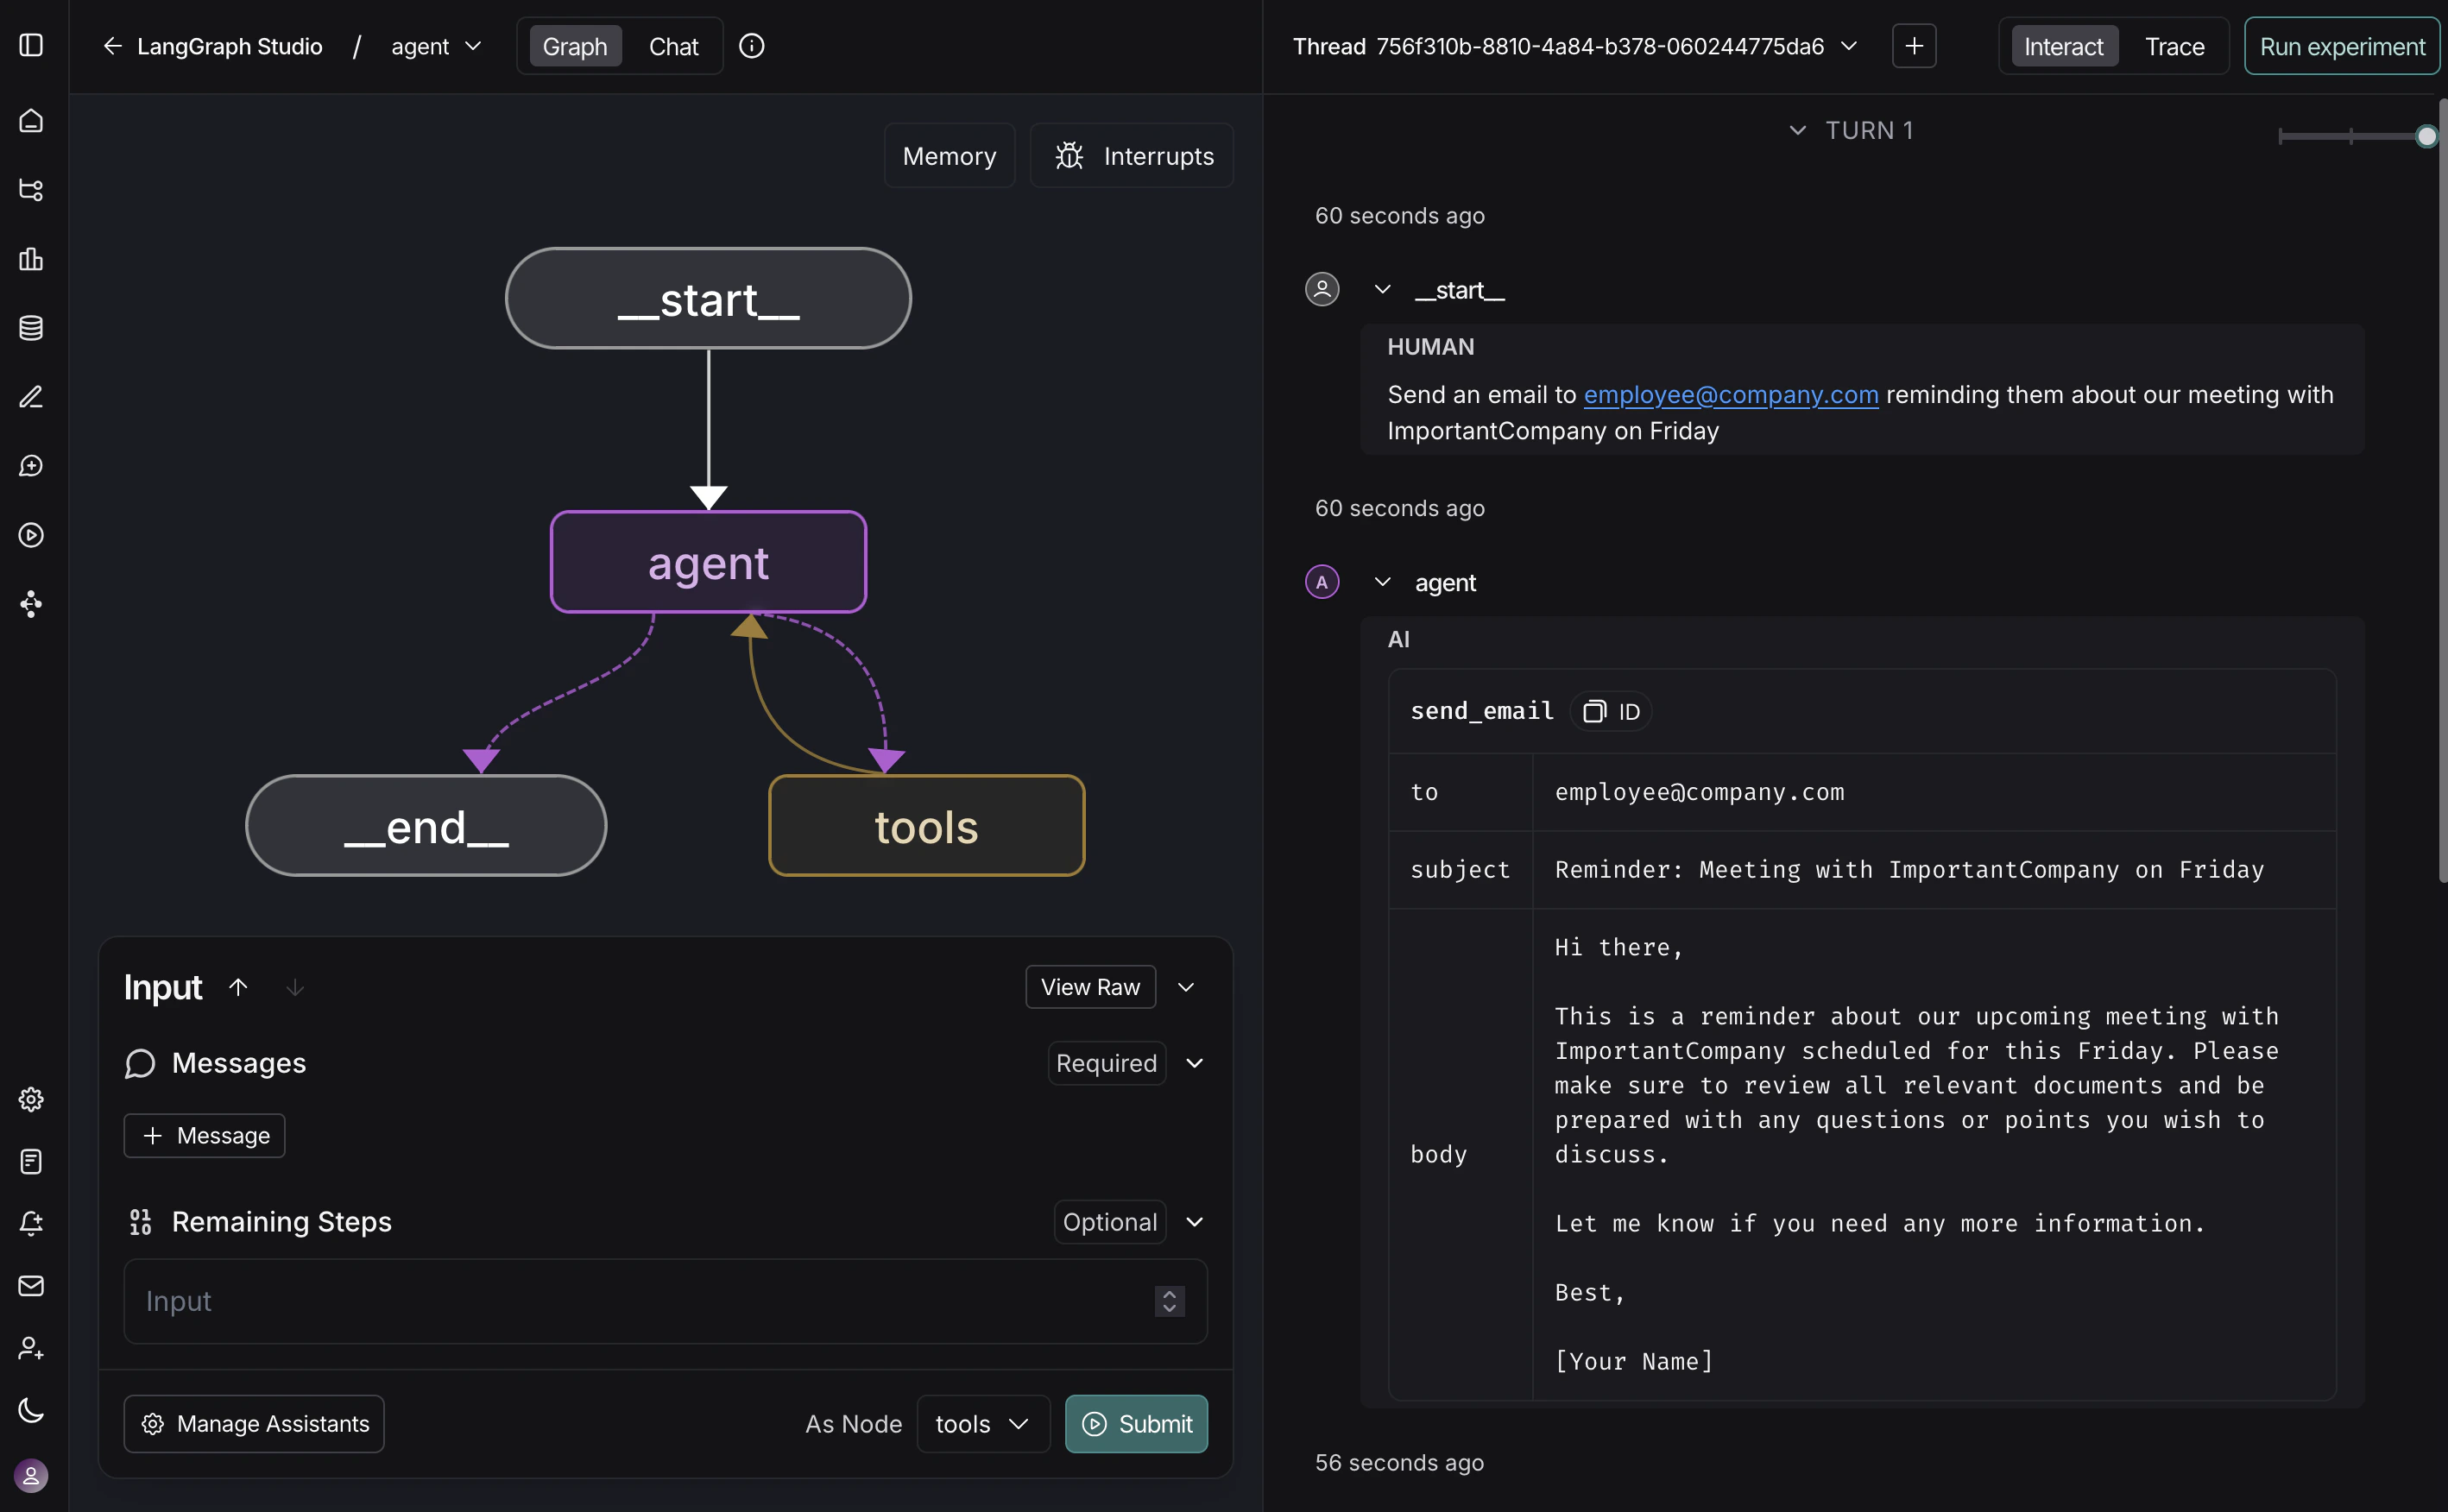
服务器运行后,你的智能体既可以通过 API 在 `http://127.0.0.1:2024` 访问,也可以通过 Studio UI 在 `https://smith.langchain.com/studio/?baseUrl=http://127.0.0.1:2024` 访问:
当 Studio 连接到你的本地智能体后,你可以快速迭代优化智能体的行为。运行测试输入,在 [LangSmith](/langsmith/observability-studio) 中检查完整的执行轨迹,包括提示、工具参数、返回值以及令牌/延迟指标。当出现问题时,Studio 会捕获异常及其周围的状态,帮助你理解发生了什么。
开发服务器支持热重载——在你的代码中修改提示或工具签名,Studio 会立即反映这些更改。你可以从任何步骤重新运行对话线程来测试更改,而无需从头开始。这种工作流程适用于从简单的单工具智能体到复杂的多节点图。
有关如何运行 Studio 的更多信息,请参阅 [LangSmith 文档](/langsmith/home)中的以下指南:
* [运行应用程序](/langsmith/use-studio#run-application)
* [管理助手](/langsmith/use-studio#manage-assistants)
* [管理线程](/langsmith/use-studio#manage-threads)
* [迭代优化提示](/langsmith/observability-studio)
* [调试 LangSmith 轨迹](/langsmith/observability-studio#debug-langsmith-traces)
* [将节点添加到数据集](/langsmith/observability-studio#add-node-to-dataset)
## 视频指南
***
[Edit this page on GitHub](https://github.com/langchain-ai/docs/edit/main/src/i18n\zh-CN\oss\langgraph\studio.mdx) or [file an issue](https://github.com/langchain-ai/docs/issues/new/choose).
[Connect these docs](/use-these-docs) to Claude, VSCode, and more via MCP for real-time answers.
 当 Studio 连接到你的本地智能体后,你可以快速迭代优化智能体的行为。运行测试输入,在 [LangSmith](/langsmith/observability-studio) 中检查完整的执行轨迹,包括提示、工具参数、返回值以及令牌/延迟指标。当出现问题时,Studio 会捕获异常及其周围的状态,帮助你理解发生了什么。
开发服务器支持热重载——在你的代码中修改提示或工具签名,Studio 会立即反映这些更改。你可以从任何步骤重新运行对话线程来测试更改,而无需从头开始。这种工作流程适用于从简单的单工具智能体到复杂的多节点图。
有关如何运行 Studio 的更多信息,请参阅 [LangSmith 文档](/langsmith/home)中的以下指南:
* [运行应用程序](/langsmith/use-studio#run-application)
* [管理助手](/langsmith/use-studio#manage-assistants)
* [管理线程](/langsmith/use-studio#manage-threads)
* [迭代优化提示](/langsmith/observability-studio)
* [调试 LangSmith 轨迹](/langsmith/observability-studio#debug-langsmith-traces)
* [将节点添加到数据集](/langsmith/observability-studio#add-node-to-dataset)
## 视频指南
***
当 Studio 连接到你的本地智能体后,你可以快速迭代优化智能体的行为。运行测试输入,在 [LangSmith](/langsmith/observability-studio) 中检查完整的执行轨迹,包括提示、工具参数、返回值以及令牌/延迟指标。当出现问题时,Studio 会捕获异常及其周围的状态,帮助你理解发生了什么。
开发服务器支持热重载——在你的代码中修改提示或工具签名,Studio 会立即反映这些更改。你可以从任何步骤重新运行对话线程来测试更改,而无需从头开始。这种工作流程适用于从简单的单工具智能体到复杂的多节点图。
有关如何运行 Studio 的更多信息,请参阅 [LangSmith 文档](/langsmith/home)中的以下指南:
* [运行应用程序](/langsmith/use-studio#run-application)
* [管理助手](/langsmith/use-studio#manage-assistants)
* [管理线程](/langsmith/use-studio#manage-threads)
* [迭代优化提示](/langsmith/observability-studio)
* [调试 LangSmith 轨迹](/langsmith/observability-studio#debug-langsmith-traces)
* [将节点添加到数据集](/langsmith/observability-studio#add-node-to-dataset)
## 视频指南
***